Amazon has just released their RDS Migration Tool, and Pythian has recently undertaken training to use for our clients. I wanted to share my initial thoughts on the tool, give some background on its internals, and provide a walk-through on the functionality it will be most commonly used for. There are many factors to consider when evaluating cloud service providers, including cost, performance, and high availability and disaster recovery options. One of the most critical and overlooked elements of any cloud offering though, is the ease of migration. Often, weeks are spent evaluating all of the options only to discover after the choice is made that it will take hours of expensive downtime to complete the migration, and that there is no good rollback option in the case of failure. In order to reduce the friction inherent in the move to a DBaaS offering, Amazon has developed an RDS Migration tool. This is an in-depth look at this new tool, which will be available after September 1, 2015. Contact Pythian to start a database migration. With the introduction of the RDS Migration tool, Amazon has provided a powerful engine capable of handling much more than basic migration tasks. It works natively with Oracle, SQL Server, Sybase, MySQL, PostgreSQL, Redshift (target only), Aurora (target only), and provides an ODBC connector for all other source systems. The engine is powerful enough to handle fairly complex transformations and replication topologies; however, it is a migration tool and isn’t intended for long-term use.
 2. Select the correct AMI and build your new VM. Amazon recommends an M4.large or M4.xlarge. 3. After building the new VM, you will need to install the connectors for your database engine. In this example, we’ll be using Oracle Instant Client 12.1.0.2 and MySQL ODBC Connector 5.2.7.
6. Clicking on the Tasks menu in the upper-left corner will bring up a drop-down menu to access Global Settings. From here, you can set Notifications, Error Handling, Logging, etc…
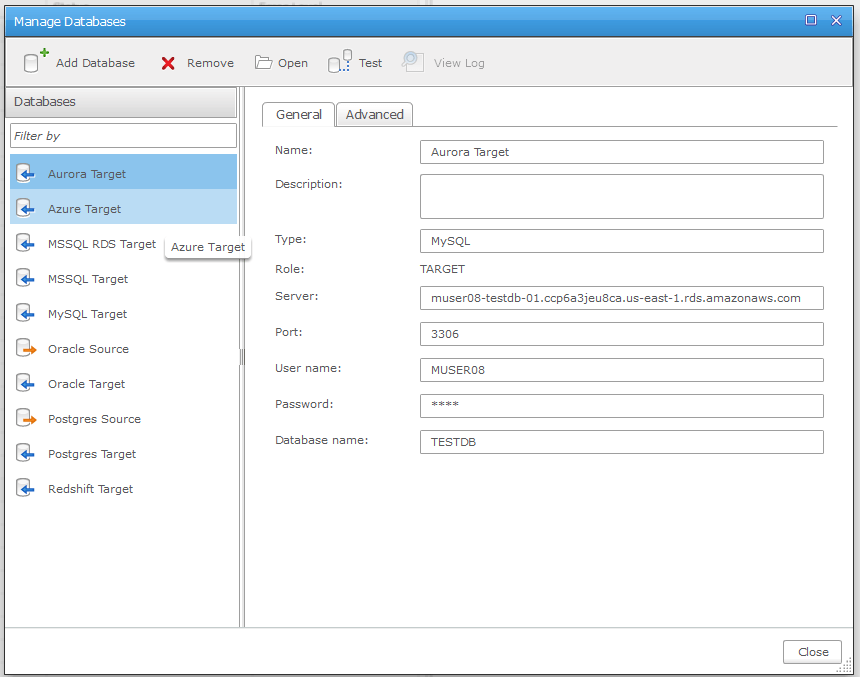
7. Back on the Tasks menu, click the Manage Databases button to add the source and target databases. As mentioned earlier, this walkthrough will be an Oracle to Aurora migration. Aurora targets are a MySQL database for the purposes of this tool.
8. After defining your connections, close the Manage Databases pop-up and select New Task. Here, you can define if the task will perform a bulk-load of your data and/or if it will attempt to apply changes made.
9. After closing the New Task window, simply drag & drop the source and target connectors into the task. 10. By selecting Task Settings, you can now define task level settings such as number of threads, truncate or append data, and define how a restart is handled when the task is paused. You can also override the global error handling and logging settings here.
11. Select the Table Selection button to choose which tables will be migrated. The tool uses wildcard searches to allow any combination of tables to exclude or include. For example, you can:
12. After defining which tables will be migrated, select an individual table and choose the Table Settings button. Here you can add transformations for the individual tables, add new columns or remove existing ones, and filter the data that is brought over. In this screenshot, the T1 table records will only be brought over if the ID is greater than or equal to 50 and the C1 column is LIKE ‘Migrated%’
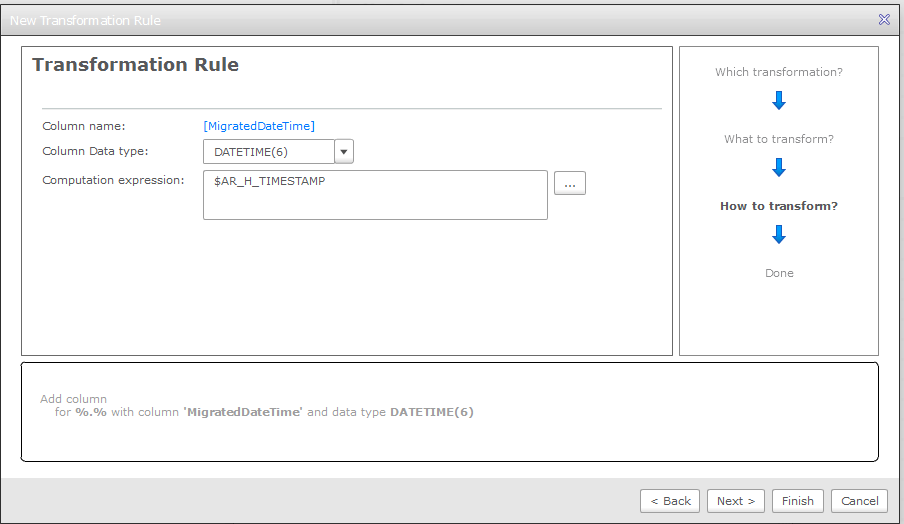
13. Select the Global Transformations button. Like the table selection screen, you use wildcards to define which tables these transformations will be applied to. You can:
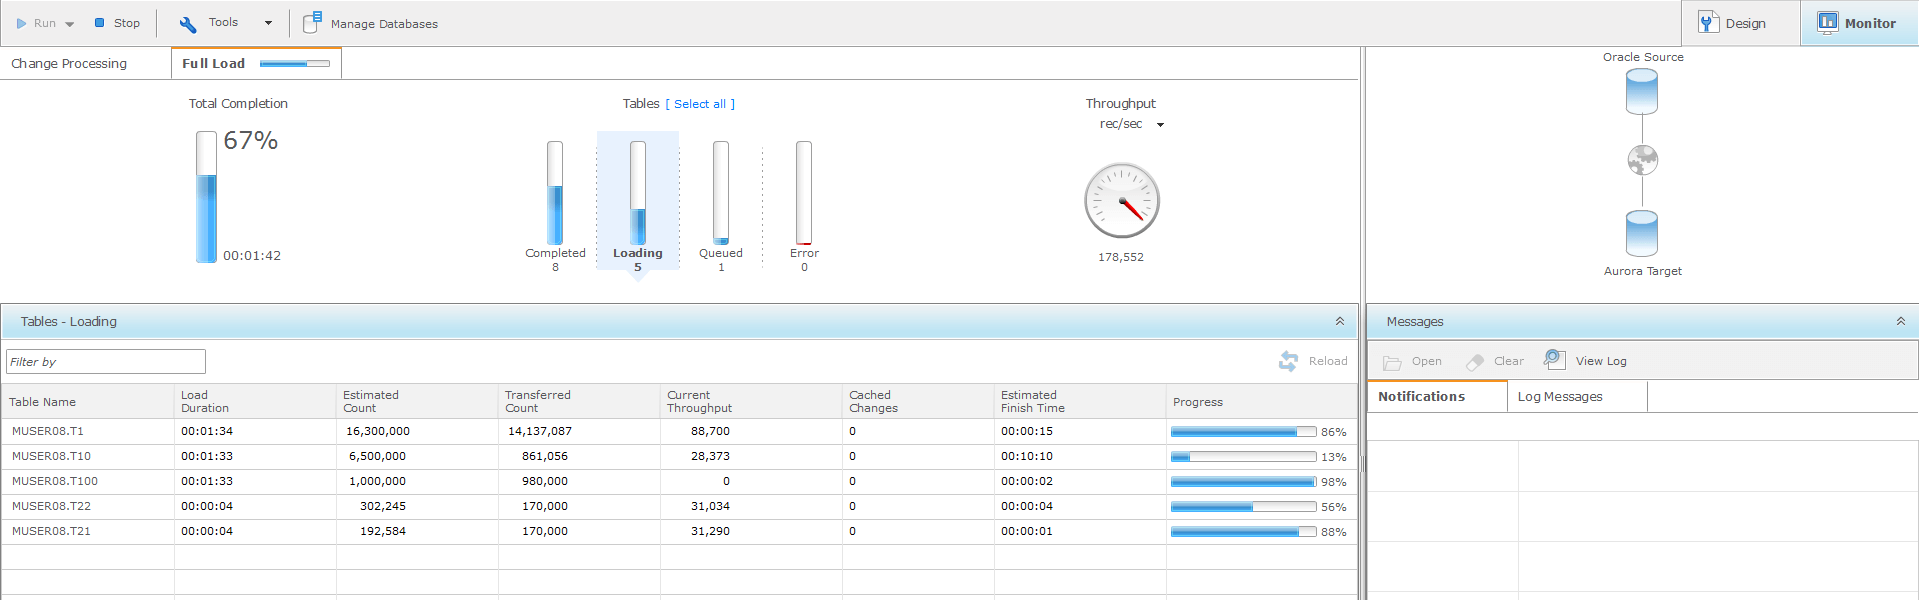
14. Finally, save the task and choose Run. This will kick off the migration process and bring up the Monitoring window. From here, you can see the current task’s status, notifications, and errors, as well as get an idea of the remaining time.
2. Select the correct AMI and build your new VM. Amazon recommends an M4.large or M4.xlarge. 3. After building the new VM, you will need to install the connectors for your database engine. In this example, we’ll be using Oracle Instant Client 12.1.0.2 and MySQL ODBC Connector 5.2.7.
6. Clicking on the Tasks menu in the upper-left corner will bring up a drop-down menu to access Global Settings. From here, you can set Notifications, Error Handling, Logging, etc…
7. Back on the Tasks menu, click the Manage Databases button to add the source and target databases. As mentioned earlier, this walkthrough will be an Oracle to Aurora migration. Aurora targets are a MySQL database for the purposes of this tool.
8. After defining your connections, close the Manage Databases pop-up and select New Task. Here, you can define if the task will perform a bulk-load of your data and/or if it will attempt to apply changes made.
9. After closing the New Task window, simply drag & drop the source and target connectors into the task. 10. By selecting Task Settings, you can now define task level settings such as number of threads, truncate or append data, and define how a restart is handled when the task is paused. You can also override the global error handling and logging settings here.
11. Select the Table Selection button to choose which tables will be migrated. The tool uses wildcard searches to allow any combination of tables to exclude or include. For example, you can:
12. After defining which tables will be migrated, select an individual table and choose the Table Settings button. Here you can add transformations for the individual tables, add new columns or remove existing ones, and filter the data that is brought over. In this screenshot, the T1 table records will only be brought over if the ID is greater than or equal to 50 and the C1 column is LIKE ‘Migrated%’
13. Select the Global Transformations button. Like the table selection screen, you use wildcards to define which tables these transformations will be applied to. You can:
14. Finally, save the task and choose Run. This will kick off the migration process and bring up the Monitoring window. From here, you can see the current task’s status, notifications, and errors, as well as get an idea of the remaining time.
Architecture
Amazon's RDS Migration Tool architecture is very simple. It consists of your source system, an AWS VM with the Migration Tool installed on it, and the target RDS instance. Each migration is broken up into Tasks. Within a Task, a source and target database are defined, along with the ability to transform the data, filter the tables or data being moved, and perform complex transformations. Tasks can be scheduled to run at particular times, can be paused and resumed, and can alert on success or failure. It’s important to note that if a task is paused while a table is loading, that table will be reloaded completely from the beginning when the task resumes. Within a running task, the following high-level steps are performed: • Data is pulled from the source using a single thread per table • Data is converted into a generic data type • All transformations are applied • Data is re-converted into the target system’s datatype and inserted • After the initial load, if specified, the tool monitors for updates to data and applies them in near real-time While processing the data, each table has a single thread reading from it, and any updates are captured using the source system’s native change data capture utility. Changes are not applied until after the initial load is completed. This is done to avoid overloading the source system, where it’s assumed client applications will still be running.Performance Considerations
There are several factors which might limit the performance seen when migrating a database. Network Bandwidth Probably the biggest contributor to performance issues across data centers, there is no magic button when moving to RDS. If the database is simply too big or too busy for the network to handle the data being sent across, then other options may need to be explored or used in conjunction with this tool. Some workarounds to consider when network performance is slow include: • Setup AWS Direct Connect • Use a bulk-load utility, and then use the tool to catch up on transactions • Only migrate data from a particular point in time RDS Migration Tool Server CPU The migration tool converts all data into a common data type before performing any transformations, then converts them into the target database’s data type. This is obviously very heavy on the server’s CPU, and this is where the main performance bottlenecks on the server are seen. Capacity of Source database This tool uses a single SELECT statement to migrate the data, and then returns for any changed data after the initial bulk load is completed. On a busy system, this can be a lot of undo and redo data to migrate, and the source system needs to be watched closely to ensure the log files don’t grow out of control. Capacity of Target database In the best case scenario, this will be the limiter as it means all other systems are moving very fast. Amazon does recommend disabling backups for the RDS system while the migration is running to minimize logging.Walkthrough
The following walkthrough looks at the below capabilities of this tool in version 1.2: • Bulk Data Migration to and from the client’s environment and Amazon RDS • Near Real-Time Updates to data after the initial load is completed • The ability to transform data or add auditing information on the fly • Filtering capabilities at the table or schema level You will need to have setup network access to your databases for the RDS Migration Tool. 1. After confirming access with your account manager, access the tool by opening the AWS console, selecting EC2, and choosing AMIs.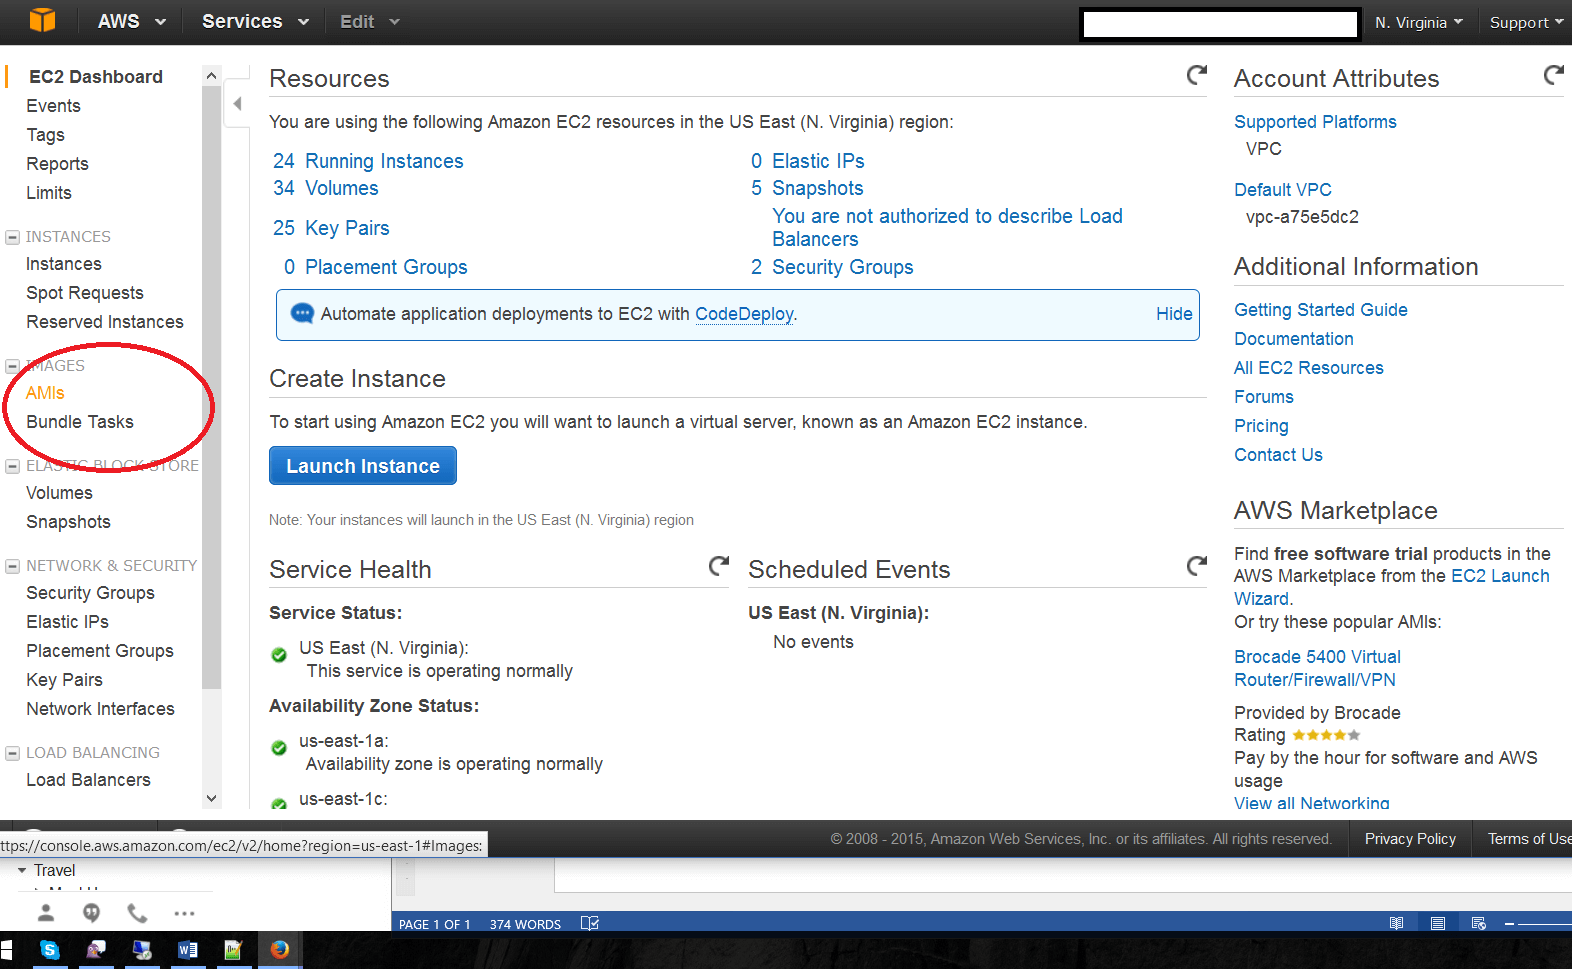 2. Select the correct AMI and build your new VM. Amazon recommends an M4.large or M4.xlarge. 3. After building the new VM, you will need to install the connectors for your database engine. In this example, we’ll be using Oracle Instant Client 12.1.0.2 and MySQL ODBC Connector 5.2.7.
- For the SQL Server client tools, you will need to stop the Migration services before installing.
- Within VM: https://localhost/AmazonRDSMigrationConsole/
- Public URL: https:[VM-DNS]/AmazonRDSMigrationConsole/
- Username/Password is the Administrator login to the VM
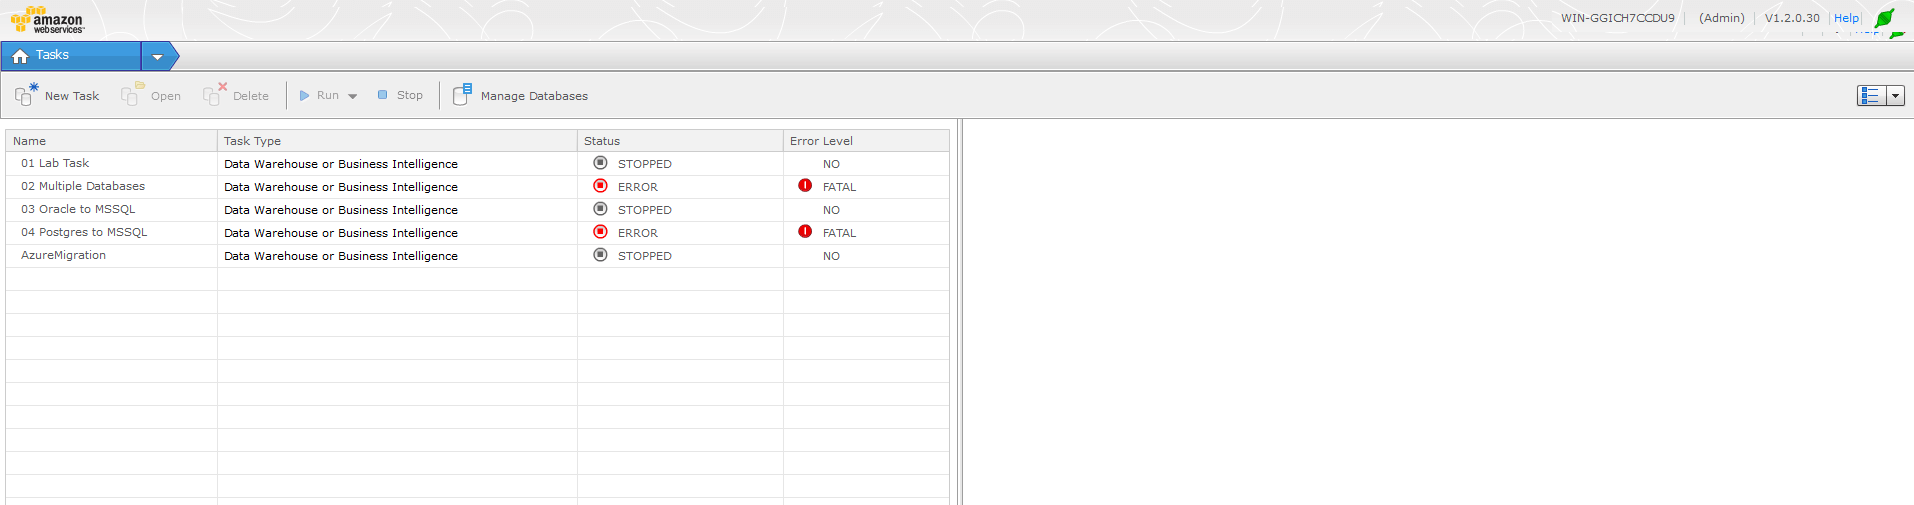 6. Clicking on the Tasks menu in the upper-left corner will bring up a drop-down menu to access Global Settings. From here, you can set Notifications, Error Handling, Logging, etc…
 7. Back on the Tasks menu, click the Manage Databases button to add the source and target databases. As mentioned earlier, this walkthrough will be an Oracle to Aurora migration. Aurora targets are a MySQL database for the purposes of this tool.
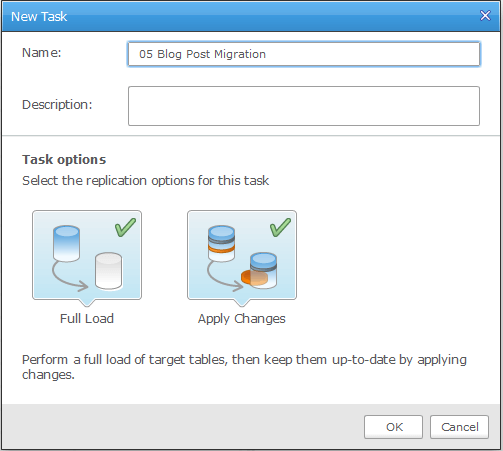
 8. After defining your connections, close the Manage Databases pop-up and select New Task. Here, you can define if the task will perform a bulk-load of your data and/or if it will attempt to apply changes made.
 9. After closing the New Task window, simply drag & drop the source and target connectors into the task. 10. By selecting Task Settings, you can now define task level settings such as number of threads, truncate or append data, and define how a restart is handled when the task is paused. You can also override the global error handling and logging settings here.
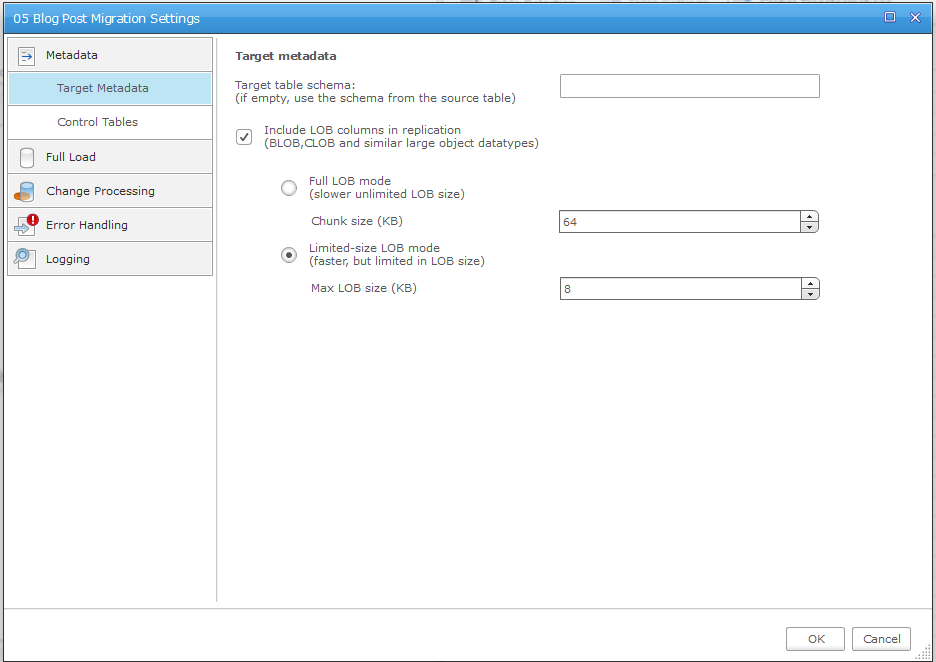
- The best practice recommendation is to find the largest LOB value in your source database and set that as the max LOB size in the task. Setting this value allows the task to optimize LOB handling, and will give the best performance.
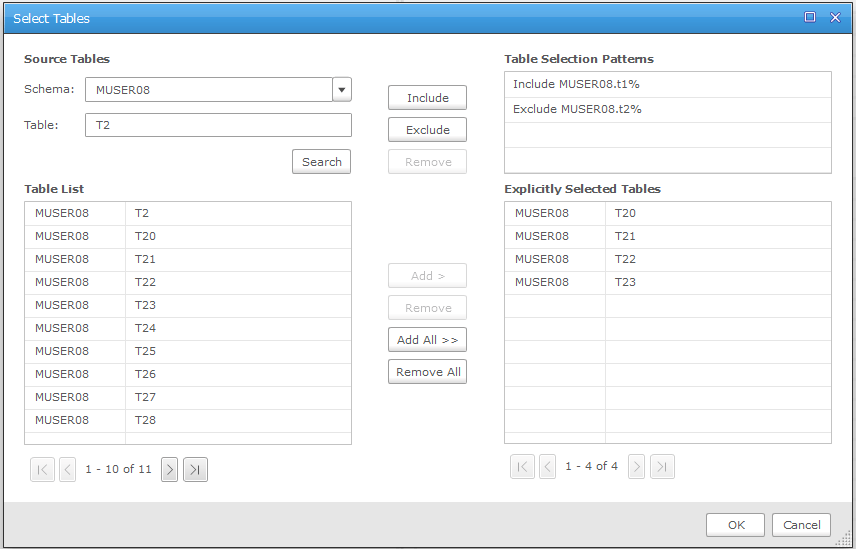
 11. Select the Table Selection button to choose which tables will be migrated. The tool uses wildcard searches to allow any combination of tables to exclude or include. For example, you can:
- Include all tables in the database
- Include all tables in a schema or set of schemas
- Exclude individual tables and bring over all remaining tables
- Include individual tables and exclude all remaining tables
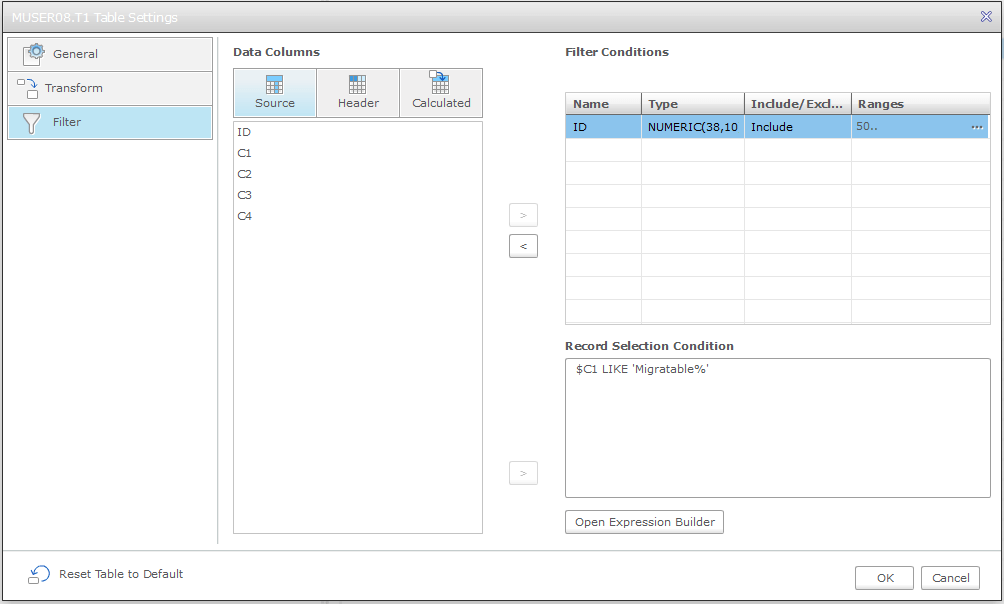
 12. After defining which tables will be migrated, select an individual table and choose the Table Settings button. Here you can add transformations for the individual tables, add new columns or remove existing ones, and filter the data that is brought over. In this screenshot, the T1 table records will only be brought over if the ID is greater than or equal to 50 and the C1 column is LIKE ‘Migrated%’
 13. Select the Global Transformations button. Like the table selection screen, you use wildcards to define which tables these transformations will be applied to. You can:
- Rename the schema
- Rename the table
- Rename columns
- Add new columns
- Drop existing columns
- Change the column data types
 14. Finally, save the task and choose Run. This will kick off the migration process and bring up the Monitoring window. From here, you can see the current task’s status, notifications, and errors, as well as get an idea of the remaining time.