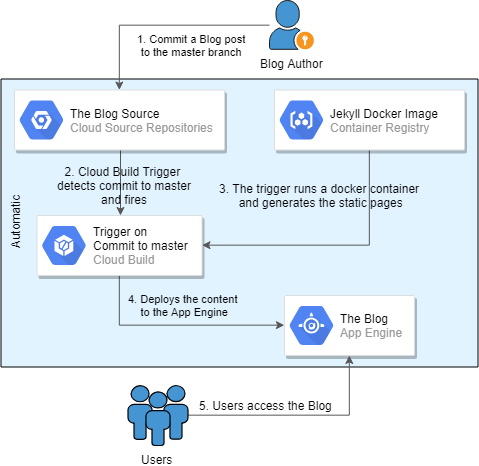
I quickly figured out that I needed to simplify the whole implementation to have more options on the desk. I started by experimenting with Jekyll, which in the end allowed me to convert the blog to static web pages and get rid of the heavy Wordpress platform. I tried hosting the blog from an AWS S3 Bucket with Route 53 or a GCP Cloud Storage Bucket with HTTP Load Balancer. I looked at GCP's Cloud (HTTP) Functions and Triggers, I tried running it from a tiny VM instance, and I even tried GitHub Pages, but there was always one inefficiency or another to work around: no SSL support, cost increase, no scaling, insufficient theme support, etc. My final solution, described here, is a serverless deployment of a static webpage blog that's generated from the blog's source stored in a GCP Cloud Repository using Jekyll. GCP Cloud Build Trigger is used to generate the new static web pages automatically upon a commit to the blog's source repository master branch, and it also deploys the new version to the GCP App Engine that actually serves the web pages. The whole solution fits under the GCP Free Tier's Always Free limits unless the visitor numbers grow very quickly, and even then this could be a very cost-effective solution. Of course, you should review the description of the Always Free limits carefully to make sure your region/service/configuration is covered before you configure your own blog. Here's a quick diagram on how different services interact to automatically deploy the new blog posts after the whole solution is implemented.
The workflow for a blog post publishing[/caption] The rest of this article will go through the configuration details, hopefully in sufficient detail for you to follow and set up your own blogging platform!
$ docker pull jekyll/jekyll
 $ mkdir tempblog.me-dba.com
 $ cd tempblog.me-dba.com
jekyll new, then run jekyll serve to test the blog. Notice that the current location (tempblog.me-dba.com) is attached as "/srv/jekyll" to the container, and the created files will be located outside the container. jekyll new will install all the required dependencies, ruby gems and themes, so this might take a while.
$ docker run --rm --publish 4000:4000 --volume="$PWD:/srv/jekyll" --privileged -it jekyll/jekyll:latest bash
 $ jekyll new /srv/jekyll
 $ jekyll serve
# from another session
 $ docker ps
 CONTAINER ID IMAGE COMMAND CREATED STATUS PORTS NAMES
 04418b39cec7 e220e1251707 "/usr/jekyll/bin/ent…" 23 minutes ago Up 23 minutes 0.0.0.0:4000->4000/tcp, 35729/tcp laughing_benz

 # Use the ID from the previous output
 $ docker commit -m "created by adding all Gems" 04418b39cec7 jekyll/jekyll:latest
 sha256:9667c6cbe572e78a8d3b552286b21eb0e34f8264c6c3c7c2b63850680b6cc891
Ctrl-C to terminate the jekyll serve followed by exit to exit and remove the container.$ find . . ./.gitignore ./.sass-cache ./.sass-cache/04702c00cd9fa60073a601ea6f7a61c45d2d95af ./.sass-cache/04702c00cd9fa60073a601ea6f7a61c45d2d95af/minima.scssc ./.sass-cache/2644ddacc47d466a8fd18366436f273677dc9e09 ./.sass-cache/2644ddacc47d466a8fd18366436f273677dc9e09/_base.scssc ./.sass-cache/2644ddacc47d466a8fd18366436f273677dc9e09/_layout.scssc ./.sass-cache/2644ddacc47d466a8fd18366436f273677dc9e09/_syntax-highlighting.scssc ./404.html ./_config.yml ./_posts ./_posts/2019-01-21-welcome-to-jekyll.markdown ./about.md ./index.md ./Gemfile ./Gemfile.lock ./_site ./_site/404.html ./_site/about ./_site/about/index.html ./_site/index.html ./_site/assets ./_site/assets/main.css ./_site/assets/minima-social-icons.svg ./_site/feed.xml ./_site/jekyll ./_site/jekyll/update ./_site/jekyll/update/2019 ./_site/jekyll/update/2019/01 ./_site/jekyll/update/2019/01/21 ./_site/jekyll/update/2019/01/21/welcome-to-jekyll.htmlOnly the highlighted files are the source code of the blog. The
_site directory is the generated version of the static pages, and .sass-cache is some caching mechanism that Jekyll uses. Both of these locations are excluded in .gitignore. This is a good point to edit the _config.yml to customize the blog - change the theme of the blog, add plugins and adjust other configurables. Having completed the modifications, test them with jekyll serve again (note: the correct use of whitespace indentation is critical in YAML files):
$ cat _config.yml | grep -v "^ *#"

 title: My Awesome Serverless Blog on GCP
 email: elsins@pythian.com
 description: >- # this means to ignore newlines until "baseurl:"
  This is the example blog created by Maris Elsins in 2019 to support the article named
  "Building a Cost Efficient Serverless Blogging Platform on GCP".
 baseurl: "" # the subpath of your site, e.g. /blog
 url: "https://tempblog.me-dba.com"
 twitter_username: MarisDBA

 markdown: kramdown
 theme: minima
 plugins:
  - jekyll-feed

 $ docker run --rm --publish 4000:4000 --volume="$PWD:/srv/jekyll" --privileged -it jekyll/jekyll:latest jekyll serve
_config.yml:
disqus:
  shortname: tempblog-me-dba-com
As instructed in the theme's
README.md, the site needs to be regenerated in "production mode" by setting the JEKYLL_ENV=production before running jekyll serve or jekyll build like this:
$ docker run --rm --publish 4000:4000 --volume="$PWD:/srv/jekyll" --privileged -it jekyll/jekyll:latest bash -c "JEKYLL_ENV=production jekyll serve"
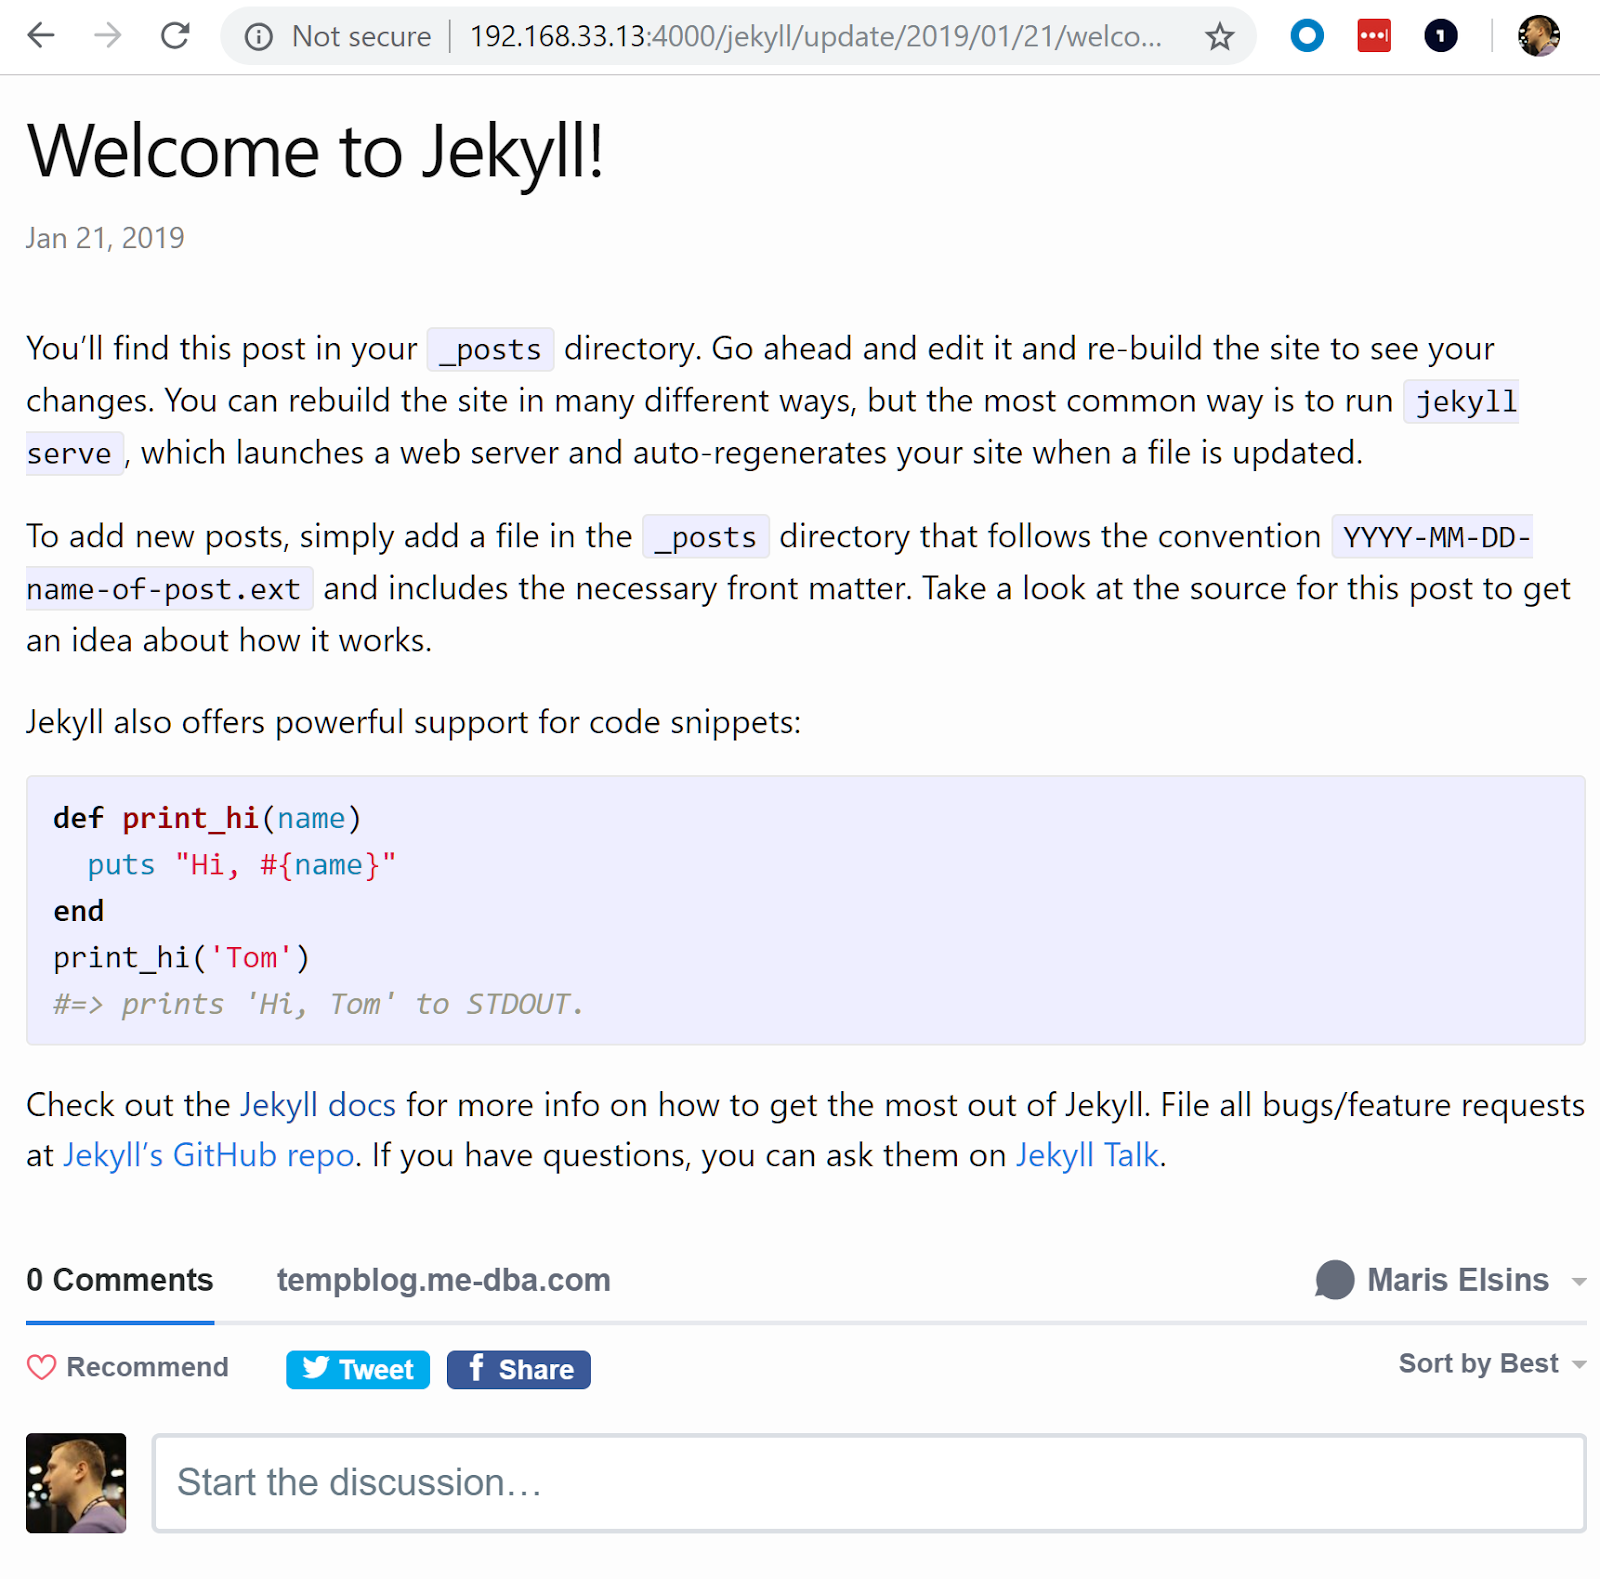
And that's it. The comments section should already be rendered correctly, like this, which means we've completed setting up the initial version of the blog's source code: [caption id="attachment_106241" align="aligncenter" width="1600"]
tempblog-me-dba.gcloud init, log on as your user and set the newly created project as the default.
$ gcloud init
 ...
 $ gcloud config list
 [core]
 account = Maris.Elsins@me-dba.com
 disable_usage_reporting = True
 project = tempblog-me-dba
 ...
$ gcloud source repos create tempblog-me-dba-repo
 API [sourcerepo.googleapis.com] not enabled on project [520897212625].
  Would you like to enable and retry (this will take a few minutes)?
 (y/N)? y

 Enabling service [sourcerepo.googleapis.com] on project [520897212625]...
 Waiting for async operation operations/acf.6999a26b-ba23-42d3-b1f0-b97ddced5057 to complete...
 Operation finished successfully. The following command can describe the Operation details:
  gcloud services operations describe operations/tmo-acf.6999a26b-ba23-42d3-b1f0-b97ddced5057
 API [sourcerepo.googleapis.com] not enabled on project [520897212625].
  Would you like to enable and retry (this will take a few minutes)?
 (y/N)? y

 Created [tempblog-me-dba-repo].
 WARNING: You may be billed for this repository. See https://cloud.google.com/source-repositories/docs/pricing for details.
git if you haven't done it yet. I recommend using version 2.0.1+ as it supports Authentication for GCP better. My code was stored on a Centos Machine, so I followed https://tecadmin.net/install-git-2-0-on-centos-rhel-fedora/ to set it up.$ cd $ gcloud source repos clone tempblog-me-dba-repo Cloning into '/home/vagrant/tempblog-me-dba-repo'... Checking connectivity... done. warning: remote HEAD refers to nonexistent ref, unable to checkout. Project [tempblog-me-dba] repository [tempblog-me-dba-repo] was cloned to [/home/vagrant/tempblog-me-dba-repo].
$ cd ~/tempblog.me-dba,com
 $ cp -vrp ./* ../tempblog-me-dba-repo/
 $ cp -vrp .gitignore ../tempblog-me-dba-repo/
 $ cp -vrp .sass-cache ../tempblog-me-dba-repo/
$ git add -A
 $ git status
 On branch master

 Initial commit

 Changes to be committed:
  (use "git rm --cached ..." to unstage)

  new file: .gitignore
  new file: 404.html
  new file: Gemfile
  new file: Gemfile.lock
  new file: _config.yml
  new file: _posts/2019-01-21-welcome-to-jekyll.markdown
  new file: about.md
  new file: index.md
 $ git commit -m "initial commit"
 ...
 $ git push origin master
 Counting objects: 11, done.
 Delta compression using up to 2 threads.
 Compressing objects: 100% (10/10), done.
 Writing objects: 100% (11/11), 3.90 KiB | 0 bytes/s, done.
 Total 11 (delta 0), reused 0 (delta 0)
 To https://source.developers.google.com/p/tempblog-me-dba/r/tempblog-me-dba-repo
  * [new branch] master -> master
We've come to the end of the first part of the article. We've set up all the required tools to generate a static html-based blog site with the help of Jekyll, and we've also configured Disqus for the only dynamic content that there is - the comments. This implementation doesn't require any database behind it so all the configuration and the blog posts itself can be easily stored in a source repository. We've also started up the blog locally by using the jekyll serve from a Docker instance we used in the process. Of course, these are only the preparation tasks. We still need to set up all the infrastructure on GCP to serve the blog and make it available to the public. That's the story for the second part of this series. See you soon in Part 2!
Ready to optimize your use of Google Cloud's AI tools?