Self-directed learning about a product as complex as Oracle E-Business Suite can be challenging. Oracle helpfully provides a pre-built environment (called 'Vision') for training purposes. Configuring a viable training or "sandbox" environment on a workstation can be pretty daunting, however, considering:
- The memory and storage resources required to run a "small" Vision instance
- The need to install and configure the OS and a list of pre-requisite patches and packages
- Learning about the installer itself, which is straightforward but can be a little quirky, especially without careful attention to item #2!
- Learning enough about basic EBS administration to turn the darn thing on and start playing
Over time, improved specs for workstations have made item #1 less of a problem. There is ample documentation to cover items 2-4, and several people (including yours truly) have written basic bootstrap guides to help people get up and running quickly. Then, Oracle went a step further and released Oracle VM templates for EBS (and updated them earlier this year), which eliminate the need for all of the fiddly stuff in steps 2-3, except for one small detail: They only run in Oracle VM Server, and maintaining an Oracle VM environment is a resource-intensive endeavor by itself.
This blog post aims to change all that. Are you ready to learn how to deploy the Oracle VM templates in Oracle VirtualBox so you can run them on your own workstation without the need to run Oracle VM Server? I hope you are, because let me tell you, I've done a lot of typing. Whew.
Oh, and that "One hour of work" line in the title is not a mere advertising gimmick! There are long steps at the beginning, but they're mostly hands-free (downloading and converting the OVM templates, steps 1-3 below). After you've gone through that, you really can have a working EBS 12.1.3 Vision instance up and running in a little over an hour. Let's begin...
Ingredients
You will need:
- At least 3.5 GB of free memory (2 GB for the database server, 1.5 for the application server). You may be O.K. to use 1.5 GB and 1 GB, respectively, but I have not done rigorous testing on usable lower limits. Bottom line: If you have 4 GB of RAM in your workstation, this may still work, but it will be a tight fit.
- A recent version of Oracle VirtualBox. Virtualbox installation instructions are beyond the scope of this post, but it's a straightforward install.
- A lot of storage, for reasons that will become clear later. ~700GB. Fortunately, 1TB USB drives are pretty cheap these days, and you can reclaim some of the space when you're done with this exercise.
- A Linux install ISO image (or physical CD, if you're into that sort of thing). I used Oracle Enterprise Linux 5, Update 6, but any relatively recent OEL or RHEL install image should do the job here. [Update, 22-May-2013: A few readers have mentioned in the comments that they've had problems when attempting to use OEL6 ISOs for the rescue boot disk. Unless you have an appetite for additional hackery beyond the contents of this post, I strongly recommend using OEL5u6]
- An understanding of some basic Linux systems administration tasks.
- Familiarity with configuring storage and network options in Virtualbox.
- Familiarity with the EBS Rapid Clone (adcfgclone) utility, or willingness to blindly follow instructions and cross your fingers. :)
- Patience. There are large downloads involved, and then operations on some pretty big files.
Important notes
Nothing you're about to read in this post is supported by anyone. Not me, not Pythian, and certainly not Oracle. If you're thinking about using the techniques described here for any sort of production or QA deployment, please stop and question your sanity. Then call a few colleagues over to your desk and ask them to question your sanity.
Please be mindful of your licensing and support status for Oracle E-Business Suite when experimenting with your "sandbox" E-Business Suite instances. EBS is subject to a far more restrictive evaluation license than the more-familiar OTN development license.
Presumably, the basic method described in this post could be applied to convert other OVM templates. I haven't tried this yet, but there is no EBS-specific magic here. For that matter, with a bit of adjustment, one should also be able to deploy these and other OVM templates under VMware workstation products.
As with many things you'll find on the intertubes, this is not an original idea. I took my inspiration from the following blog posts, and am grateful to their authors for sharing:
- This post in the VMware Community
- Jim Marion's post on converting Peoplesoft VM templates to Virtualbox
Finally, you'll note a Unix-y bias to my instructions. :) I've done my VirtualBox work on OS X, but all the principles are the same for Windows and Linux hosts. You'll need to be able to concatenate and uncompress some files, have an ssh client to connect to your VMs, and use a command-line utility that comes with your VirtualBox install (VBoxManage). That's about it from the host (workstation) side. The guests (VMs) are all Linux, of course. There's no getting around that!
HOW-TO: The short version
Here are the basic steps, so you know what you're in for. This may actually be enough to get some readers 95% of the way there, but there are a few tweaks required along the way. I advise checking the more detailed instructions below as well, particularly steps 6, 9, 11, and 14.
- Download the OVM EBS 12.1 Vision database and app tier templates from the Oracle Software Cloud thingy (formerly E-Delivery).
- Unzip all the zip files and unzip those contents as well.
- Convert the disk image files from the two VM templates to .vdi format.
- Boot the database server from the Linux ISO in rescue mode and install a non-Xen version of the Linux kernel.
- Reboot and configure the EBS database.
- Boot the application server from the Linux ISO in rescue mode and install a non-Xen version of the Linux kernel.
- Reboot and configure the EBS application server.
- Play on!
HOW-TO: The long version (with screenshots and everything!)
-
- Download the software:
Connect to Oracle's Software Delivery Cloud and download the files listed under Oracle VM Templates for Oracle E-Business Suite Release 12.1.3 Vision Media Pack for x86 (64 bit). You'll need all 11 files (V25323-1.zip through V25333-01.zip). I also recommend clicking the "View Digest " button near the top of the download page, and running md5sum on each of the downloaded zip files to make sure the checksums match that list.
- Extract the templates:
Note: If you're using Windows and don't have a Unix-like shell environment like Cygwin available, you may have to translate some of these steps to their Windows-y equivalents. Since we're just concatenating and uncompressing files, I will assume you can do that. :-)- Unzip all the files you just downloaded (
unzip 'V25*.zip'). This will produce two sets of files:OVM_OL5U6_X86_64_EBIZ12.1.3_DB_VIS_PVM.tgz.[0-7](database tier template) andOVM_OL5U6_X86_64_EBIZ12.1.3_APPS_VIS_PVM.tgz.[0-2](apps tier template). - Concatenate and uncompress the two sets of files:
zathras:OVM jpiwowar$ time cat /Volumes/Software/OVM1213Templ/OVM_OL5U6_X86_64_EBIZ12.1.3_DB_VIS_PVM.tgz.* | tar xvz
x OVM_OL5U6_X86_64_EBIZ12.1.3_DB_VIS_PVM/
x OVM_OL5U6_X86_64_EBIZ12.1.3_DB_VIS_PVM/ebs1211db.img
x OVM_OL5U6_X86_64_EBIZ12.1.3_DB_VIS_PVM/System.img
x OVM_OL5U6_X86_64_EBIZ12.1.3_DB_VIS_PVM/vm.cfg
x OVM_OL5U6_X86_64_EBIZ12.1.3_DB_VIS_PVM/README.txt

real	84m53.974s
user	12m44.096s
sys	5m13.680s
zathras:OVM jpiwowar$ time cat /Volumes/Software/OVM1213Templ/OVM_OL5U6_X86_64_EBIZ12.1.3_APPS_VIS_PVM.tgz.* | tar xvz
x OVM_OL5U6_X86_64_EBIZ12.1.3_APPS_VIS_PVM/
x OVM_OL5U6_X86_64_EBIZ12.1.3_APPS_VIS_PVM/vm.cfg
x OVM_OL5U6_X86_64_EBIZ12.1.3_APPS_VIS_PVM/ebs1211apps.img
x OVM_OL5U6_X86_64_EBIZ12.1.3_APPS_VIS_PVM/README.txt
x OVM_OL5U6_X86_64_EBIZ12.1.3_APPS_VIS_PVM/System.img

real	16m11.327s
user	2m42.887s
sys 1m11.960s - When complete, you should have two directories:
zathras:Valen jpiwowar$ ls -lh OVM_OL5U6_X86_64_EBIZ12.1.3_*
OVM_OL5U6_X86_64_EBIZ12.1.3_APPS_VIS_PVM:
total 105194496
-rwxrwxrwx  1 jpiwowar  jpiwowar    20K Nov  4 19:44 README.txt
-rwxrwxrwx  1 jpiwowar  jpiwowar   5.2G Nov  4 19:47 System.img
-rwxrwxrwx  1 jpiwowar  jpiwowar    45G Nov  4 19:44 ebs1211apps.img
-rwxrwxrwx  1 jpiwowar  jpiwowar   448B Nov  4 19:15 vm.cfg

OVM_OL5U6_X86_64_EBIZ12.1.3_DB_VIS_PVM:
total 514145024
-rwxrwxrwx  1 jpiwowar  jpiwowar    20K Nov  4 22:28 README.txt
-rwxrwxrwx  1 jpiwowar  jpiwowar   5.2G Nov 13 02:59 System.img
-rwxrwxrwx  1 jpiwowar  jpiwowar   240G Nov  4 22:24 ebs1211db.img
-rwxrwxrwx  1 jpiwowar  jpiwowar   434B Nov  4 22:28 vm.cfg
Incidentally, the README files contain a few interesting tidbits about the environment you're building. I recommend reviewing them while waiting for Step 3 to complete. :)
- Unzip all the files you just downloaded (
- Convert the disk images to .vdi format:
Open a command/terminal window and use the VBoxManage utility to convert the raw disk images (.img) to vdi files. The utility is installed with VirtualBox. You may need to find the utility first and add it to your path (location varies by host platform). Timings listed in the examples below are provided to set expectations for how long you'll need to wait for the conversion to complete. Note that I was doing this on a slow 5400rpm drive on my laptop; you may get better performance. To save yourself some confusion later when attaching the converted disks to your VMs, I strongly recommend changing the name of 'System' image files to something uniquely identifiable, as shown below. Note: I'm running VirtualBox on OS X, and the installer dropped VBoxManage into /usr/bin for me, so it's already in my path. Presumably, you'll find a similar situation in Linux. If you're on Windows, and haven't customized your install, you should be able to find VBoxManage.exe inProgram Files/Oracle/VirtualBox.-
zathras:OVM_OL5U6_X86_64_EBIZ12.1.3_APPS_VIS_PVM jpiwowar$ time VBoxManage convertfromraw /Volumes/Io/OVM/OVM_OL5U6_X86_64_EBIZ12.1.3_APPS_VIS_PVM/System.img EBS121AppRoot.vdi; time VBoxManage convertfromraw /Volumes/Io/OVM/OVM_OL5U6_X86_64_EBIZ12.1.3_APPS_VIS_PVM/ebs1211apps.img ebs1211apps.vdi
Converting from raw image file="/Volumes/Io/OVM/OVM_OL5U6_X86_64_EBIZ12.1.3_APPS_VIS_PVM/System.img" to file="EBS121AppRoot.vdi"...
Creating dynamic image with size 5535613440 bytes (5280MB)...

real	3m39.852s
user	0m1.814s
sys	0m7.244s
Converting from raw image file="/Volumes/Io/OVM/OVM_OL5U6_X86_64_EBIZ12.1.3_APPS_VIS_PVM/ebs1211apps.img" to file="ebs1211apps.vdi"...
Creating dynamic image with size 48323520000 bytes (46085MB)...

real	32m22.239s
user	0m14.037s
sys	1m22.806s

zathras:OVM_OL5U6_X86_64_EBIZ12.1.3_DB_VIS_PVM jpiwowar$ time VBoxManage convertfromraw /Volumes/Io/OVM/OVM_OL5U6_X86_64_EBIZ12.1.3_DB_VIS_PVM/System.img EBS121DBRoot.vdi; time VBoxManage convertfromraw /Volumes/Io/OVM/OVM_OL5U6_X86_64_EBIZ12.1.3_DB_VIS_PVM/ebs1211db.img ebs1211db.img.vdi
Converting from raw image file="/Volumes/Io/OVM/OVM_OL5U6_X86_64_EBIZ12.1.3_DB_VIS_PVM/System.img" to file="EBS121DBRoot.vdi"...
Creating dynamic image with size 5535613440 bytes (5280MB)...

real	3m54.990s
user	0m1.561s
sys	0m7.082s
Converting from raw image file="/Volumes/Io/OVM/OVM_OL5U6_X86_64_EBIZ12.1.3_DB_VIS_PVM/ebs1211db.img" to file="ebs1211db.img.vdi"...
Creating dynamic image with size 257706247680 bytes (245768MB)...

real	193m12.402s
user	1m10.258s
sys 10m15.028s - Create two new Virtualbox VMs:
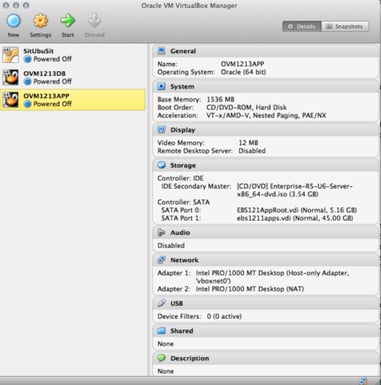
You'll need one VM for the apps server and one for the database server. I'm assuming you know how to create VMs in Virtualbox already, so I will not go into excruciating, screenshot-laden detail. Here are the requirements for each VM...- OS: Oracle Linux, 64-bit
- CPUs: 1
- Device boot order: CD-ROM, Hard Disk
- Memory: 2GB for db server, 1GB for app server
- Storage: Attach Linux installation ISO to CD/DVD drive on the IDE controller and attach the two vdi files to the SATA controller.
- Network: Two network interfaces - 1 host-only (vboxnet0), and 1 NAT. I set this up to allow the VMs to communicate between themselves and get out to the Internet for patches and updates. If you have a preferred configuration for your VMs that also achieves these goals, please feel free to use that instead. :)
The screenshots below illustrate the final configurations of the db and app servers:
-
- Boot the database server VM in rescue mode from the install CD: Enter "linux rescue" at the the
boot:prompt to enter rescue mode: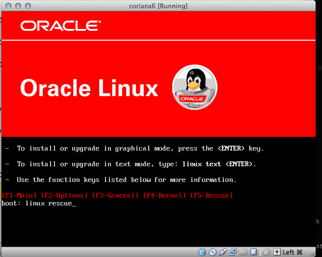
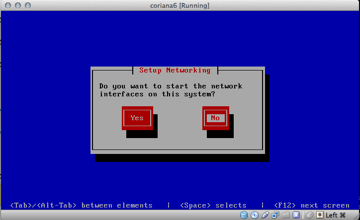
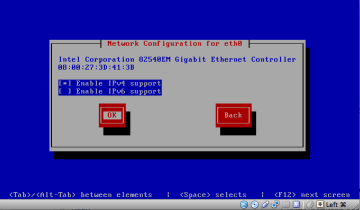
- Select the keyboard and language preferences that suit you, and enable both network interfaces (For now, just select "use IPv4" and "DHCP" when configuring eth0 and eth1, unless you have strong opinions. These settings are temporary.):
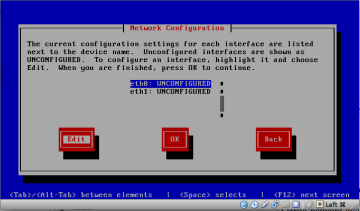
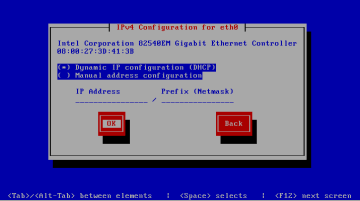
- (Repeat the steps above for the second interface, eth1.) After setting up the network interfaces, progress through the menus ("Continue" and "OK" in my case) until you get to a linux prompt, and switch to the root volume as instructed:
# chroot /mnt/sysimage
Optional step: Start the sshd service and connect to the VM from your host via ssh, instead of performing the next few steps from the console of the VM. Use 'ifconfig eth0' to find the IP address to use. (Note: As listed in the README in the template directory, the root password for both VMs is 'ovsroot'.)# service sshd start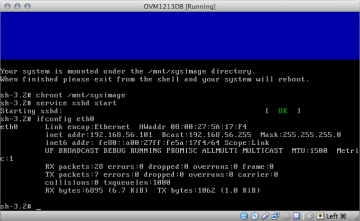
- Update configuration files:
The kernel modules that are loaded to support the Xen kernel are not going to work with the non-Xen kernel, so we need to update modprobe.conf to match our target kernel version:[root@localhost ~]# cp /etc/modprobe.conf /etc/modprobe.conf.xen
[root@localhost ~]# cat /etc/modprobe.conf
alias eth0 xennet
alias scsi_hostadapter xenblk
[root@localhost ~]# vi /etc/modprobe.conf
"/etc/modprobe.conf" 3L, 78C written
[root@localhost ~]# diff /etc/modprobe.conf /etc/modprobe.conf.xen
1,3c1,2
< alias eth0 e1000
< alias scsi_hostadapter ata_piix
< alias scsi_hostadapter1 ahci
---
> alias eth0 xennet
> alias scsi_hostadapter xenblk
[root@localhost ~]# cat /etc/modprobe.conf
alias eth0 e1000
alias scsi_hostadapter ata_piix
alias scsi_hostadapter1 ahciUpdate /etc/fstab to disable automatic fsck on /u01, or you'll be sitting for a little while at boot time:
[root@localhost ~]# vi /etc/fstab
"/etc/fstab" 8L, 608C written
[root@localhost ~]# grep /u01 /etc/fstab
LABEL=ebs1211db         /u01                    ext3    defaults        1 0
Finally, edit /etc/sysconfig/oraclevm-template to disable template configuration at boot time. Otherwise, you'll have to run through all these steps on the console, no matter what else happens at boot time, and that's annoying.
[root@localhost ~]# vi /etc/sysconfig/oraclevm-template
"/etc/sysconfig/oraclevm-template" 27L, 929C written
[root@localhost ~]# grep RUN_ /etc/sysconfig/oraclevm-template
#RUN_TEMPLATE_CONF=YES
RUN_TEMPLATE_CONF=NO - Install a new kernel: (This isn't as scary as it sounds... We're not the late 90's anymore!)Virtualbox can't boot the Xen kernel that supports para-virtualized operation under OVM, so we need to replace it with a standard kernel of the same version. One way to do this is to install the correct kernel version from the install media. However, just in case you're using media that isn't the same as what's installed in the OVM template (OEL5 update 6), we'll use the Oracle public yum server instead. (That's why we've configured and activated the NAT interface):
[root@localhost etc]# cd /etc/yum.repos.d

[root@localhost yum.repos.d]# wget https://public-yum.oracle.com/public-yum-el5.repo
--2012-11-15 00:25:26--  https://public-yum.oracle.com/public-yum-el5.repo
Resolving public-yum.oracle.com... 141.146.44.34
Connecting to public-yum.oracle.com|141.146.44.34|:80... connected.
HTTP request sent, awaiting response... 200 OK
Length: 3974 (3.9K)
Saving to: `public-yum-el5.repo'

100%[==========================================================================================> 3,974       --.-K/s   in 0s

2012-11-15 00:25:26 (316 MB/s) - `public-yum-el5.repo' saved [3974/3974]
Update the public-yum-el5.repo file and set enabled=0 for every source except ol5_u6_base:
[root@localhost yum.repos.d]# vi public-yum-el5.repo
"public-yum-el5.repo" 111L, 3974C written
[root@localhost yum.repos.d]# grep -B5 'enabled=1' public-yum-el5.repo | grep ']'
[ol5_u6_base]
Install the OEL5 update 6 (2.6.18-238) kernel form the Oracle public yum server:
[root@localhost yum.repos.d]# yum install kernel-2.6.18-238.el5
ol5_u6_base                                                                                                  | 1.1 kB     00:00
ol5_u6_base/primary                                                                                          | 1.5 MB     00:02
ol5_u6_base                                                                                                               4551/4551
Setting up Install Process
Resolving Dependencies
--> Running transaction check
---> Package kernel.x86_64 0:2.6.18-238.el5 set to be installed
--> Finished Dependency Resolution

Dependencies Resolved

====================================================================================================================================
 Package                     Arch                        Version                             Repository                        Size
====================================================================================================================================
Installing:
 kernel                      x86_64                      2.6.18-238.el5                      ol5_u6_base                       19 M

Transaction Summary
====================================================================================================================================
Install       1 Package(s)
Upgrade       0 Package(s)

Total download size: 19 M
Is this ok [y/N]: y
Downloading Packages:
kernel-2.6.18-238.el5.x86_64.rpm                                                                             |  19 MB     00:23
Running rpm_check_debug
Running Transaction Test
Finished Transaction Test
Transaction Test Succeeded
Running Transaction
  Installing     : kernel                                                                                                       1/1

Installed:
  kernel.x86_64 0:2.6.18-238.el5

Complete!
Create an initrd for the new kernel; this should also add a new stanza to grub.conf:
[root@localhost yum.repos.d]# mkinitrd -v -f /boot/initrd-2.6.18-238.el5.img 2.6.18-238.el5
Creating initramfs
Looking for deps of module ehci-hcd
Looking for deps of module ohci-hcd
Looking for deps of module uhci-hcd
Looking for deps of module ext3: jbd
Looking for deps of module jbd
Found root device sda2 for LABEL=/
Looking for driver for device sda2
Looking for deps of module pci:v00008086d00002829sv00000000sd00000000bc01sc06i01: scsi_mod libata ahci scsi_mod libata ahci
Looking for deps of module scsi_mod
Looking for deps of module sd_mod: scsi_mod
Looking for deps of module libata: scsi_mod
Looking for deps of module ahci: scsi_mod libata
Looking for driver for device sda3
Looking for deps of module pci:v00008086d00002829sv00000000sd00000000bc01sc06i01: scsi_mod libata ahci scsi_mod libata ahci
Looking for deps of module ata_piix: scsi_mod libata
Looking for deps of module ide-disk
Looking for deps of module dm-mem-cache
Looking for deps of module dm-region_hash: dm-mod dm-log
Looking for deps of module dm-mod
Looking for deps of module dm-log: dm-mod
Looking for deps of module dm-message
Looking for deps of module dm-raid45: dm-message dm-mod dm-mem-cache dm-log dm-region_hash
Using modules:  /lib/modules/2.6.18-238.el5/kernel/drivers/usb/host/ehci-hcd.ko /lib/modules/2.6.18-238.el5/kernel/drivers/usb/host/ohci-hcd.ko /lib/modules/2.6.18-238.el5/kernel/drivers/usb/host/uhci-hcd.ko /lib/modules/2.6.18-238.el5/kernel/fs/jbd/jbd.ko /lib/modules/2.6.18-238.el5/kernel/fs/ext3/ext3.ko /lib/modules/2.6.18-238.el5/kernel/drivers/scsi/scsi_mod.ko /lib/modules/2.6.18-238.el5/kernel/drivers/scsi/sd_mod.ko /lib/modules/2.6.18-238.el5/kernel/drivers/ata/libata.ko /lib/modules/2.6.18-238.el5/kernel/drivers/ata/ahci.ko /lib/modules/2.6.18-238.el5/kernel/drivers/ata/ata_piix.ko /lib/modules/2.6.18-238.el5/kernel/drivers/md/dm-mem-cache.ko /lib/modules/2.6.18-238.el5/kernel/drivers/md/dm-mod.ko /lib/modules/2.6.18-238.el5/kernel/drivers/md/dm-log.ko /lib/modules/2.6.18-238.el5/kernel/drivers/md/dm-region_hash.ko /lib/modules/2.6.18-238.el5/kernel/drivers/md/dm-message.ko /lib/modules/2.6.18-238.el5/kernel/drivers/md/dm-raid45.ko
/sbin/nash -> /tmp/initrd.TY1796/bin/nash
/sbin/insmod.static -> /tmp/initrd.TY1796/bin/insmod
/etc/udev/rules.d/05-udev-early.rules -> /tmp/initrd.TY1796/etc/udev/rules.d/05-udev-early.rules
/sbin/firmware_helper.static -> /tmp/initrd.TY1796/sbin/firmware_helper
/sbin/udevd.static -> /tmp/initrd.TY1796/sbin/udevd
copy from `/lib/modules/2.6.18-238.el5/kernel/drivers/usb/host/ehci-hcd.ko' [elf64-x86-64] to `/tmp/initrd.TY1796/lib/ehci-hcd.ko' [elf64-x86-64]
copy from `/lib/modules/2.6.18-238.el5/kernel/drivers/usb/host/ohci-hcd.ko' [elf64-x86-64] to `/tmp/initrd.TY1796/lib/ohci-hcd.ko' [elf64-x86-64]
copy from `/lib/modules/2.6.18-238.el5/kernel/drivers/usb/host/uhci-hcd.ko' [elf64-x86-64] to `/tmp/initrd.TY1796/lib/uhci-hcd.ko' [elf64-x86-64]
copy from `/lib/modules/2.6.18-238.el5/kernel/fs/jbd/jbd.ko' [elf64-x86-64] to `/tmp/initrd.TY1796/lib/jbd.ko' [elf64-x86-64]
copy from `/lib/modules/2.6.18-238.el5/kernel/fs/ext3/ext3.ko' [elf64-x86-64] to `/tmp/initrd.TY1796/lib/ext3.ko' [elf64-x86-64]
copy from `/lib/modules/2.6.18-238.el5/kernel/drivers/scsi/scsi_mod.ko' [elf64-x86-64] to `/tmp/initrd.TY1796/lib/scsi_mod.ko' [elf64-x86-64]
copy from `/lib/modules/2.6.18-238.el5/kernel/drivers/scsi/sd_mod.ko' [elf64-x86-64] to `/tmp/initrd.TY1796/lib/sd_mod.ko' [elf64-x86-64]
copy from `/lib/modules/2.6.18-238.el5/kernel/drivers/ata/libata.ko' [elf64-x86-64] to `/tmp/initrd.TY1796/lib/libata.ko' [elf64-x86-64]
copy from `/lib/modules/2.6.18-238.el5/kernel/drivers/ata/ahci.ko' [elf64-x86-64] to `/tmp/initrd.TY1796/lib/ahci.ko' [elf64-x86-64]
copy from `/lib/modules/2.6.18-238.el5/kernel/drivers/ata/ata_piix.ko' [elf64-x86-64] to `/tmp/initrd.TY1796/lib/ata_piix.ko' [elf64-x86-64]
copy from `/lib/modules/2.6.18-238.el5/kernel/drivers/md/dm-mem-cache.ko' [elf64-x86-64] to `/tmp/initrd.TY1796/lib/dm-mem-cache.ko' [elf64-x86-64]
copy from `/lib/modules/2.6.18-238.el5/kernel/drivers/md/dm-mod.ko' [elf64-x86-64] to `/tmp/initrd.TY1796/lib/dm-mod.ko' [elf64-x86-64]
copy from `/lib/modules/2.6.18-238.el5/kernel/drivers/md/dm-log.ko' [elf64-x86-64] to `/tmp/initrd.TY1796/lib/dm-log.ko' [elf64-x86-64]
copy from `/lib/modules/2.6.18-238.el5/kernel/drivers/md/dm-region_hash.ko' [elf64-x86-64] to `/tmp/initrd.TY1796/lib/dm-region_hash.ko' [elf64-x86-64]
copy from `/lib/modules/2.6.18-238.el5/kernel/drivers/md/dm-message.ko' [elf64-x86-64] to `/tmp/initrd.TY1796/lib/dm-message.ko' [elf64-x86-64]
copy from `/lib/modules/2.6.18-238.el5/kernel/drivers/md/dm-raid45.ko' [elf64-x86-64] to `/tmp/initrd.TY1796/lib/dm-raid45.ko' [elf64-x86-64]
/sbin/dmraid.static -> /tmp/initrd.TY1796/bin/dmraid
/sbin/kpartx.static -> /tmp/initrd.TY1796/bin/kpartx
Adding module ehci-hcd
Adding module ohci-hcd
Adding module uhci-hcd
Adding module jbd
Adding module ext3
Adding module scsi_mod
Adding module sd_mod
Adding module libata
Adding module ahci
Adding module ata_piix
Adding module dm-mem-cache
Adding module dm-mod
Adding module dm-log
Adding module dm-region_hash
Adding module dm-message
Adding module dm-raid45

[root@localhost yum.repos.d]# cat /boot/grub/grub.conf
# grub.conf generated by anaconda
#
# Note that you do not have to rerun grub after making changes to this file
# NOTICE:  You have a /boot partition.  This means that
#          all kernel and initrd paths are relative to /boot/, eg.
#          root (hd0,0)
#          kernel /vmlinuz-version ro root=/dev/xvda2
#          initrd /initrd-version.img
#boot=/dev/xvda
timeout=5
splashimage=(hd0,0)/grub/splash.xpm.gz
hiddenmenu
default=0
title Oracle Linux Server (2.6.18-238.el5)
     root (hd0,0)
     kernel /vmlinuz-2.6.18-238.el5 ro root=LABEL=/ numa=off
     initrd /initrd-2.6.18-238.el5.img
title Oracle Linux Server (2.6.18-238.0.0.0.1.el5xen)
     root (hd0,0)
     kernel /vmlinuz-2.6.18-238.0.0.0.1.el5xen ro root=LABEL=/ numa=off
     initrd /initrd-2.6.18-238.0.0.0.1.el5xen.img
title Oracle Linux Server (2.6.32-100.26.2.el5)
     root (hd0,0)
     kernel /vmlinuz-2.6.32-100.26.2.el5 ro root=LABEL=/ numa=off
     initrd /initrd-2.6.32-100.26.2.el5.img
title Enterprise Linux Enterprise Linux Server (2.6.32-100.0.19.el5)
     root (hd0,0)
     kernel /vmlinuz-2.6.32-100.0.19.el5 ro root=LABEL=/ numa=off
     initrd /initrd-2.6.32-100.0.19.el5.img
title Enterprise Linux Enterprise Linux Server (2.6.18-128.0.0.0.2.el5xen)
     root (hd0,0)
     kernel /vmlinuz-2.6.18-128.0.0.0.2.el5xen ro root=LABEL=/ numa=off
     initrd /initrd-2.6.18-128.0.0.0.2.el5xen.img
Side note: Astute readers will notice (by inspection of grub.conf or by running rpm -q) that there are a number of other kernels already installed in this VM, including some "vanilla" OEL6/UEK kernels and an earlier OEL5 Xen kernel. I chose to stick with OEL 5.6 because it matches the version of the template's Xen kernel, and therefore best fits the most recent configuration of the VM. Besides, at the time of writing this, there are still some components of E-Business Suite that are not yet supported under OEL6/RHEL6 (see "Unsupported Products" in My Oracle Support Note 761566.1).
[root@localhost ~]# rpm -qa | grep kernel
kernel-uek-headers-2.6.32-100.26.2.el5
kernel-xen-2.6.18-128.0.0.0.2.el5
kernel-2.6.32-100.0.19.el5
kernel-xen-2.6.18-238.0.0.0.1.el5
kernel-firmware-2.6.32-100.0.19.el5
kernel-uek-firmware-2.6.32-100.26.2.el5
kernel-uek-2.6.32-100.26.2.el5
- Update configuration files:
- Reboot and prepare for next steps:
- Detach the boot ISO from the CD drive of the database server VM. (Devices menu -> Remove disk from virtual drive)
- Reboot the database server VM.
- Connect as the root user. (The password, as listed in the template README file, is 'ovsroot'.)
-
- Configure the Vision database tier:
Oracle provides a helpful script that, when run as root, will configure your network interfaces and the E-Business Suite Vision database tier. It should need to be run only once. First, we need to re-enable the script before we invoke it, by settingRUN_TEMPLATE_CONF=YESin /etc/sysconfig/oraclevm-template:
- Configure the Vision database tier:
[root@localhost ~]# vi /etc/sysconfig/oraclevm-template
"/etc/sysconfig/oraclevm-template" 26L, 907C written
[root@localhost ~]# grep RUN_ /etc/sysconfig/oraclevm-template
RUN_TEMPLATE_CONF=YES
Now start the config script. The first part will help you configure networking. For my setup of the first network interface (eth0), I chose an IP address that was unused in the range supported by my host-only network, and was also not part of the range of DHCP addresses for the host-only network. Pick anything you like for the hostname, as long as it follows the three-part 'host.domain.com' scheme required by the configuration script. The sometimes-popular host.localdomain format won't work in this case. For DNS server, choose one that will work for you. I like Google's; it's easy to remember. :) Note that the script also picked my NAT interface to use as a gateway. This didn't cause me any problems so far, so I'm living with it. Warning: This script stops and restarts network interfaces! To minimize risk of failure, run these steps from the console of your VM. If you choose to connect to the VM via ssh, I recommend using 'screen' before running the oraclevm-template script, to insulate yourself from dropped network connections.
[root@localhost ~]# /etc/init.d/oraclevm-template start
Starting oraclevm-template...
Regenerating SSH host keys.
Stopping sshd: [ OK ]
Generating SSH1 RSA host key: [ OK ]
Generating SSH2 RSA host key: [ OK ]
Generating SSH2 DSA host key: [ OK ]
Starting sshd: [ OK ]
Setting Oracle validated configuration parameters.
Configuring Oracle E-Business Suite...
Configuring network interface.
Network device: eth0
Hardware address: 08:00:27:5A:17:F4
Enter static IP address: 192.168.56.42
Enter netmask: [255.255.255.0] <ENTER to take default>
Enter gateway: 192.168.56.1
Enter DNS server: 8.8.8.8
Shutting down interface eth0: [ OK ]
Shutting down interface eth1: [ OK ]
Shutting down loopback interface: [ OK ]
Configuring network settings.
IP configuration: Static IP address
Bringing up loopback interface: [ OK ]
Bringing up interface eth0: [ OK ]
Bringing up interface eth1:
Determining IP information for eth1... done.
[ OK ]
Enter hostname (e.g, host.domain.com): gkar.local.org
Network configuration changed successfully.
IP configuration: Static IP address
IP address: 192.168.56.42
Netmask: 255.255.255.0
Gateway: 10.0.3.2
DNS server: 8.8.8.8
Hostname: gkar.local.orgOnce the network is set up, the script invokes the Rapid Clone utility to set up the EBS database tier. You can get valid values from the README file that came with the template or follow the example below.
                     Copyright (c) 2002 Oracle Corporation
                        Redwood Shores, California, USA

                        Oracle Applications Rapid Clone

                                 Version 12.0.0

                      adcfgclone Version 120.31.12010000.8

Enter the APPS password : apps

Running:
/u01/E-BIZ/db/tech_st/11.2.0.2/appsutil/clone/bin/../jre/bin/java -Xmx600M -cp /u01/E-BIZ/db/tech_st/11.2.0.2/appsutil/clone/jlib/java:/u01/E-BIZ/db/tech_st/11.2.0.2/appsutil/clone/jlib/xmlparserv2.jar:/u01/E-BIZ/db/tech_st/11.2.0.2/appsutil/clone/jlib/ojdbc5.jar oracle.apps.ad.context.CloneContext -e /u01/E-BIZ/db/tech_st/11.2.0.2/appsutil/clone/bin/../context/db/CTXORIG.xml -validate -pairsfile /tmp/adpairsfile_7558.lst -stage /u01/E-BIZ/db/tech_st/11.2.0.2/appsutil/clone  2> /tmp/adcfgclone_7558.err; echo $? > /tmp/adcfgclone_7558.res

Log file located at /u01/E-BIZ/db/tech_st/11.2.0.2/appsutil/clone/bin/CloneContext_1115072133.log

Provide the values required for creation of the new Database Context file.

Target System Hostname (virtual or normal) [gkar] : <ENTER to take default>

Target Instance is RAC (y/n) [n] : <ENTER to take default>

Target System Database SID : VIS

Target System Base Directory : /u01/E-BIZ

Target System utl_file_dir Directory List : /usr/tmp

Number of DATA_TOP's on the Target System [1] : <ENTER to take default>

Target System DATA_TOP Directory 1 [/u01/E-BIZ/db/apps_st/data] : <ENTER to take default>

Target System RDBMS ORACLE_HOME Directory [/u01/E-BIZ/db/tech_st/11.1.0] : /u01/E-BIZ/db/tech_st/11.2.0.2

Do you want to preserve the Display [atgtxk05:0.0] (y/n)  : n

Target System Display [gkar:0.0] : <ENTER to take default>

Do you want the the target system to have the same port values as the source system (y/n) [y] ? : n

Target System Port Pool [0-99] : 42

Checking the port pool 42
done: Port Pool 42 is free
Report file located at /u01/E-BIZ/db/tech_st/11.2.0.2/appsutil/temp/portpool.lst
Complete port information available at /u01/E-BIZ/db/tech_st/11.2.0.2/appsutil/temp/portpool.lst

Creating the new Database Context file from :
  /u01/E-BIZ/db/tech_st/11.2.0.2/appsutil/template/adxdbctx.tmp

The new database context file has been created :
  /u01/E-BIZ/db/tech_st/11.2.0.2/appsutil/VIS_gkar.xml

Log file located at /u01/E-BIZ/db/tech_st/11.2.0.2/appsutil/clone/bin/CloneContext_1115072133.log
Check Clone Context logfile /u01/E-BIZ/db/tech_st/11.2.0.2/appsutil/clone/bin/CloneContext_1115072133.log for details.

Running Rapid Clone with command:
perl /u01/E-BIZ/db/tech_st/11.2.0.2/appsutil/clone/bin/adclone.pl java=/u01/E-BIZ/db/tech_st/11.2.0.2/appsutil/clone/bin/../jre mode=apply stage=/u01/E-BIZ/db/tech_st/11.2.0.2/appsutil/clone component=dbTier method=CUSTOM dbctxtg=/u01/E-BIZ/db/tech_st/11.2.0.2/appsutil/VIS_gkar.xml showProgress contextValidated=true
Running:
perl /u01/E-BIZ/db/tech_st/11.2.0.2/appsutil/clone/bin/adclone.pl java=/u01/E-BIZ/db/tech_st/11.2.0.2/appsutil/clone/bin/../jre mode=apply stage=/u01/E-BIZ/db/tech_st/11.2.0.2/appsutil/clone component=dbTier method=CUSTOM dbctxtg=/u01/E-BIZ/db/tech_st/11.2.0.2/appsutil/VIS_gkar.xml showProgress contextValidated=true
APPS Password :

Beginning database tier Apply - Thu Nov 15 07:24:40 2012

/u01/E-BIZ/db/tech_st/11.2.0.2/appsutil/clone/bin/../jre/bin/java -Xmx600M -DCONTEXT_VALIDATED=true  -Doracle.installer.oui_loc=/u01/E-BIZ/db/tech_st/11.2.0.2/oui -classpath /u01/E-BIZ/db/tech_st/11.2.0.2/appsutil/clone/jlib/xmlparserv2.jar:/u01/E-BIZ/db/tech_st/11.2.0.2/appsutil/clone/jlib/ojdbc5.jar:/u01/E-BIZ/db/tech_st/11.2.0.2/appsutil/clone/jlib/java:/u01/E-BIZ/db/tech_st/11.2.0.2/appsutil/clone/jlib/oui/OraInstaller.jar:/u01/E-BIZ/db/tech_st/11.2.0.2/appsutil/clone/jlib/oui/ewt3.jar:/u01/E-BIZ/db/tech_st/11.2.0.2/appsutil/clone/jlib/oui/share.jar:/u01/E-BIZ/db/tech_st/11.2.0.2/appsutil/clone/jlib/oui/srvm.jar:/u01/E-BIZ/db/tech_st/11.2.0.2/appsutil/clone/jlib/ojmisc.jar   oracle.apps.ad.clone.ApplyDBTier -e /u01/E-BIZ/db/tech_st/11.2.0.2/appsutil/VIS_gkar.xml -stage /u01/E-BIZ/db/tech_st/11.2.0.2/appsutil/clone   -showProgress
APPS Password : Log file located at /u01/E-BIZ/db/tech_st/11.2.0.2/appsutil/log/VIS_gkar/ApplyDBTier_11150724.log
  \     15% completed

Completed Apply...
Thu Nov 15 07:43:22 2012

Starting database listener for VIS:
Running:
/u01/E-BIZ/db/tech_st/11.2.0.2/appsutil/scripts/VIS_gkar/addlnctl.sh start VIS
Logfile: /u01/E-BIZ/db/tech_st/11.2.0.2/appsutil/log/VIS_gkar/addlnctl.txt

You are running addlnctl.sh version 120.1.12010000.4

Starting listener process VIS ...

Listener VIS has already been started.

addlnctl.sh: exiting with status 0

addlnctl.sh: check the logfile /u01/E-BIZ/db/tech_st/11.2.0.2/appsutil/log/VIS_gkar/addlnctl.txt for more information ...

Template configuration disabled.
                                                           [  OK  ]
[root@localhost ~]# ps -ef | grep pmon
oracle   14565     1  0 07:36 ?        00:00:00 ora_pmon_VIS
root     15375  2319  0 07:45 pts/0    00:00:00 grep pmon
Okay, we're done with the first part! Keep the database server running (not optional, required), and let's move on to the apps tier!
- Boot the app server VM in rescue mode from the install CD:
Start the application server VM in rescue mode ("linux rescue" at the boot: prompt). Follow the same steps as for the database server, including enabling the network interfaces, andchroot /mnt/sysimage. I'll spare you the screenshots this time. - Update configuration files:
As with the database server, adjust /etc/modprobe.conf, /etc/fstab, and /etc/sysconfig/oraclevm-template:[root@localhost ~]# cat /etc/modprobe.conf
alias eth0 e1000
alias scsi_hostadapter ata_piix
alias scsi_hostadapter1 ahci
[root@localhost ~]# grep ebs1211apps /etc/fstab
LABEL=ebs1211apps /u01 ext3 defaults 1 0
[root@localhost ~]# grep RUN /etc/sysconfig/oraclevm-template
#RUN_TEMPLATE_CONF=YES
RUN_TEMPLATE_CONF=NO- Install a new kernel:
Same idea as before, with a few exceptions: The app server VM doesn't have a nameserver entry in resolv.conf, so we need to add it before we reach out the to the yum server. We do not, however, need to download the repository config file:[root@localhost ~]# cd /etc/yum.repos.d
[root@localhost yum.repos.d]# cat /etc/resolv.conf
cat: /etc/resolv.conf: No such file or directory
[root@localhost yum.repos.d]# echo "nameserver 8.8.8.8" > /etc/resolv.conf
[root@localhost yum.repos.d]# cat /etc/resolv.conf
nameserver 8.8.8.8
[root@localhost yum.repos.d]# nslookup public-yum.oracle.com
Server: 8.8.8.8
Address: 8.8.8.8#53
Non-authoritative answer:
public-yum.oracle.com canonical name = bigip-public-yum.oracle.com.
Name: bigip-public-yum.oracle.com
Address: 141.146.44.34
[root@localhost yum.repos.d]# ls -l public-yum-el5.repo
-rw-r--r-- 1 root root 2308 Feb 1 2011 public-yum-el5.repo
"public-yum-el5.repo" 69L, 2308C written
[root@localhost yum.repos.d]# vi public-yum-el5.repo
[root@localhost yum.repos.d]# grep -B5 'enabled=1' public-yum-el5.repo | grep ']'
[ol5_u6_base]
[root@localhost yum.repos.d]# yum install kernel-2.6.18-238.el5
ol5_u6_base | 1.1 kB 00:00
ol5_u6_base/primary | 1.5 MB 00:02
ol5_u6_base 4551/4551
Setting up Install Process
Resolving Dependencies
--> Running transaction check
---> Package kernel.x86_64 0:2.6.18-238.el5 set to be installed
--> Finished Dependency Resolution
Dependencies Resolved
====================================================================================================================================
Package Arch Version Repository Size
====================================================================================================================================
Installing:
kernel x86_64 2.6.18-238.el5 ol5_u6_base 19 M
Transaction Summary
====================================================================================================================================
Install 1 Package(s)
Upgrade 0 Package(s)
Total download size: 19 M
Is this ok [y/N]: y
Downloading Packages:
kernel-2.6.18-238.el5.x86_64.rpm | 19 MB 00:23
Running rpm_check_debug
Running Transaction Test
Finished Transaction Test
Transaction Test Succeeded
Running Transaction
Installing : kernel 1/1
Installed:
kernel.x86_64 0:2.6.18-238.el5
Complete!
[root@localhost yum.repos.d]# mkinitrd -v -f /boot/initrd-2.6.18-238.el5.img 2.6.18-238.el5
[mkinitrd output snipped this time. You're welcome]
[root@localhost yum.repos.d]# head -15 /boot/grub/grub.conf
# grub.conf generated by anaconda
#
# Note that you do not have to rerun grub after making changes to this file
# NOTICE: You have a /boot partition. This means that
# all kernel and initrd paths are relative to /boot/, eg.
# root (hd0,0)
# kernel /vmlinuz-version ro root=/dev/xvda2
# initrd /initrd-version.img
#boot=/dev/xvda
timeout=5
splashimage=(hd0,0)/grub/splash.xpm.gz
hiddenmenu
default=0
title Oracle Linux Server (2.6.18-238.el5)
root (hd0,0) - Reboot and prepare for next steps:
- Detach the boot ISO from the CD drive of the app server VM (Devices menu -> Remove disk from virtual drive)
- Reboot the app server VM.
- Connect as the root user. (The password, as listed in the template README file, is 'ovsroot'.)
- Configure the Vision applications tier:
There are some important differences here from the database server setup. Please read carefully. The first part, however, is the same: Re-enable and run the oraclevm-template script, setting up the same network options as before (different IP/hostname for the app server, of course). As with the database server, make sure to run the config script in the VM console or in a screen session to avoid network interruptions![root@localhost ~]# grep RUN /etc/sysconfig/oraclevm-template
RUN_TEMPLATE_CONF=YES
[root@localhost ~]# /etc/init.d/oraclevm-template start
Starting oraclevm-template...
Regenerating SSH host keys.
Stopping sshd: [ OK ]
Generating SSH1 RSA host key: [ OK ]
Generating SSH2 RSA host key: [ OK ]
Generating SSH2 DSA host key: [ OK ]
Starting sshd: [ OK ]
Setting Oracle validated configuration parameters.
Configuring Oracle E-Business Suite...
Configuring network interface.
Network device: eth0
Hardware address: 08:00:27:3D:41:3B
Enter static IP address: 192.168.56.43
Enter netmask: [255.255.255.0] <ENTER to take default>
Enter gateway: 192.168.56.1
Enter DNS server: 8.8.8.8
Shutting down interface eth0: [ OK ]
Shutting down interface eth1: [ OK ]
Shutting down loopback interface: [ OK ]
Configuring network settings.
IP configuration: Static IP address
Bringing up loopback interface: [ OK ]
Bringing up interface eth0: [ OK ]
Bringing up interface eth1:
Determining IP information for eth1... done.
[ OK ]
Enter hostname (e.g, host.domain.com): natoth.local.org
Network configuration changed successfully.
IP configuration: Static IP address
IP address: 192.168.56.43
Netmask: 255.255.255.0
Gateway: 10.0.3.2
DNS server: 8.8.8.8
Hostname: natoth.local.org***IMPORTANT*** AFTER network configuration, but BEFORE proceeding with any Rapid Clone steps, start a second session (do NOT interrupt the template configuration script) to add the IP and hostname for your database server to /etc/hosts. Otherwise, Rapid Clone won't be able to find the db server to complete its configuration. It's not helpful to try to "cheat forward" and make the /etc/hosts adjustments before starting the template configuration script, because the script overwrites /etc/hosts. So:
root@192.168.56.43's password: [you should be able to access the VM via the IP you specified earlier]
Last login: Tue Nov 20 21:51:13 2012 from 192.168.56.1
[root@natoth ~]# cat /etc/hosts
127.0.0.1       localhost.localdomain   localhost
::1     localhost6.localdomain6 localhost6
192.168.56.43     natoth.local.org natoth
[root@natoth ~]# echo "192.168.56.42 gkar.local.org gkar" >> /etc/hosts
[root@natoth ~]# cat /etc/hosts
127.0.0.1       localhost.localdomain   localhost
::1     localhost6.localdomain6 localhost6
192.168.56.43     natoth.local.org natoth
192.168.56.42 gkar.local.org gkar
[root@natoth ~]# ping gkar [confirm that app server can see the database server]
PING gkar.local.org (192.168.56.42) 56(84) bytes of data.
64 bytes from gkar.local.org (192.168.56.42): icmp_seq=1 ttl=64 time=1.94 ms
64 bytes from gkar.local.org (192.168.56.42): icmp_seq=2 ttl=64 time=0.505 ms

--- gkar.local.org ping statistics ---
***RESUME Rapid Clone run in the first session*** (It should be waiting for you to enter the APPS user password.)
-
                     Copyright (c) 2002 Oracle Corporation
                        Redwood Shores, California, USA

                        Oracle Applications Rapid Clone

                                 Version 12.0.0

                      adcfgclone Version 120.31.12010000.8

Enter the APPS password : apps

Running:
/u01/E-BIZ/apps/apps_st/comn/clone/bin/../jre/bin/java -Xmx600M -cp /u01/E-BIZ/apps/apps_st/comn/clone/jlib/java:/u01/E-BIZ/apps/apps_st/comn/clone/jlib/xmlparserv2.jar:/u01/E-BIZ/apps/apps_st/comn/clone/jlib/ojdbc14.jar oracle.apps.ad.context.CloneContext -e /u01/E-BIZ/apps/apps_st/comn/clone/bin/../context/apps/CTXORIG.xml -validate -pairsfile /tmp/adpairsfile_21022.lst -stage /u01/E-BIZ/apps/apps_st/comn/clone  2> /tmp/adcfgclone_21022.err; echo $? > /tmp/adcfgclone_21022.res

Log file located at /u01/E-BIZ/apps/apps_st/comn/clone/bin/CloneContext_1120230342.log

Provide the values required for creation of the new APPL_TOP Context file.

Target System Hostname (virtual or normal) [natoth] : <ENTER to take default>

Target System Database SID : VIS

Target System Database Server Node [natoth] : gkar

Target System Database Domain Name [local.org] : <ENTER to take default>

Target System Base Directory : /u01/E-BIZ

Target System Tools ORACLE_HOME Directory [/u01/E-BIZ/apps/tech_st/10.1.2] : <ENTER to take default>

Target System Web ORACLE_HOME Directory [/u01/E-BIZ/apps/tech_st/10.1.3] : <ENTER to take default>

Target System APPL_TOP Directory [/u01/E-BIZ/apps/apps_st/appl] : <ENTER to take default>

Target System COMMON_TOP Directory [/u01/E-BIZ/apps/apps_st/comn] : <ENTER to take default>

Target System Instance Home Directory [/u01/E-BIZ/inst] : <ENTER to take default>

Target System Root Service [enabled] : <ENTER to take default>

Target System Web Entry Point Services [enabled] : <ENTER to take default>

Target System Web Application Services [enabled] : <ENTER to take default>

Target System Batch Processing Services [enabled] : <ENTER to take default>

Target System Other Services [disabled] : <ENTER to take default>

Do you want to preserve the Display [atgtxk-09:0.0] (y/n)  : n

Target System Display [natoth:0.0] : <ENTER to take default>

Do you want the the target system to have the same port values as the source system (y/n) [y] ? : n

Target System Port Pool [0-99] : 42

Checking the port pool 42
done: Port Pool 42 is free
Report file located at /u01/E-BIZ/inst/apps/VIS_natoth/temp/portpool.lst
Complete port information available at /u01/E-BIZ/inst/apps/VIS_natoth/temp/portpool.lst

UTL_FILE_DIR on database tier consists of the following directories.

1. /usr/tmp
2. /usr/tmp
3. /u01/E-BIZ/db/tech_st/11.2.0.2/appsutil/outbound/VIS_gkar
4. /usr/tmp
Choose a value which will be set as APPLPTMP value on the target node [1] : 1

Backing up /u01/E-BIZ/inst/apps/VIS_natoth/appl/admin/VIS_natoth.xml to /u01/E-BIZ/inst/apps/VIS_natoth/appl/admin/VIS_natoth.xml.bak

Creating the new APPL_TOP Context file from :
  /u01/E-BIZ/apps/apps_st/appl/ad/12.0.0/admin/template/adxmlctx.tmp

The new APPL_TOP context file has been created :
  /u01/E-BIZ/inst/apps/VIS_natoth/appl/admin/VIS_natoth.xml

Log file located at /u01/E-BIZ/apps/apps_st/comn/clone/bin/CloneContext_1120230342.log
Check Clone Context logfile /u01/E-BIZ/apps/apps_st/comn/clone/bin/CloneContext_1120230342.log for details.

Running Rapid Clone with command:
perl /u01/E-BIZ/apps/apps_st/comn/clone/bin/adclone.pl java=/u01/E-BIZ/apps/apps_st/comn/clone/bin/../jre mode=apply stage=/u01/E-BIZ/apps/apps_st/comn/clone component=appsTier method=CUSTOM appctxtg=/u01/E-BIZ/inst/apps/VIS_natoth/appl/admin/VIS_natoth.xml showProgress contextValidated=true
Running:
perl /u01/E-BIZ/apps/apps_st/comn/clone/bin/adclone.pl java=/u01/E-BIZ/apps/apps_st/comn/clone/bin/../jre mode=apply stage=/u01/E-BIZ/apps/apps_st/comn/clone component=appsTier method=CUSTOM appctxtg=/u01/E-BIZ/inst/apps/VIS_natoth/appl/admin/VIS_natoth.xml showProgress contextValidated=true
APPS Password :

Beginning application tier Apply - Tue Nov 20 23:04:58 2012

/u01/E-BIZ/apps/apps_st/comn/clone/bin/../jre/bin/java -Xmx600M -DCONTEXT_VALIDATED=true  -Doracle.installer.oui_loc=/oui -classpath /u01/E-BIZ/apps/apps_st/comn/clone/jlib/xmlparserv2.jar:/u01/E-BIZ/apps/apps_st/comn/clone/jlib/ojdbc14.jar:/u01/E-BIZ/apps/apps_st/comn/clone/jlib/java:/u01/E-BIZ/apps/apps_st/comn/clone/jlib/oui/OraInstaller.jar:/u01/E-BIZ/apps/apps_st/comn/clone/jlib/oui/ewt3.jar:/u01/E-BIZ/apps/apps_st/comn/clone/jlib/oui/share.jar:/u01/E-BIZ/apps/apps_st/comn/clone/jlib/oui/srvm.jar:/u01/E-BIZ/apps/apps_st/comn/clone/jlib/ojmisc.jar  oracle.apps.ad.clone.ApplyAppsTier -e /u01/E-BIZ/inst/apps/VIS_natoth/appl/admin/VIS_natoth.xml -stage /u01/E-BIZ/apps/apps_st/comn/clone    -showProgress
APPS Password : Log file located at /u01/E-BIZ/inst/apps/VIS_natoth/admin/log/ApplyAppsTier_11202304.log
  \     73% completed

Completed Apply...
Tue Nov 20 23:13:40 2012

Do you want to startup the Application Services for VIS? (y/n) [y] : y

Starting application Services for VIS:
Running:
/u01/E-BIZ/inst/apps/VIS_natoth/admin/scripts/adstrtal.sh -nopromptmsg

You are running adstrtal.sh version 120.15.12010000.3

The logfile for this session is located at /u01/E-BIZ/inst/apps/VIS_natoth/logs/appl/admin/log/adstrtal.log
Executing service control script:
/u01/E-BIZ/inst/apps/VIS_natoth/admin/scripts/adopmnctl.sh start
script returned:
****************************************************

You are running adopmnctl.sh version 120.6.12010000.5

Starting Oracle Process Manager (OPMN) ...
opmnctl: opmn started.

adopmnctl.sh: exiting with status 0

adopmnctl.sh: check the logfile /u01/E-BIZ/inst/apps/VIS_natoth/logs/appl/admin/log/adopmnctl.txt for more information ...

.end std out.

.end err out.

****************************************************

Executing service control script:
/u01/E-BIZ/inst/apps/VIS_natoth/admin/scripts/adalnctl.sh start
script returned:
****************************************************

adalnctl.sh version 120.3

Checking for FNDFS executable.
Starting listener process APPS_VIS.

adalnctl.sh: exiting with status 0

adalnctl.sh: check the logfile /u01/E-BIZ/inst/apps/VIS_natoth/logs/appl/admin/log/adalnctl.txt for more information ...

.end std out.

.end err out.

****************************************************

Executing service control script:
/u01/E-BIZ/inst/apps/VIS_natoth/admin/scripts/adapcctl.sh start
script returned:
****************************************************

You are running adapcctl.sh version 120.7.12010000.2

Starting OPMN managed Oracle HTTP Server (OHS) instance ...
opmnctl: opmn is already running.
opmnctl: starting opmn managed processes...

adapcctl.sh: exiting with status 0

adapcctl.sh: check the logfile /u01/E-BIZ/inst/apps/VIS_natoth/logs/appl/admin/log/adapcctl.txt for more information ...

.end std out.

.end err out.

****************************************************

Executing service control script:
/u01/E-BIZ/inst/apps/VIS_natoth/admin/scripts/adoacorectl.sh start
script returned:
****************************************************

You are running adoacorectl.sh version 120.13

Starting OPMN managed OACORE OC4J instance  ...

adoacorectl.sh: exiting with status 0

adoacorectl.sh: check the logfile /u01/E-BIZ/inst/apps/VIS_natoth/logs/appl/admin/log/adoacorectl.txt for more information ...

.end std out.

.end err out.

****************************************************

Executing service control script:
/u01/E-BIZ/inst/apps/VIS_natoth/admin/scripts/adformsctl.sh start
script returned:
****************************************************

You are running adformsctl.sh  version 120.16.12010000.3

Starting OPMN managed FORMS OC4J instance  ...
Calling txkChkFormsDeployment.pl to check whether latest FORMSAPP.EAR is deployed...
Program : /u01/E-BIZ/apps/apps_st/appl/fnd/12.0.0/patch/115/bin/txkChkFormsDeployment.pl started @ Thu Nov 29 07:20:21 2012

*** Log File = /u01/E-BIZ/inst/apps/VIS_natoth/logs/appl/rgf/TXK/txkChkFormsDeployment_Thu_Nov_29_07_20_20_2012/txkChkFormsDeployment_Thu_Nov_29_07_20_20_2012.log

File "/u01/E-BIZ/apps/tech_st/10.1.3/j2ee/forms/applications/forms/formsweb/WEB-INF/lib/frmsrv.jar" exists. Proceeding to check the size...

=============================================
*** Latest formsapp.ear has been deployed ***
=============================================

Program : /u01/E-BIZ/apps/apps_st/appl/fnd/12.0.0/patch/115/bin/txkChkFormsDeployment.pl completed @ Thu Nov 29 07:20:21 2012

Perl script txkChkFormsDeployment.pl got executed successfully

adformsctl.sh: exiting with status 0

adformsctl.sh: check the logfile /u01/E-BIZ/inst/apps/VIS_natoth/logs/appl/admin/log/adformsctl.txt for more information ...

.end std out.
*** ALL THE FOLLOWING FILES ARE REQUIRED FOR RESOLVING RUNTIME ERRORS
*** Log File = /u01/E-BIZ/inst/apps/VIS_natoth/logs/appl/rgf/TXK/txkChkFormsDeployment_Thu_Nov_29_07_20_20_2012/txkChkFormsDeployment_Thu_Nov_29_07_20_20_2012.log

.end err out.

****************************************************

Executing service control script:
/u01/E-BIZ/inst/apps/VIS_natoth/admin/scripts/adoafmctl.sh start
script returned:
****************************************************

You are running adoafmctl.sh version 120.8

Starting OPMN managed OAFM OC4J instance  ...

adoafmctl.sh: exiting with status 0

adoafmctl.sh: check the logfile /u01/E-BIZ/inst/apps/VIS_natoth/logs/appl/admin/log/adoafmctl.txt for more information ...

.end std out.

.end err out.

****************************************************

Executing service control script:
/u01/E-BIZ/inst/apps/VIS_natoth/admin/scripts/adcmctl.sh start
script returned:
****************************************************

You are running adcmctl.sh version 120.17.12010000.5

Starting concurrent manager for VIS ...
Starting VIS_1129@VIS Internal Concurrent Manager
Default printer is noprint

adcmctl.sh: exiting with status 0

adcmctl.sh: check the logfile /u01/E-BIZ/inst/apps/VIS_natoth/logs/appl/admin/log/adcmctl.txt for more information ...

.end std out.

.end err out.

****************************************************

Executing service control script:
/u01/E-BIZ/inst/apps/VIS_natoth/admin/scripts/jtffmctl.sh start
script returned:
****************************************************

You are running jtffmctl.sh version 120.3

Validating Fulfillment patch level via /u01/E-BIZ/apps/apps_st/comn/java/classes
Fulfillment patch level validated.
Starting Fulfillment Server for VIS on port 9342 ...

jtffmctl.sh: exiting with status 0

.end std out.

.end err out.

****************************************************

All enabled services for this node are started.

adstrtal.sh: Exiting with status 0

adstrtal.sh: check the logfile /u01/E-BIZ/inst/apps/VIS_natoth/logs/appl/admin/log/adstrtal.log for more information ...

Template configuration disabled.
[Apps DBAs with experience running Vision might be a bit worried about this last step because of the number of services that can be started by default. I found that the version delivered with the template is reasonably trim, with only a handful of concurrent managers configured. It could probably still be pared down, but the default config won't make your VM choke and fall over.]
That's it! Almost...
A few more notes to get you on your way:
- Access the front-end of your shiny new E-Business Suite Release 12.1.3 instance at https://your_hostname:80nn, where nn is the value of the port pool that you chose during the Rapid Clone run (https://natoth.local.org:8042 in my example). The login to use is sysadmin, and the password is the same (but they're pronounced differently).
- If you have JRE 7 installed on your workstation, you are going to have problems when launching the Oracle Forms interface, but the web interface ("Self Service") should work without issues. If you're interested in giving the Forms interface a whirl, you will need to roll back to JRE 6.
- To start and stop the apps the "quick and easy" way, you can use the scripts found in /u01 on each server: startapps.sh and stopapps.sh on the app server, and startdb.shs and stopdb.sh on the database server. These scripts need to be run as the software owner (Oracle, in both cases), not root!
- The oracle user accounts are configured to prompt you to change default passwords whenever you log in:
**************************ATTENTION**************************************
This is the first time you are logging in to the system as oracle user
Oracle recommends that you change the default password for the oracle user
Would you like to change the password now (YES/NO)?
*************************************************************************

Enter YES or NO :
It's not a bad idea to change the passwords, of course. If you're happy with the defaults, however, then just answer NO to all the prompts, and issue the command
touch /home/oracle/.passchangedto avoid being prompted on subsequent logins. - To make sure that your environment variables are set correctly when connecting to the apps and db servers as Oracle, add the following lines to the .bash_profile:
App server:
echo ". /u01/E-BIZ/apps/apps_st/appl/APPSVIS_`hostname -s`.env" >> ~/.bash_profile
DB Server:
echo ". /u01/E-BIZ/db/tech_st/11.2.0.2/VIS_`hostname -s`.env" >> ~/.bash_profile - More than likely, if you're bothering to go through with all of this nonsense, you're already somewhat familiar with E-Business Suite. If you're new to the administrative side of EBS, however, I humbly recommend a review of Part 3 and Part 4 of the EBS install guide I wrote for oraclenerd.com a while back. It barely scratches the surface, but there's enough there for some basic orientation. After that, you have lots of documentation reading ahead of you!
- Install a new kernel:
- Download the software:
Oracle EBS Consulting Services
Ready to optimize your Oracle EBS for the future?
Share this
Share this

Install EBS 12.2.2 Vision in Virtualbox from OVM templates