Have you ever tried to change the definitions of your Microsoft Azure Virtual Machine? Tasks like changing the Virtual Network, or moving the Virtual Machine to another location/region are not that simple, even impossible. Today the Azure Portal has simplified the way to move a Virtual Machine (and its resources) to another Resource Group or even subscription. However, as an example, this movement won´t allow us to change the related Virtual Network. Even if the objective is not to change the Virtual Machine's configuration, you may want to clone the Virtual Machine, which is “kind of” possible by generalizing the Virtual Machine and creating a template. But what if you don’t want to generalize the Virtual Machine? I accepted a request to move a Microsoft Azure Virtual Machine to another Resource Group and to assign the Virtual Machine to another Virtual Network/Subnet. After a quick look in the Azure Portal, I found this fantastic "button":
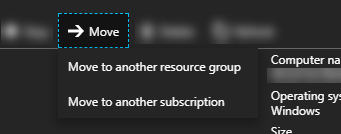 So, my first reaction was: Let’s click on it, move the Virtual Machine and celebrate a flawless victory! But, no… In fact, the resource movement works fine, but the most important thing didn’t happen: The Virtual Machine was still in the same Virtual Network, and I could not change it. After some “Googling” I found out that this task is not as easy as it seems. I tried different approaches and scripts and nothing worked. Long story short: I ended up doing it my way… and it worked. The strategy was simple, the implementation not that simple, but basically I wrote a script to create a copy of each Virtual Machine component and create a Virtual Machine based on a copy of the OS disk from the original Virtual Machine. In Azure, a RM Virtual Machine is composed by the following components:
So, my first reaction was: Let’s click on it, move the Virtual Machine and celebrate a flawless victory! But, no… In fact, the resource movement works fine, but the most important thing didn’t happen: The Virtual Machine was still in the same Virtual Network, and I could not change it. After some “Googling” I found out that this task is not as easy as it seems. I tried different approaches and scripts and nothing worked. Long story short: I ended up doing it my way… and it worked. The strategy was simple, the implementation not that simple, but basically I wrote a script to create a copy of each Virtual Machine component and create a Virtual Machine based on a copy of the OS disk from the original Virtual Machine. In Azure, a RM Virtual Machine is composed by the following components:
- Storage Account
- Disks
- Network Interface Card (NIC)
- Virtual Network
- Subnet
- IP Address
- Public
- Private
- Network Security Group (NSG)
- Virtual Network
- Shutdown the original Virtual Machine and make a copy of the OS disk (a vhd file).
- You can do it by using the AzCopy, Azure Storage Explorer or PowerShell.
- Make sure you are copying it to the right storage account in the right region.
- Yes, you will need to “turn-off” the Virtual Machine to be able to copy the file.
- If your Virtual Machine is using Managed Disks, you will need to export the OS disk, get the generated URI and use this method to copy the file.
- Create a new Virtual Machine based on the old Virtual Machine configuration and the copy of the OS disk.
- After creating the new Virtual Machine with success you can remove the old Virtual Machine. Please, make sure that everything is working as expected before you remove the “old” Virtual Machine.
Install-Module AzureRM.Compute -RequiredVersion 2.6.0 The complete script is attached to the article, but here are some key points: An initial step is to get information about the current Virtual Machine:
$vm = Get-AzureRmVM -Name $vmName -ResourceGroupName $resourceGroupName As the source Virtual Machine has a Managed Disk, we need to export the disk in order to get a URI. Having this, we will be able to copy the vhd from the specified URI to the destination storage account. For that we can use the Start-AzureStorageBlobCopy cmdlet.
$storageAccount = Get-AzureRmStorageAccount -ResourceGroupName $newResourceGroupName -StorageAccountName $storageAccountName
 $ctx = $storageAccount.Context
 Start-AzureStorageBlobCopy -AbsoluteUri $sourceUrl `
 -DestContainer $destinationContainer `
 -DestBlob $newFileName `
 -DestContext $ctx
If the destination Resource Group is different from the source, we need to create a new Network Security Group. In order to keep the current NSG rules, we can do the following:
$rules = (Get-AzureRmNetworkSecurityGroup -Name $networkSecurityGroupName -ResourceGroupName $resourceGroupName).SecurityRules
 $networkSecurityGroup = New-AzureRmNetworkSecurityGroup -Name $networkSecurityGroupName -ResourceGroupName $newResourceGroupName -Location $newLocation -SecurityRules $rules
On this page
Share this
Share this
Creating a test lab using VirtualBox / NAT networking
![]()
Creating a test lab using VirtualBox / NAT networking
Sep 22, 2015 12:00:00 AM
19
min read
SAP on MSSQL: An 8-Step Homogeneous System Copy Approach

SAP on MSSQL: An 8-Step Homogeneous System Copy Approach
Apr 19, 2023 12:00:00 AM
3
min read
Slimming Down Oracle RAC 12c's resource footprint
![]()
Slimming Down Oracle RAC 12c's resource footprint
Feb 8, 2015 12:00:00 AM
3
min read