Setting up your NAT network
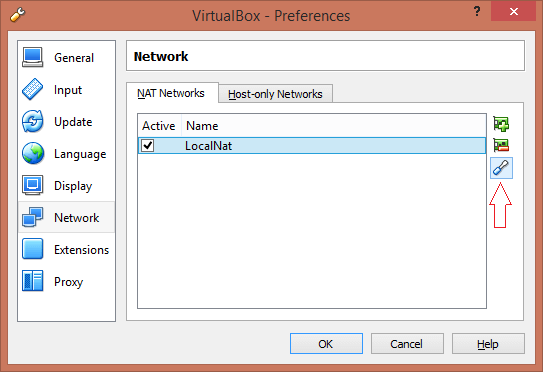
For this tutorial I've installed VirtualBox version 5.0.4 on my local machine. A Nat Network is already setup by default, but you can verify this by going to File -> Preferences -> Network (on the left menu bar). On the Nat Networks tab you will likely see an network called 'LocalNat'. You can click on the edit button (the little screwdriver icon) to see the network configuration. If you don't have a Nat Network by default, create one by hitting the icon that looks like a network card with a ‘+’ symbol over it, then select it and click the edit button.
You will see the following options in the Nat Network Details window: (Checkbox) Enable Network: Make sure this is checked. Network Name: I've decided to stay with the name ‘LocalNat’. Network CCIDR: This is the IP/Netmask of the Nat Network. For this tutorial I’ve chosen to stay with the default option of 10.0.2.0/24. For those of you unfamiliar with slash subnet notation , /24 translates to 255.255.255.0, or rather a class 'C' network. This means all devices (or in this case, virtual machines) that connect to this network must have an IP starting with 10.0.2.XX, but the XX can be anything you want it to be above the number 3. The reason for this the first IP (1) is reserved for the host resolution and the second IP (2) is reserved for the network gateway. (Checkbox) Support DHCP: Leave this unchecked. We will be assigning static IPs. (Checkbox) Support IPv6: Leave this unchecked. We only need Ipv4.
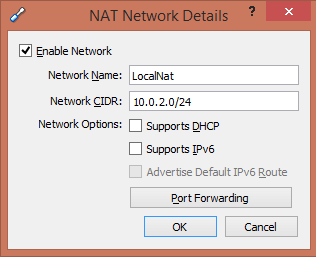
There will also be a button for port forwarding. We will come back to that later after our first virtual machine has been created. Keep clicking OK until you're back to VM VirtualBox Manager, as any networking configuration changes you have made will not be applied until you have done so.
Creating the first virtual machine
The network is setup and we're ready to create our first virtual machine! Click on new and this will take you to the 'Create Virtual Machine' window. The first option will be to name your virtual machine. In this case I am going to name my first virtual machine 'CentVM1' and, will use type 'Linux' and Version 'Red Hat (64-Bit)'.
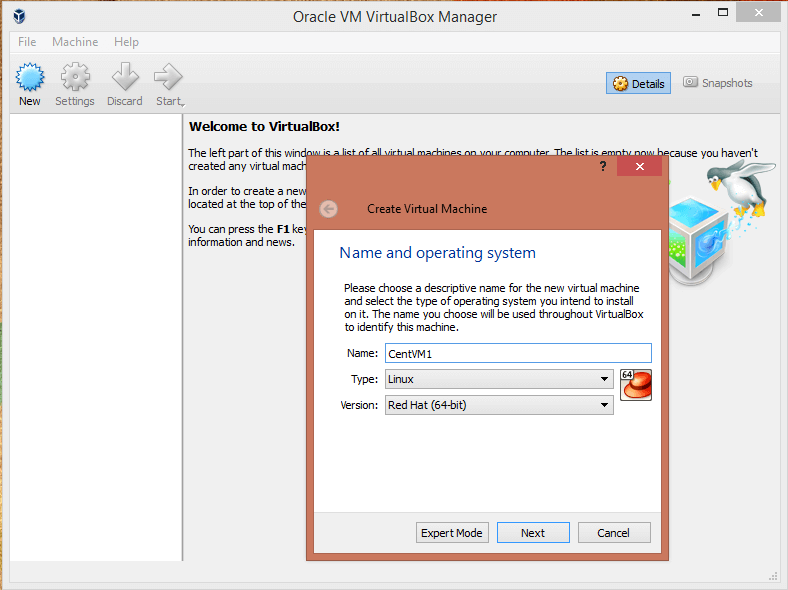
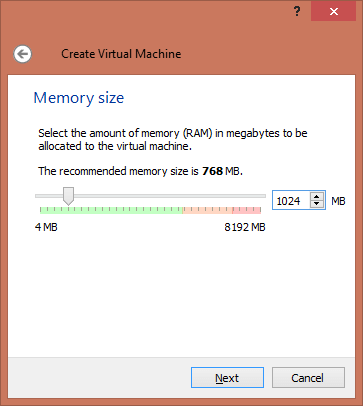
NOTE : Often I hear about people having issues with the 64-bit options not being available in the version menu. If you only see 32 bit versions, learn how to enable the 64 bit options. The next option will be to set the amount of memory that your virtual machine will use. Bare in mind that the amount of virtual memory you set will be used on your local machine whenever the virtual machine is turned on. For this tutorial I have set the memory to 1024MB (1G), meaning whenever the virtual machine is on, 1G of memory will be used on the local machine to support it.
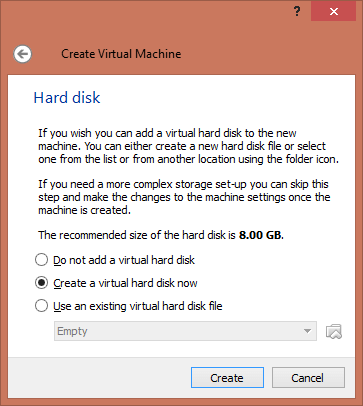
The next step will give you the option to create a virtual hard disk for your virtual machine. Select 'create a virtual hard disk now' and click 'create'.
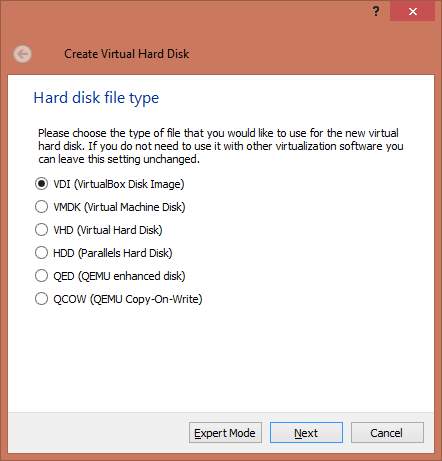
The next option will allow you to select a hard disk type. In this example I will use a VDI (VirtualBox Disk Image).
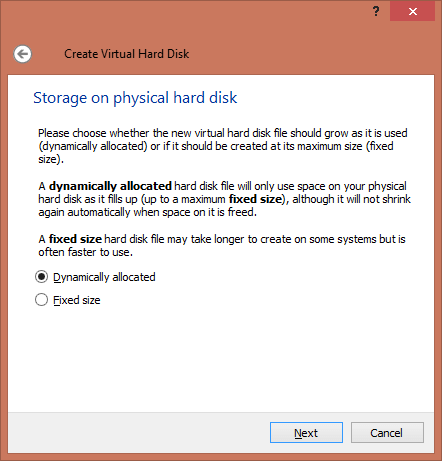
The next option will allow you to choose whether you want the virtual hard disk to be dynamically allocated or a fixed size. Dynamically allocated means that the file on your machine that represents the virtual hard disk will start at a small size, but will grow as needed until it meets the cap designated by the size of the drive. For example, if you specify for the drive to be 20G in size it will appear as 20G in the virtual machine, but the file that represents this on your host machine will be much smaller until the disk space is actually used. The advantage to this is that you save space initially until you actually use the hard disk space in the virtual machine. The downside to this is if you need to use more space, you may incur I/O overhead to allow your host machine to expand the size of the file on demand. The file can also easily become fragmented and distributed on the physical drive platter. Fixed size is just what it sounds like. If you specify that the virtual machine is going to have a 20G hard disk, a 20G file is going to be created on the host machine and will likely not experience any expansion beyond that. The downside is that the file that represents the disk on your host machine will be 20G regardless of how much of the disk is actually being used. The upside is that you don't have to worry about losing track of how much your virtual machine disk files may expand. In this case I find dynamic allocation to be acceptable as I'm only going to use this VM for testing and development. However, you can use whichever you feel comfortable with using.
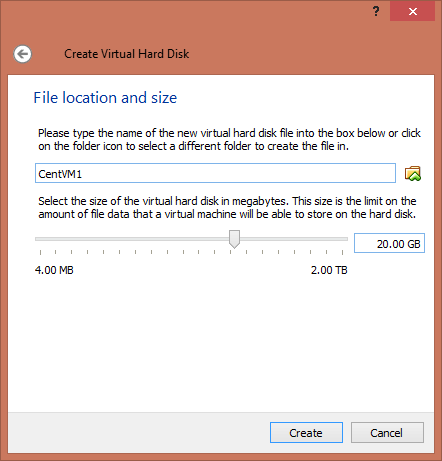
The next option allows you to set the size of the virtual hard disk. For a MySQL lab virtual machine I would recommend no less than 10G. In this case, I'm going to use 20G in case I need the extra space.
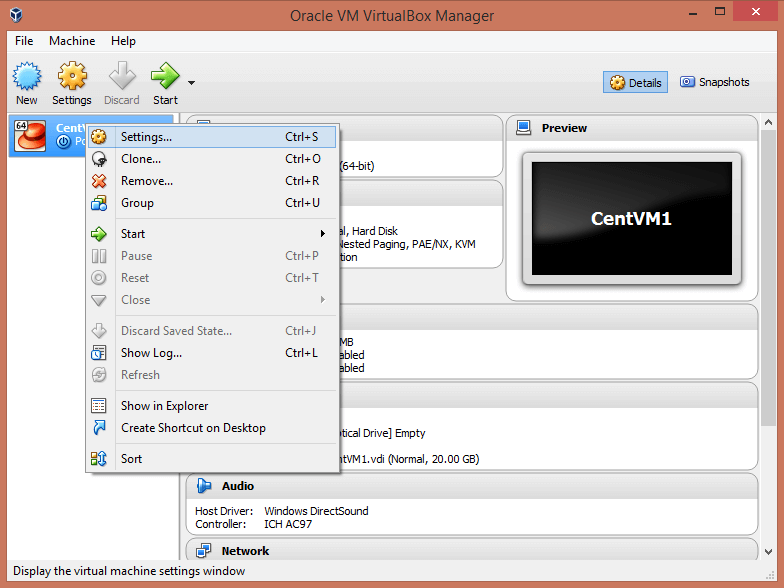
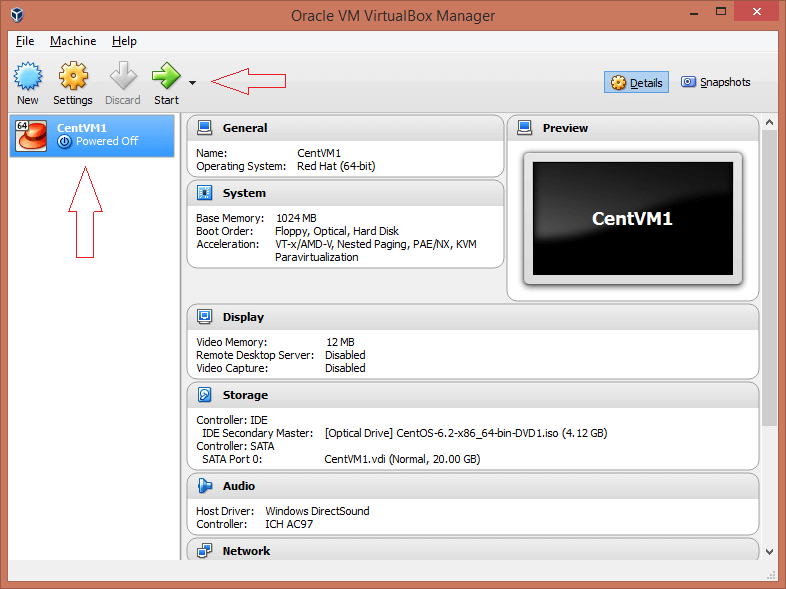
After clicking 'create' you will be brought back to the VM VirtualBox Manager. You will see the VM you just created, but we can't start it up just yet! We need to attach it to the Nat Network we setup earlier and we need to load the CentOS 6 ISO. Right click on your new virtual machine (CentosVM1) and click Settings.
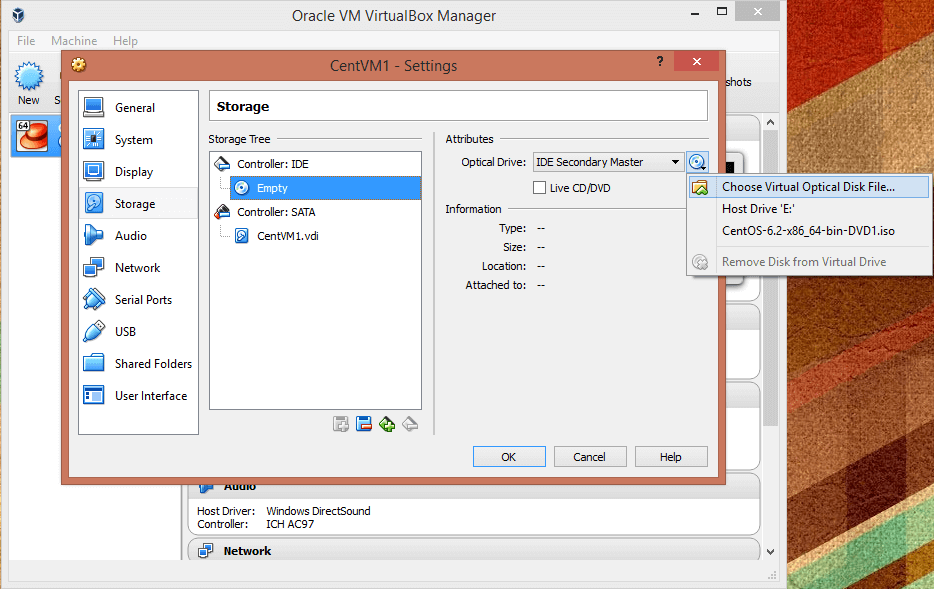
In the settings window for you virtual machine, click ‘Storage’ on the left menu, in the storage tree section click the 'empty' CD-ROM designation under the IDE controller, and then to the right click in the attributes section click on the icon that looks like a CD next to the optical drive drop down menu. Then click ‘Choose Virtual Optical Disk File’
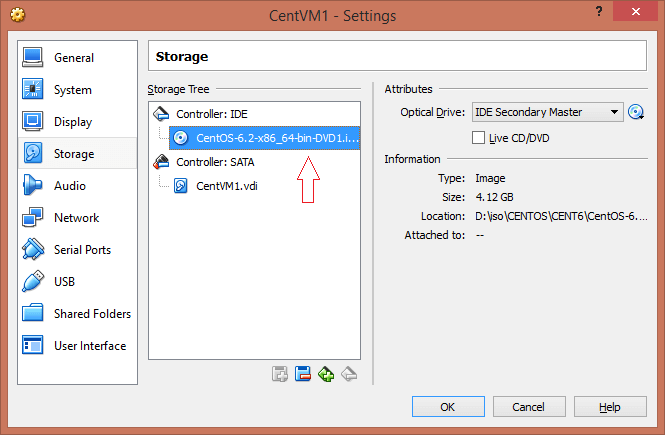
Browse to and select the CentOS 6 iso. When you return to the Virtual machines setting window you will see that the iso has been loaded into the virtual optical drive on the IDE controller.
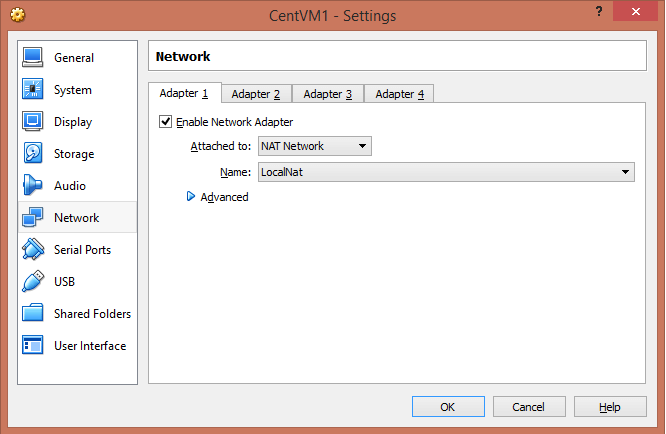
Next, on the left menu section, click 'Network'. Here you will see that you have a network adapter that is enabled and is attached to NAT by default. Use the 'Attached to' drop down menu and select 'Nat Network', then on the 'Name' drop down menu, select the Nat Network we created earlier (LocalNat). This will attach this network controller to your Nat Network.
Click OK to go back to the VM VirtualBox Manager. We are now ready to start up the virtual machine! I know we said earlier we were going to create 2 virtual machines, but we'll take care of the second one later using cloning. For now, select your first virtual machine (CentVM1) and click start.
Install OS / Configure networking
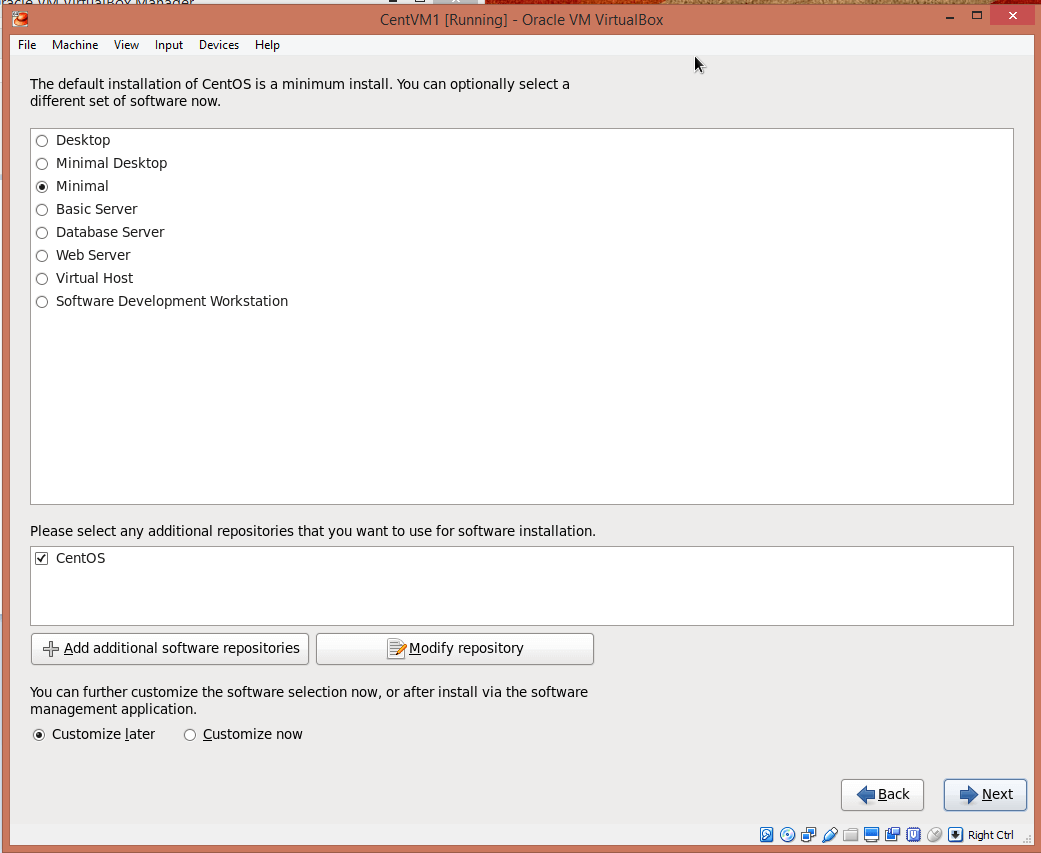
You should install CentOS as you normally would in any other circumstance. However, I would suggest that you consider a minimal installation when given the option of what installation you would like to use. You don't know what you will or won't have available to you on a client system, so I strongly prefer to have a virtual machine where I can't assume anything and will need to install packages on an as needed basis. This will allow you to troubleshoot and be ready for issues you may face on a client system.
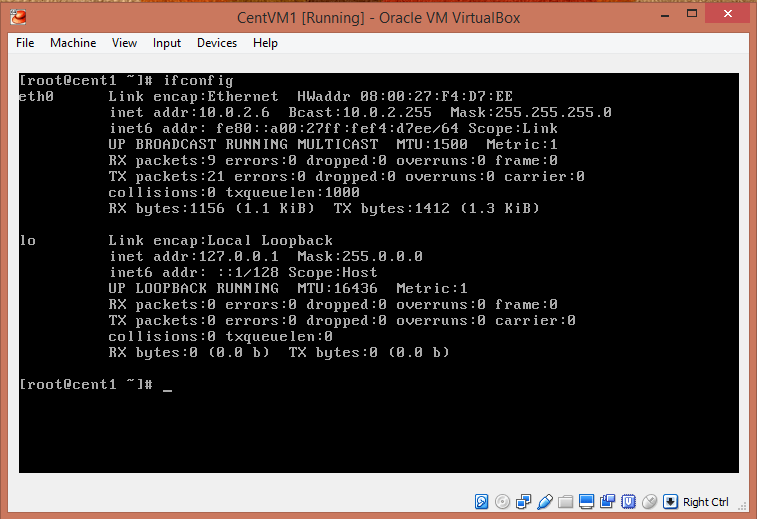
The only other thing to note is that during the installation I selected to use the hostname cent1.localhost. Once the installation is complete we are going to have to use the virtualbox virtual machine terminal until we have connectivity established. We can start by setting up networking. You'll notice that if you run 'ifconfig' there isn't any network controllers enabled beyond the virtual machine's loopback (127.0.0.1). Let's enable the controller by editing it’s config file. You can edit the file with vi by using the following command: > vi /etc/sysconfig/network-scripts/ifcfg-eth0 You will want the file to contain the following:
DEVICE="eth0" #this is the default, do not change
HWADDR="08:00:27:F6:B3:84" #this is going to be the mac address of the VM's network interface, do not change
NM_CONTROLLED="yes" #this is the default, do not change
ONBOOT="yes" #set to yes. This is what sets the network interface to start at boot
BOOTPROTO="none" #Since we are using a static IP, we don't want any boot networking protocol like dhcp or bootp to run
IPADDR=10.0.2.6 #The IP address of your virtual machine. I typically start my first machine with 6 and then move up from there. This is a matter of personal preference
NETMASK=255.255.255.0 #This netmask matches the /24 subnet notation we set for the Nat Network earlier
GATEWAY=10.0.2.2 #As stated earlier, VirtualBow reserves the .2 IP in the subnet for gateway
DNS1=8.8.8.8 #The DNS server you want to use. Personal preference.

Once you're done modifying the configuration file for adapter eth0, you will want to restart networking with the following command: > /etc/init.d/network restart You should now see your static IP when running ifconfig and should be able to ping out.
Snapshots
At this point the machine is able to perform its basic functions. Note that you can't SSH to the server yet, we'll get to that. This is where you will want to put any finishing touches on the virtual machine and create your first snapshot. Before creating my first snapshot I will typically take the following steps.- Stop iptables and remove it entirely from chkconfig so it doesn't start at boot. This is the linux software firewall and hasn't been needed for any work I've ever had to do in a lab. This is typically one of the big things that throws people off when they're trying to establish inbound connectivity for the first time so I recommend disabling it.
- Disable SELINUX.
- Update the OS by running yum update.
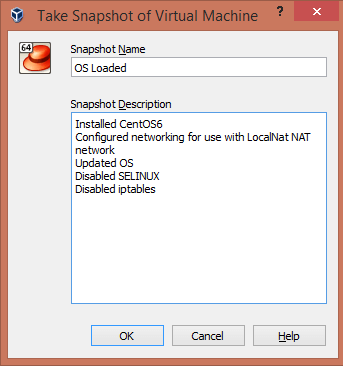
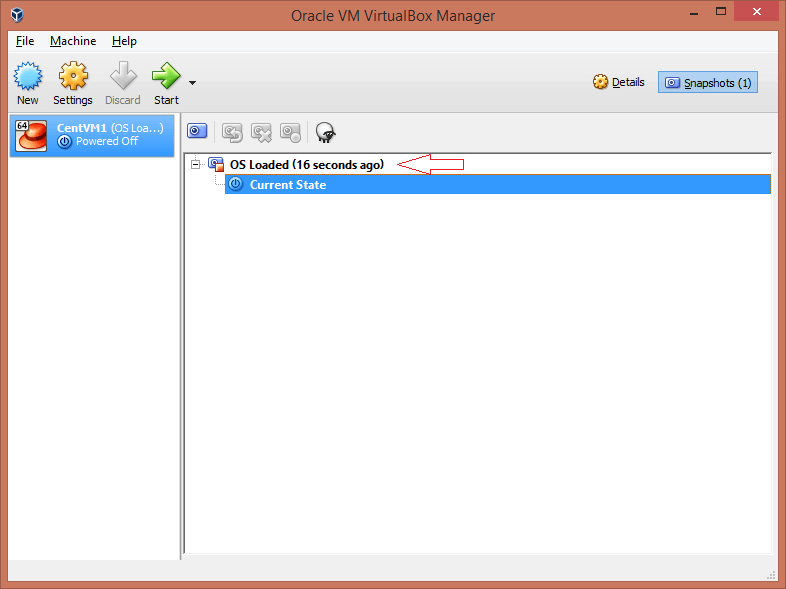
Note that I did not install MySQL. The reason for this is I want a snapshot of just the operating system load and nothing else. I utilize snapshots a lot to quickly spin up different types of working environments and I find it's easier to restore an OS load to create a new environment then to deal with uninstalling and reinstalling packages. For example. If I have an Oracle MySQL 5.6 VM installed and I want to switch to Percona 5.6, I would stop the VM, take a snapshot of my Oracle load for future reference, restore the OS Load snapshot, start the VM, and now I have a freshly installed CentOS VM where I can install Percona 5.6 and then create a new snapshot for it. This way if I ever need to use Oracle or Percona I can just load the appropriate snapshot and start the VM. No need to have more than 1 VM unless you're emulating a replication or clustering environment. So now that we have our first VM configured. Let's shut it down and snapshot it. Shutdown your VM using the following command. > shutdown -h now Once shut down, go back to the VM VirtualBox Manager. Click on your VM and then click on snapshots.

Right now the only thing that you should see is the current state. No other states have been saved at this point, so create a new snapshot by clicking the menu icon that looks like a camera. This will take you to the option to create a snapshot of your virtual machine. When naming your snapshot and creating the snapshot description BE DESCRIPTIVE . You are going to want to know what is the state of the snapshot without having to load it. Once done, click ok and you will see that the new snapshot is created.
Setting up port forwarding
The last thing you need to do for this VM is make it accessible. You'll notice that if you try to SSH to the machine at 10.0.2.6 you're not going to get very far. The reason for this is because that IP is sitting behind a NAT network, just like your machine does if you are using a router between yourself and your ISP. If your local machine on your local network is 192.168.1.20, no one outside your network is going to be able to ping your machine from the internet, they would have to connect to you using your public facing IP address with a port that you have designated to forward from your router to your local machine. Remember how we mentioned NAT Network port forwarding earlier? We're going to configure that now. Click on File -> Preferences -> Network (on the left menu bar), select your NAT network (LocalNat) and click the screwdriver icon to the right to edit like we did before when confirming the networking settings for the NAT network. This will bring you back to the NAT networking details window, click on the 'port forwarding' button. You'll need to setup a rule to forward a port on your local machine to the port of your virtual machine. In this example we're going to setup an SSH port forward. We'll use the following options... Name: CentVM1SSH Protocol: TCP Host IP: <blank> Host Port: 61022 Guest IP: 10.0.2.6 Guest Port: 22
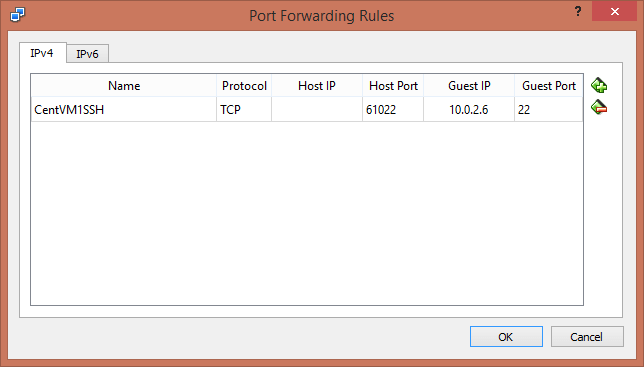
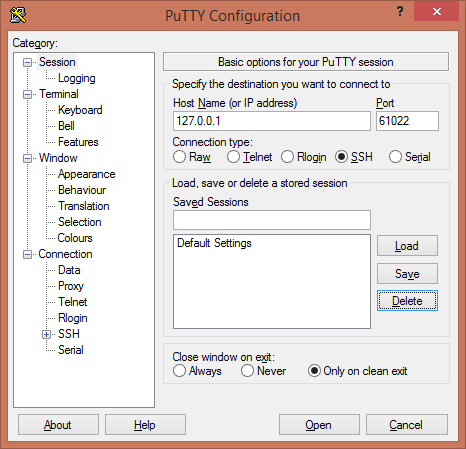
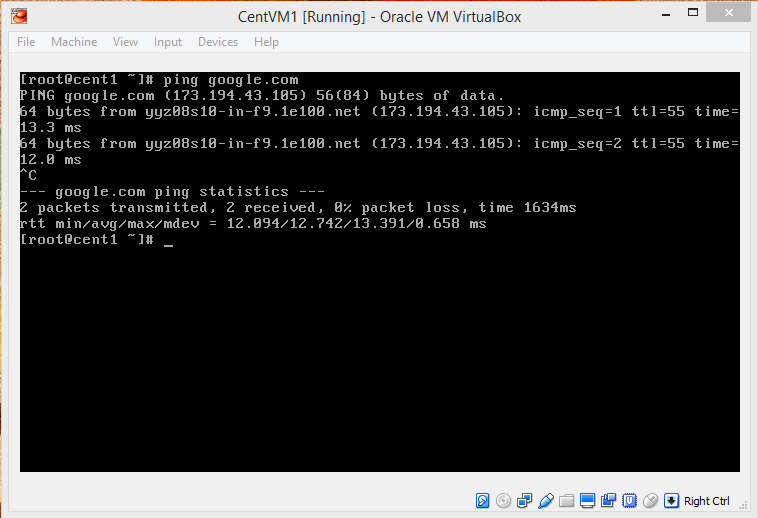
What we have done is created a port forwarding rule called 'CentVM1SSH' that has stated that any inbound connectivity on port 61022 on your local machine should be forwarded to port 22 on the virtual machine we just created. Now we should be able to SSH from our local machine to our VM using 127.0.0.1:61022. Don't forget to turn your virtual machine back on before you try this! Also, be sure that you have clicked okay on all preferences windows and are back to the VirtualBox VM Manager before attempting as new networking port forward rules will not be applied until you have done so.
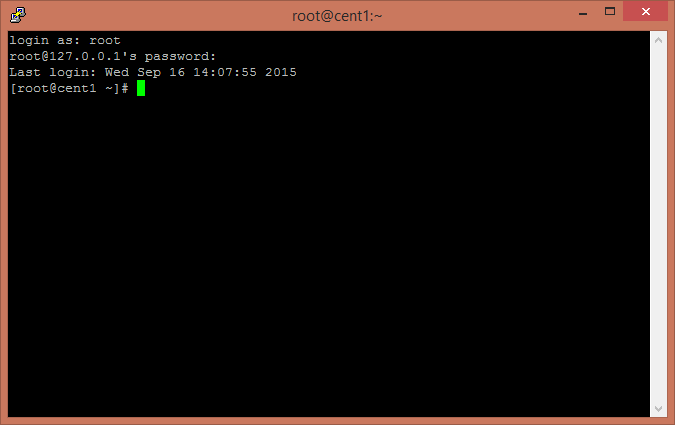
Cool! As you can see from the example images above we can SSH directly to our VM using the ports we have forwarded. Having 1 virtual machine is nice, but it's not going to be enough. How often do you see single server solutions? We need another! However, I don't want to go through all that configuration again, so let's just clone this virtual machine. Make sure your first virtual machine is shut down and then follow these steps.
Cloning your virtual machine
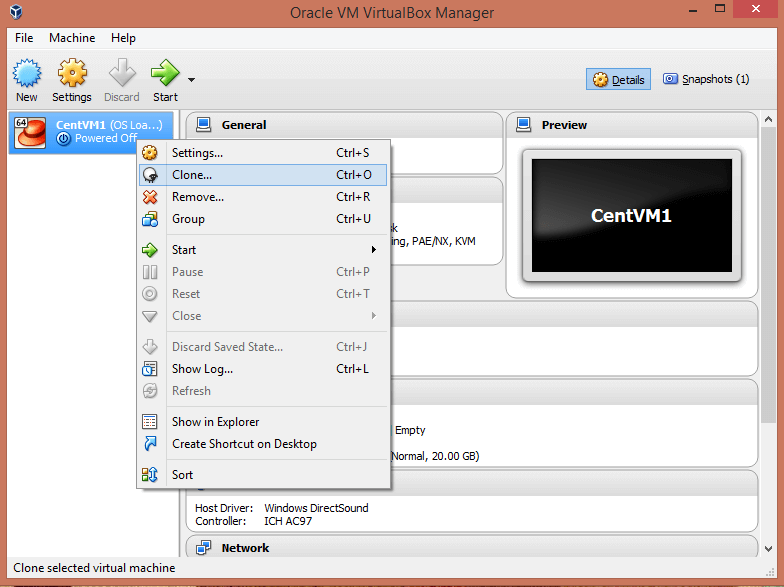
In the VM VirtualBox Manager, right click on your first virtual machine and click on clone.
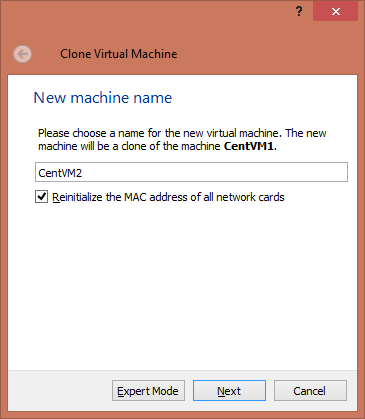
This will bring up the 'Clone Virtual Machine' window. Enter the name for your second virtual machine (CentVM2), MAKE SURE 'Reinitialize the MAC address of all network cards' IS CHECKED and then click next. If you do not reinitialize the MAC address, it means that the network card on your new virtual machine will have the same MAC address as the first one. This is bad.
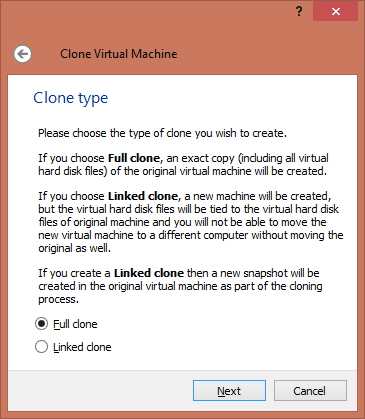
The next options will be to either create a full clone or a linked clone. A linked clone is like a snapshot. I prefer to go with full clones so long as I have the disk space to support them.
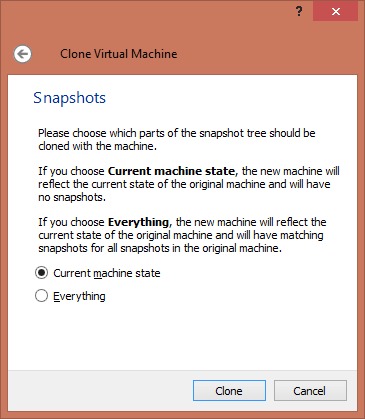
The next option will ask if you want the a clone of the machine in just it's current state, or everything including the existing snapshots. I would suggest cloning the machine in it's current state. We are going to have to update some networking settings on the new virtual machine and create a new OS load snapshot for it later.
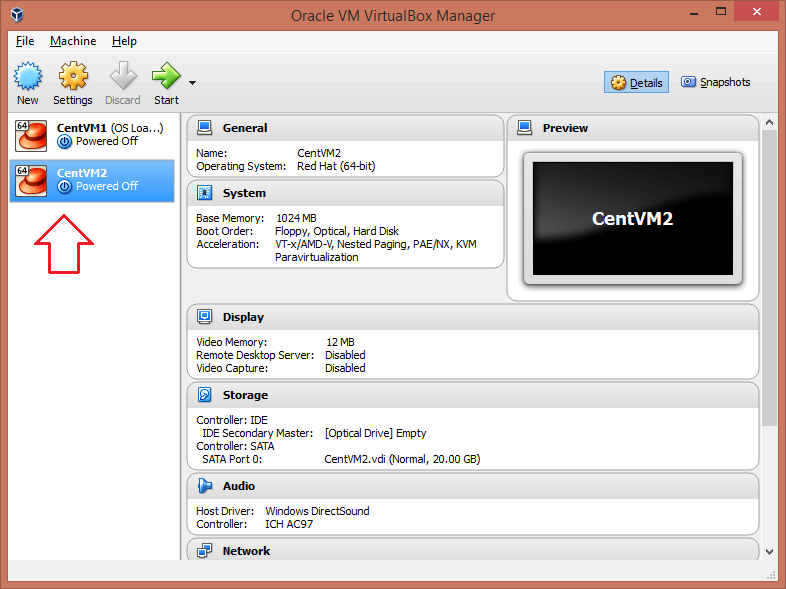
After you click on the clone button, you'll see a progress bar come up. On average the cloning process of a small VM with just an OS load typically takes about 5 minutes. Once it's done you will see that you have 2 virtual machines at your disposal. However there are going to be some issues with the second virtual machine that we will need to fix. Specifically it has the hostname, IP, and MAC address of the first virtual machine in it's configuration files. Let's fix that!
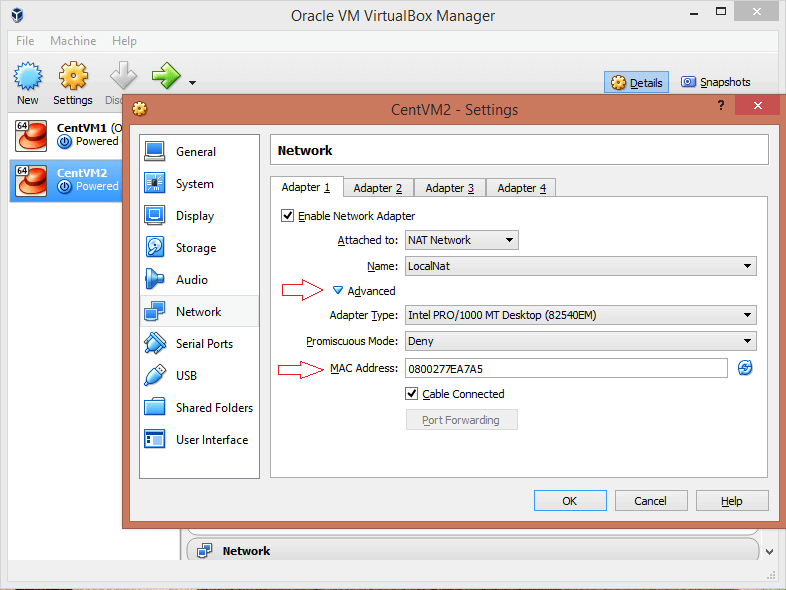
First, we need to know what the MAC address of the new virtual machine is. We can get that by right clicking on the second virtual machine, click on settings and then select network from the menu on the left. Drop down the advanced options and note the MAC address.
Go back to the VM VirtualBox Manager and start up your second virtual machine. You will want to edit the following files.... /etc/sysconfig/network Change the 'HOSTNAME' entry to whatever you would like your new virtual machine host name to be. /etc/sysconfig/network-scripts/ifcfg-eth0 Change the 'HWADDR' entry to the MAC address that was reinitialized for this virtual machine. This is the MAC address you noted earlier. Change the 'IPADDR' entry to the IP address you would like for this machine. /etc/udev/rules.d/70-persistent-net.rules Delete everything that comes below the comments at the top of the file. This file is used to store information to tie network adapters to their MAC addresses and will be repopulated on the next reboot. One this is done, reboot your virtual machine. The following is output that shows what the contents look like on my second virtual machine after it was rebooted.
[root@cent2 ~]# cat /etc/sysconfig/network
NETWORKING=yes
HOSTNAME=cent2.localhost
[root@cent2 ~]# cat /etc/sysconfig/network-scripts/ifcfg-eth0
DEVICE="eth0"
HWADDR="08:00:27:7E:A7:A5"
NM_CONTROLLED="yes"
ONBOOT="yes"
BOOTPROTO="none"
IPADDR=10.0.2.7
NETMASK=255.255.255.0
GATEWAY=10.0.2.2
DNS1=8.8.8.8
[root@cent2 ~]# cat /etc/udev/rules.d/70-persistent-net.rules
# This file was automatically generated by the /lib/udev/write_net_rules
# program, run by the persistent-net-generator.rules rules file.
#
# You can modify it, as long as you keep each rule on a single
# line, and change only the value of the NAME= key. #Delete below this line before reboot
# PCI device 0x8086:0x100e (e1000) (custom name provided by external tool)
SUBSYSTEM=="net", ACTION=="add", DRIVERS=="?*", ATTR{address}=="08:00:27:7e:a7:a5", ATTR{type}=="1", KERNEL=="eth*", NAME="eth0"
At this point you're good to go. Shut down your second virtual machine. Take an OS load snapshot of it and you're all set. You can power on both virtual machines and they should be able to communicate with one another with no additional configuration. Don't forget to set up another port forward so you can SSH directly to your second virtual machine, and additional ports as needed to connect to services like MySQL. This virtual machine setup is as compact as you would like it to be, while being effective and will remain available to you so long as you can power your machine on. Enjoy! Oh, and also, everything written in this tutorial was tested using virtual machines. Good day! Discover more about Pythian and our technical expertise.
Managed IT Consulting Services
Are you ready to save up to 60% in operational costs?