Comparing Pgpool-II and PgBouncer
Setup
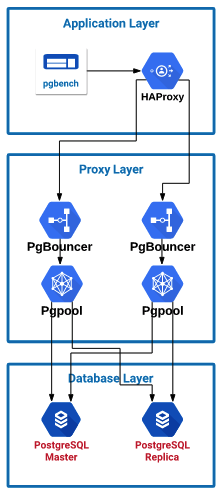
I set up a number of servers to simulate a typical environment, with different layers of infrastructure. I was still limited by the amount of resources I had within my Google Cloud environment which was 24 CPUs total between all instances.- Application server with HAProxy to split traffic to the proxy layer: 4 CPU / 3.6 GB Memory (CentOS 7)
- Two proxy layer servers for Pgpool or PgBouncer to be installed: 4 CPU / 3.6 GB Memory (CentOS 7)
- Two database layer servers with PostgreSQL 10.6: 4 CPU / 15 GB Memory (PostgreSQL configure Shared Buffer was increased to 4GB) (CentOS 7)
PostgreSQL Setup
To build the PostgreSQL 10 servers, I used a previous method to set up and install the database servers using this blog ( https://blog.pythian.com/set-up-repmgr-witness-postgresql-10/). It is a four-server setup that contains a master, two replicas, and a witness using Repmgr to handle replication and failover. Once the servers were set up I had to power down the second replica and the witness server in order to have enough CPUs for the other servers due to my CPU limit within Google Cloud. I then increased the shared_buffers to 4096 MB and increased work_mem to 64MB for better performance of the PostgreSQL server. You can find more information here: https://www.postgresql.org/docs/10/runtime-config-resource.html. Now I have a master and a replica to handle the incoming traffic and to do read/write splitting across my PostgreSQL servers for scaling my read traffic. From the configuration within that blog, I also added the proxy layer servers to my pg_hba file to allow database traffic into the servers. Using trust should only be done in testing solutions. You should use md5 and passwords in a production environmenthost repmgr repmgr 10.128.0.12/32 trust host repmgr repmgr 10.128.0.13/32 trust
Pgpool-II-10 Setup
For Pgpool, I first installed the PostgreSQL yum repository and then installed the Pgpool packages from that repository. Pgpool comes with some preconfigured config files and I configured Pgpool with the master/slave configuration and customized it to my setup. This way Pgpool could detect who the master server is and route write traffic to it accordingly. 1) Install PostgreSQL yum repo for PostgreSQL 10:2) Copy the master-slave default config as our primary configuration:yum install -y https://download.postgresql.org/pub/repos/yum/reporpms/EL-7-x86_64/pgdg-redhat-repo-latest.noarch.rpm yum install -y pgpool-II-10.x86_64
3) Modified the configuration file with my setup. I made sure to update the pid file path, as the default one does not work. Find the settings in the default file and update them according to your setup.:cd /etc/pgpool-II-10 cp pgpool.conf.sample-master-slave pgpool.conf
4) Copy the default PCP config file for Pgpool administration:listen_addresses = '*' pid_file_name = '/var/run/pgpool-II-10/pgpool.pid' master_slave_sub_mode = 'stream' pool_passwd = '' sr_check_period = 1 sr_check_user = 'repmgr' sr_check_password = 'repmgr' sr_check_database = 'repmgr' backend_hostname0 = 'psql-1' backend_port0 = 5432 backend_weight0 = 1 backend_data_directory0 = '/var/lib/pgsql/10/data/' backend_flag0 = 'ALLOW_TO_FAILOVER' backend_hostname1 = 'psql-2' backend_port1 = 5432 backend_weight1 = 1 backend_data_directory1 = '/var/lib/pgsql/10/data/' backend_flag1 = 'ALLOW_TO_FAILOVER'
5) Create MD5 key of the admin password:cp pcp.conf.sample pcp.conf
6) Update the pcp.conf file with the username and password of the PCP Admin account:pg_md5 pgpool_pass
7) Create a password file for easy execution of the Pgpool admin commands:pgpool_admin:af723b95947acb96f8690932fd2d8926
8) Enable and start the Pgpool service:touch ~/.pcppass chmod 600 ~/.pcppass vim ~/.pcppass *:*:pgpool_admin:pgpool_pass
9) Example of running a pcp command and checking the status of node 0:systemctl enable pgpool-II-10 systemctl start pgpool-II-10 systemctl status pgpool-II-10
pcp_node_info -U pgpool_admin -w 0
 psql-1 5432 1 0.333333 waiting master 0 1970-01-01 00:00:00
PgBouncer Setup
I installed PgBouncer the same way as I did Pgpool, by using the PostgreSQL 10 repository. I then configured it two different ways. For the first configuration, I pointed the first PgBouncer server to the master node, and the second PgBouncer to the slave to test it without Pgpool involved. With that type of setup, the application would have to be configured to send traffic to the correct location. Since I am only dealing with read traffic and am more interested in performance testing, I am not worrying about the routing of read/write traffic and will only be sending read traffic. For the second round of testing, I configured PgBouncer to point to Pgpool on the same server. Pgpool then sends the traffic to the database servers. 1) Install PgBouncer:2) Edit the pgbouncer configuration at /etc/pgbouncer/pgbouncer.ini to add the database to send traffic to:yum install -y pgbouncer
3) Create a new userlist at /etc/pgbouncer/userlist.txt that will contain a list of users that are allowed to use PgBouncer. Since I am using trust I do not have a password configured:[databases] repmgr = host=psql-1 dbname=repmgr # Used when testing without Pgpool repmgr = host=127.0.0.1 port=9999 dbname=repmgr # Used when testing with Pgpool [pgbouncer] listen_addr = *
4) Enable and start the service:"repmgr" ""
systemctl enable pgbouncer
 systemctl start pgbouncer
Application Server Setup
To get pgbench installed on the application server, I installed the PostgreSQL 10 client from the PostgreSQL yum repository. Next, to split the traffic across the proxy layer, I installed HAProxy and configured it to send traffic across the two servers. To redirect traffic from Pgpool and PgBouncer, I would just update the port in the HAProxy configuration and reload the configuration. 1) Install PostgreSQL client and HAProxy:2) Configure HAProxy in /etc/haproxy/haproxy.cfg:yum install -y https://download.postgresql.org/pub/repos/yum/reporpms/EL-7-x86_64/pgdg-redhat-repo-latest.noarch.rpm yum install -y postgresql10 haproxy
3) Enable and start HAProxy:frontend pg_pool_cluster bind *:54321 acl d1 dst_port 54321 use_backend pgpool if d1 default_backend pgpool backend pgpool mode tcp balance roundrobin option tcp-check option log-health-checks server pgpool-1 10.128.0.13:9999 inter 1000 fall 2 rise 1 check port 9999 server pgpool-2 10.128.0.14:9999 inter 1000 fall 5 rise 1 check port 9999
I then used the following command with pgbench to initialize the testing database on my primary PostgreSQL server:systemctl enable haproxy systemctl start haproxy
These are the pgbench commands I used to hit the local HAProxy server and change the number of connections going in:pgbench repmgr -h psql-1 -U repmgr -i -s 50 pgpooltest
pgbench repmgr -U repmgr -h 127.0.0.1 -p54321 -P 5 -S -T 30 -c 100 pgpooltest
Pgpool Testing
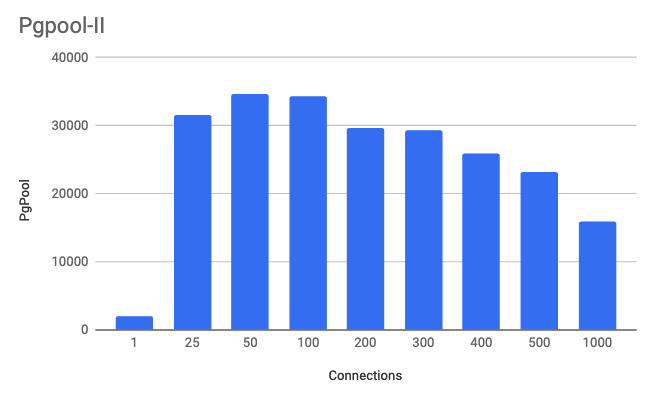
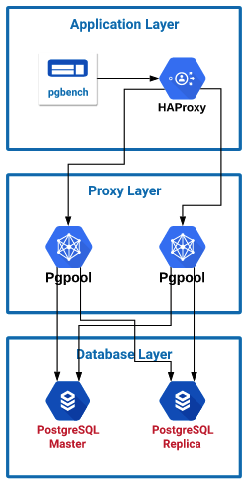
In the first setup, I configured pgbench to send traffic to the local HAProxy server which then split the traffic across the two Pgpool servers. Pgpool is then configured to load balance the traffic across the two PostgreSQL servers. Because Pgpool can detect the master and slaves, it can automatically route traffic writes to the master and read traffic to both servers. Having more than one Pgpool server helped increase the throughput as the connections started to increase. When starting the Pgpool server I noticed in the process list that it created a new process for each potential connection that could come in. I believe this could be part of the reason that the performance drops as you increase the number of connections. The key to note on this graph is that I was hitting my peak performance around 50 to 100 connections. I will use this information in my final setup. On average I was seeing around a 30-40% CPU utilization because of the proxy part of Pgpool analyzing the queries. I tried turning on local memory query caching within Pgpool and with my workload it only hurt performance instead of improving it.Connections are total connections across both servers. Transactions are read only per second.
 .
.
PgBouncer Testing
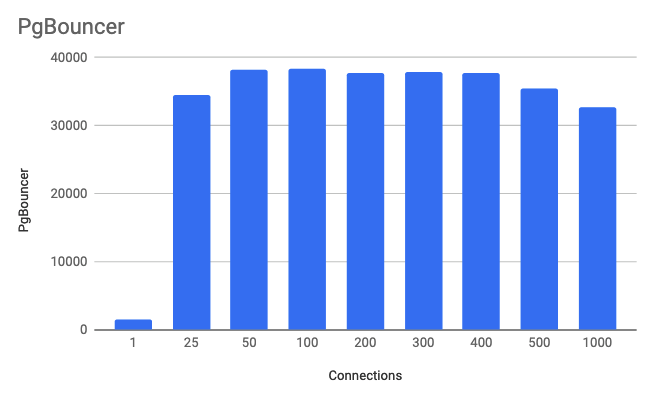
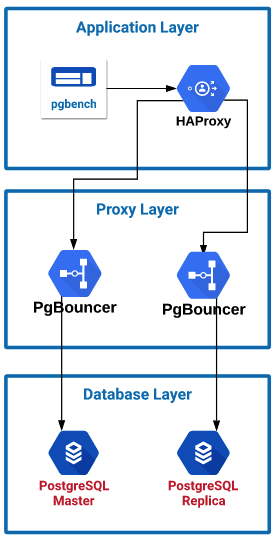
In the second setup, I configured pgbench to send traffic to the local HAProxy server which then split the traffic across the two PgBouncer servers. PgBouncer, as stated previously, is not a proxy; it is strictly a connection pool manager. Because of this we have to configure each PgBouncer server to point to a single PostgreSQL instance. HAProxy allows me to split the read traffic across the two PgBouncer servers, which then sends the traffic to the two PostgreSQL servers. PgBouncer server 1 sends traffic to the PostgreSQL master, and PgBouncer server sends traffic to the PosgreSQL replica. In a production setup, your application would have to have the ability to send read traffic to one location and write traffic to another in order to utilize PgBouncer to split read and write traffic. On average, the PgBouncer servers only utilized had 3% CPU utilization. This was because PgBouncer doesn't have a proxy and is not analyzing the queries passing through it.Connections are total connections across both servers. Transactions are read only per second.
PgBouncer --> Pgpool Testing
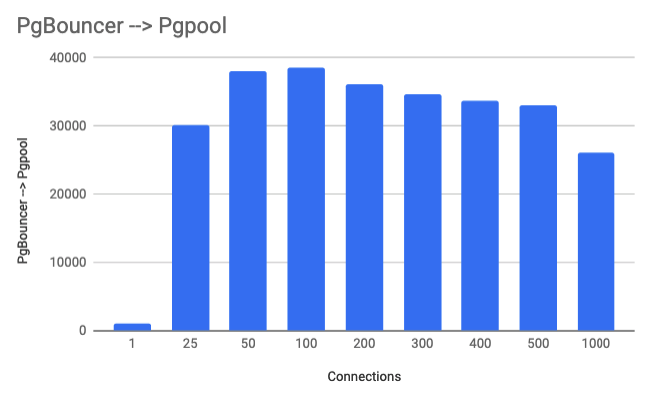
In my final setup, I noticed that Pgpool didn't handle connections too well and after you went over 100 connections, performance started to be impacted. So I set up a connection limit in PGpool to 100. This way, Pgpool will not degrade in performance with more than 100 connections. Then I placed PGBouncer in front of Pgpool and placed a connection limit within PgBouncer to around 2000 connections so that connections pour into PgBouncer and PgBouncer will manage the connections and queue queries as needed. This way, with a large number of connections coming in, PgBouncer will keep the level of traffic going into Pgpool at its optimal level of 100 connections. I saw an average of around 30% utilization on the proxy layer servers.Connections are total connections across both servers. Transactions are read only per second.
Comparing Results
By utilizing PgBouncer to ensure that Pgpool is getting the optimal amount of connections, we can see that we have significantly improved the performance of Pgpool with a higher number of connections. Going from around 15k transactions/sec at 1000 total connections (500 per server), to ~25k transactions/sec at the same number of connections just by placing PgBouncer in front of it and ensuring that only the optimal number of connections go into Pgpool.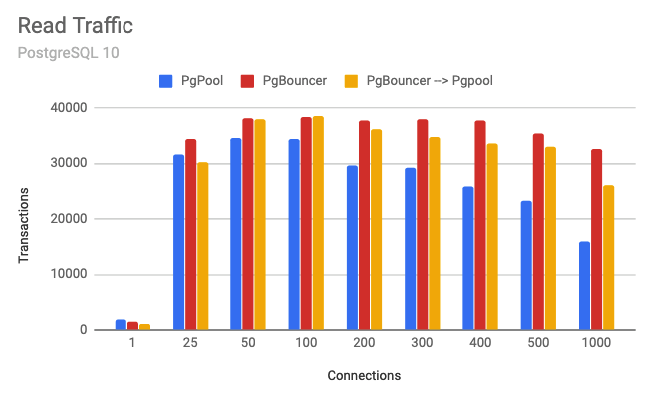
Key Takeaways
- PgBouncer does not inspect queries and does a beautiful job at managing connections, keeping for very low CPU utilization.
- If not using Pgpool, then read-write splitting needs to be done by the application. Peak performance is achieved without Pgpool inspecting the traffic, but requires more work in order to split the traffic at the application, and then setting up other methods to route the traffic.
- Pgpool doesn't manage connections too well as it spawns a new process for each connection on service start. But combined with PgBouncer, it can sustain better performance.
- Pgpool is a proxy and analyzes the queries, and can route traffic accordingly. It can also detect who the master is in a replication setup and redirect write traffic automatically. This work causes higher CPU utilization on the servers.
- Pgpool drops in performance with a higher number of connections. With four CPUs, 100 connections per server was around the max before performance started dropping.
- Pgpool, with over 25 connections, had a performance improvement by adding PgBouncer in front of it. If you need more than 100 connections on each PgPool server, then PgBouncer is a "must have".
- If you are using Pgpool, it only makes sense to use PgBouncer with it.
On this page
Share this
Share this
More resources
Learn more about Pythian by reading the following blogs and articles.
Airflow Scheduler: the very basics
![]()
Airflow Scheduler: the very basics
Jul 5, 2018 12:00:00 AM
4
min read
Disable Lock Escalation in SQL Server
![]()
Disable Lock Escalation in SQL Server
Apr 10, 2015 12:00:00 AM
1
min read
Orchestrating dbt Pipelines With Google Cloud: Part 1


Orchestrating dbt Pipelines With Google Cloud: Part 1
Nov 18, 2021 12:00:00 AM
8
min read
Ready to unlock value from your data?
With Pythian, you can accomplish your data transformation goals and more.
