Context
AWS RDS (fully managed relational database service) for MySQL is becoming increasingly popular, and so are the migration headaches when you have a very large database. I recently worked on a project to migrate a 2 TB MySQL 8 database to AWS RDS and wanted to share some details on how to do it using MySQL Shell.
There are several migration options, like AWS DMS, xtrabackup, mydumper/myloader, or even mysqldump. However, the new MySQL Shell tool offers many advantages.
MySQL Shell is an interactive Javascript, Python, or SQL interface supporting development and administration for MySQL Server and is a component of MySQL Server. You can use MySQL Shell to perform data queries, updates, and administration operations. It has several backup-related utilities for dumping instance, dumping schemas or tables. The full list and options can be found here.
Let’s start by listing the steps for a successful MySQL on-prem migration to RDS.
Evaluation
Initially, you need to evaluate the RDS instance type and size compared to your on-prem instance (RAM, CPU, disk, network). You’ll need to decide the best match to your current server, but even if you go with a lower/larger size, you can modify the instance later.
As a second step, you need to create a custom parameter group and update all modifiable settings to match your my.cnf file as closely as possible. Make sure to enable log_bin_trust_function_creators if you have stored procedures for importing. Select the same parameter group template to copy the defaults based on the MySQL version you are migrating from. Create different parameter groups based on your topology (read-only replica, reporting, backups replica, etc.) This will allow customization and tuning per environment.
The next step is to create a new empty RDS instance, choosing the custom parameter group. For this step, I suggest opting out of using multi-AZ initially, as that will slow down the import process to copy the data on two separate instances. You can always change the instance to multi-AZ once your data has been loaded.
Configuration
Some settings that might be of interest to you while configuring the RDS instance:
- DB engine version - select the same minor version as on-prem
- For the admin user - set a strong custom password
- Storage type - match your on-prem IOPS and select storage autoscaling; you can set an upper limit for storage growth
- Monitoring - Performance Insights On with seven days retention period; For Enhanced Monitoring, you might have to pay an extra monthly fee depending on the amount of storage used for the Cloud logs
- For database options - DB parameter group: select your custom already configured parameter group
- For backup - default seven days free tier; Extra backup retention will be charged additionally
- For maintenance, disable the auto minor version upgrade and select the maintenance window for any other regular maintenance (like Monday at 3 AM)
- Optionally check Deletion protection to not accidentally delete the instance
- Uncheck publicly available to prevent your instance from being exposed on the internet
When you have your RDS instance ready, you can take a logical backup using MySql Shell and import it into RDS. One command that can be used to do the instance dump is as shown below (Note: you can always use {dryRun: true} to check the actual list of commands and order of execution prior to running the actual command):
backup_dir="/mysql_backup"

mysqlsh -h localhost -u “username” -p”password” --js <<EOF

util.dumpInstance('${backup_dir}',

{ bytesPerChunk: '128M',

threads: 16,

users: false,

compatibility: ['strip_definers'] })

EOF
Solution
As mentioned above, you can explore all the options in the official documentation. While the variables are self-explanatory, threads:16 are based on the available threads on the instance where we take the backup. Running 64 on an instance with 16 threads will not help. That many threads will be used in parallel for the logical backup. bytesPerChunk allows you to chunk the tables into multiple files.
Users:false is explicitly set to not dump the users as RDS will not allow you to create users with SUPER, SYSTEM_VARIABLES_ADMIN, and some other privileges during the restore. We cover the user migration below in the steps. If you have other plugins for users and authentication, be sure first to install those on RDS (if supported) and then do the migration. It would be nice if MySQL Shell had a flag {aws_rds : 1 or cloud: aws_rds|cloudsql etc} so most things would be dumped in the proper format. I have not explored the MySQL s=Shell capabilities for migrating users; I’m sure there is more. Among the other files, there is @.json, which contains the binary log file and position, which we will use later in the steps.
compatibility: ['strip_definers'] Remove the DEFINER clause from views, routines, events, and triggers so these objects are created with the default definer.
In your next step, you must update the VPC rules to allow connectivity between your on-prem and RDS. Don’t create the RDS instance publicly available as you expose your internet data.
Load the backup taken with MySQL Shell to the RDS instance. Use appropriate threads as per instance configuration. A sample command can be used as below:
mysqlsh -h rds-endpoint.rds.amazonaws.com -u'username' -p'password ' --js <<EOF

util.loadDump('${backup_dir}',

{ threads: 16,

skipBinlog: true,

deferTableIndexes: 'all',

handleGrantErrors: ignore,

loadUsers: false})

EOF
Some of the variables used above: deferTableIndexes: all will only create the Primary index and all secondary indexes once the data is loaded (for faster import), skipBinlog skips binary logging on the target during import, handleGrantErrors ignores errors in case of GRANT or REVOKE statements (if users are being migrated). The full list of the load utilities options can be found here.
As a good practice, I’d recommend taking an immediate snapshot of the RDS instance after a successful import. This will allow a restore to the beginning state if needed at a later stage. You might break things by accident, so it’s good to be able to restore the snapshot and not have to do another backup/import using the shell. Your store procedures and functions will be migrated, as well as triggers.
If you notice in the restore command above, we decided not to load the users, so we can use pt-show-grants to export the users from on-prem and load them in RDS. pt-show-grants will generate a file that can be edited manually and remove all privileges that RDS does not allow. Some scripts on this can be found online.
Configuration
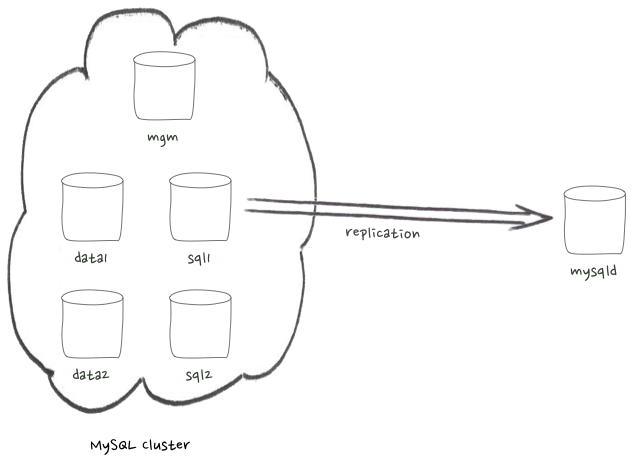
With everything migrated, it’s time to configure the RDS instance as a replica of your on-prem instance. For this, you probably know that you need to have the on-prem running as Primary (binary log enabled etc.) Create a replication user if not already there and get the binary log file and position to run the CHANGE MASTER command. Your binary log file and position will be in the file @.json in the backups directory.
Unfortunately, RDS does not support SET GTID_PURGED at this time, so if you have GTID enabled and the server already rotated the binary logs (which is probably the case), you have to go with the binary log file and position. You might get an error similar to the one below:
Got fatal error 1236 from master when reading data from binary log: 'Cannot replicate because the master purged required binary logs. Replicate the missing transactions from elsewhere, or provision a new slave from backup. Consider increasing the master's binary log expiration period. The GTID sets and the missing purged transactions are too long to print in this message. For more information, please see the master's error log or the manual for GTID_SUBTRACT'
This is not that critical as you are probably using this replication chain until you failover the Apps and switch to RDS. To be able to use GTID-based replication with auto position, you might need to configure a dedicated on-prem replica where you can reset the master before taking the backup and extend the binlogs retention.
After you configure replication, if it’s lagging behind, you can set parallel replication or tune some other variables until it’s completely in sync.
The last step is to decide on a cutover window and point your apps to RDS. RDS can also be set in front of a proxy so your Apps will not have to change the connection string on failovers or to promote a replica.
Conclusion
MySQL Shell is a great improvement for taking logical backups with multi-threading. Previously, this was only possible with tools like mydumper, but now we can confidently migrate multi-terabyte database systems even between major version differences.
Migrating to RDS can be done in one business day, including backup and restore. Once on RDS, your backups, recovery, scaling, and patching will be automated, allowing you more time for other day-to-day DBA activities.
MySQL Database Consulting
Looking to optimize your MySQL use?
Share this
Share this

How to Promote a Google Cloud Replica from an External MySQL Primary
Using mysqld_multi to Manage Multiple Servers