Editor’s Note: Because our bloggers have lots of useful tips, every now and then we bring forward a popular post from the past. We originally published today’s post on December 12, 2019.
This is the first of a series of blog posts related to Elastic Stack and the components around it. This first one covers how to install Elasticsearch using Ansible. The final objective is to deploy and secure a production-ready environment using these freely available tools.
Elasticsearch is, without any doubt, a very powerful tool that allows us to store a great quantity of data in order to search very efficiently, but it does way more! Very often, due to the complexity of the stack, we struggle to give it a try in order to install it. Even though the official installation documentation is available, it generally doesn’t include the use of a repeatable, quick and efficient process to do so. In order to overcome this issue, I propose to deploy the Elastic Stack using the vendor-provided Ansible tools.
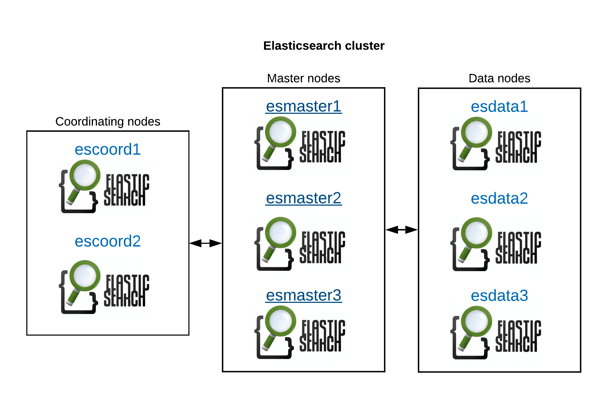
Architecture
For this stack, we’ll consider a basic architecture:
Deploying with Ansible
In order to deploy the Elastic Stack using Ansible, there is one official repository with the required Ansible playbook to do the work really fast and easily. Even though the README file is explicit and complete, very often we can get lost in the sea of different options and recommendations. If you want to just deploy a cluster with the following architecture, production-ready* follow this guide!
*Of course, “production-ready” can mean so many different things depending on the person and the situation, can’t it? ;)
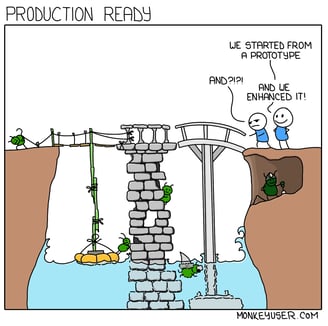
“Production Ready” on MonkeyUser.Com. Permission to use the image at https://www.monkeyuser.com/about/index.html
To begin with, it’s just a matter of installing a couple of components following these prerequisites:
- Have Ansible installed and working on a VM or instance that can reach all of your Elastic Stack cluster network components. (Ansible resources are here).
- Have access to your created VMs for the Elastic cluster you wish to install. (It is out of the scope of this blog post to go through sizing and other advanced considerations, although that is very good material for a further post in the future!)
We need to note that by using Ansible, it doesn’t matter what OS your VMs have. You can have Red Hat Enterprise Linux, CentOS, Ubuntu or any other servers. It really doesn’t matter!
Once you have the above requisites ready and Ansible configured and up and running, it’s just a matter of getting the repository accessible with the following command:
ansible-galaxy install elastic.elasticsearch,7.4.2
YAML config files
Then, you need to create a YAML inventory for your Elasticsearch nodes. (Please remember YAML is very picky when it comes to blank spaces!).
For this example, we’ll deploy three data, three masters and two coordinating nodes. We’ll call this file inventory.yml.
[hosts] esdata1 esdata2 esdata3 escoord1 escoord2 esmaster1 esmaster2 esmaster3 [data] esdata1 esdata2 esdata3 [masters] esmaster1 esmaster2 esmaster3 [coordinating] escoord1 escoord2
Then, we’ll create the elastic.yml file in order to have our cluster deployed. We’ll continue with the example above:
(Note: adjust the heap size on the three sections of the file to your RAM requirements!)
- hosts: masters roles: - role: elastic.elasticsearch vars: es_heap_size: "8g" es_config: cluster.name: "esprd" network.host: 0 cluster.initial_master_nodes: "esmaster1,esmaster2,esmaster3" discovery.seed_hosts: "esmaster1:9300,esmaster2:9300,esmaster3:9300" http.port: 9200 node.data: false node.master: true node.ingest: false node.ml: false cluster.remote.connect: false bootstrap.memory_lock: true - hosts: data roles: - role: elastic.elasticsearch vars: es_data_dirs: - "/var/lib/elasticsearch" es_heap_size: "30g" es_config: cluster.name: "esprd" network.host: 0 discovery.seed_hosts: "esmaster1:9300,esmaster2:9300,esmaster3:9300" http.port: 9200 node.data: true node.master: false node.ml: false bootstrap.memory_lock: true indices.recovery.max_bytes_per_sec: 100mb - hosts: coordinating roles: - role: elastic.elasticsearch vars: es_heap_size: "16g" es_config: cluster.name: "esprd" network.host: 0 discovery.seed_hosts: "esmaster1:9300,esmaster2:9300,esmaster3:9300" http.port: 9200 node.data: false node.master: false node.ingest: false node.ml: false cluster.remote.connect: false bootstrap.memory_lock: true
Execute!
Once we have our YAML definition, now it’s just a matter of executing the following command. Do it and watch the magic flow!
ansible-playbook elastic.yml -i inventory.yml
Review
After a few minutes, the above command should get us a nice Elasticsearch cluster up and running. We can verify its status like this:
$ curl -XGET 'https://esmaster1' { "name" : "esmaster1", "cluster_name" : "esprd", "cluster_uuid" : "ABC6pGHgRWGhooEjvIElkA", "version" : { "number" : "7.4.2", "build_flavor" : "default", "build_type" : "rpm", "build_hash" : "7a013de", "build_date" : "2019-12-07T14:04:00.380842Z", "build_snapshot" : false, "lucene_version" : "8.0.0", "minimum_wire_compatibility_version" : "6.8.0", "minimum_index_compatibility_version" : "6.0.0-beta1" }, "tagline" : "You Know, for Search" }
Furthermore, we can confirm cluster health as well:
$ curl -XGET 'https://esmaster1:9200/_cluster/health?pretty' { "cluster_name" : "esprd", "status" : "green", "timed_out" : false, "number_of_nodes" : 8, "number_of_data_nodes" : 3, "active_primary_shards" : 0, "active_shards" : 0, "relocating_shards" : 0, "initializing_shards" : 0, "unassigned_shards" : 0, "delayed_unassigned_shards" : 0, "number_of_pending_tasks" : 0, "number_of_in_flight_fetch" : 0, "task_max_waiting_in_queue_millis" : 0, "active_shards_percent_as_number" : 100.0 }
Final words
Sadly, one thing I find disturbing in this time and age is Elastic Stack’s default behavior. It’s always configured to have all of the messages exchanged between the components in the stack in plain text!
For now, that’s it, this is how we install Elasticsearch using Ansible. The next post explores the topic of securing your installation.
Managed IT Consulting Services
Are you ready to save up to 60% in operational costs?
Share this
Share this
How to Secure Your Elastic Stack (Plus Kibana, Logstash and Beats)

Expand Elastic Configuration on Oracle Exadata - Part 1