Welcome back to the 2nd part! Last time, we set up the tools that allowed managing the blog as a set of configuration and Markdown-formatted files stored in a source code repository. Now it's time to deploy the blog on GCP to allow the world to see it!
 Running the trigger manually[/caption] Navigate to "History" on the left side menu, you may see that the build runs for a while, and then fails: [caption id="attachment_106239" align="aligncenter" width="1301"]
 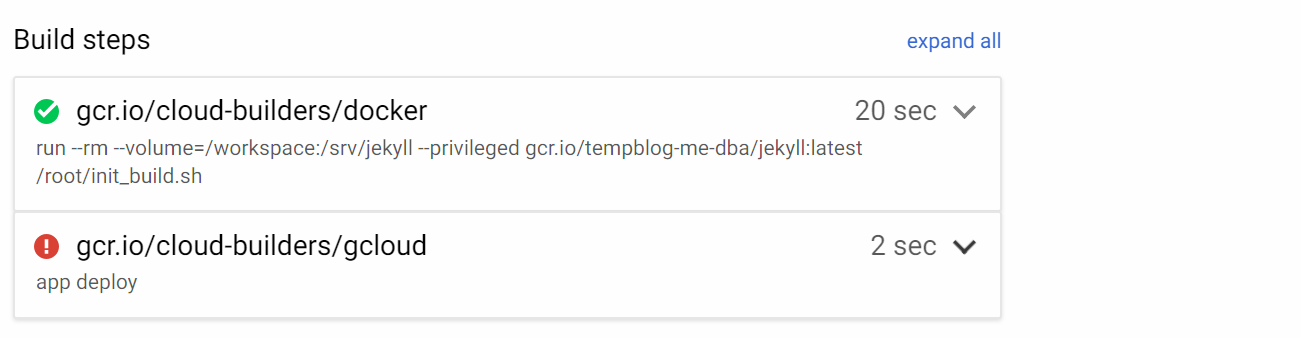 The app deployment step fails at this point[/caption] In my case, the first step succeeded (it should be the same for you too), but the second step failed. The log entries visible on the same page displayed the following entry:
 Adding the "App Engine Admin" role to the service account[/caption] Additionally, the "App Engine Admin API' needs to be enabled by navigating to "APIs & Services". It may require a minute or two for the new privileges to take effect. Navigate back to the "Cloud Build" -> "History", open the details of the failed run, and click on "Retry", to run the build again. This time the build should succeed.
Serverless Deployment
Going serverless made a lot of sense to me, especially because my blog is not very well-attended. The costs of these services are calculated only for the actual resource consumption. GCP App Engine also provides some resources under the Always Free program and based on my calculations, my resource usage would be low enough to be able to use the service free of charge. Another reason for using serverless technologies is the learning opportunity. There is a common trend to decompose large, monolithic applications into smaller pieces and move as much as possible to the serverless world, which allows simpler management of the individual functions. I wanted to learn a little about how it works in practice. Unfortunately, using GCP App Engine was too simple, so my learning goal was not really fulfilled.GCP App Engine
At this moment, we have our blog files stored locally in the_site directory. Fortunately, GCP App Engine allows deploying and serving them very easily, and as the site is built using only static files, everything is even more simple. In the root folder of our git repository we need to create a file app.yaml with the following content to tell how the deployment needs to be done:
$ cat app.yaml
 runtime: python27
 api_version: 1
 threadsafe: true

 handlers:
 - url: /
  static_files: _site/index.html
  upload: _site/index.html
  secure: always
  redirect_http_response_code: 301

 - url: /(.*)
  static_files: _site/\1
  upload: _site/(.*)
  secure: always
  redirect_http_response_code: 301
The file basically defines how each URL is handled by the application:
- when the root URL https://<domain>/ is accessed, the
_site/index.htmlwill be displayed - when any other URL https://<domain>/<path> is requested, it will serve the
_site/<path>file secure: alwaystells that the https protocol will always be usedredirect_http_response_code: 301means that whenever an HTTP request is made, it will be redirected to the corresponding HTTPS URL by using the HTTP 301 response.
$ git add app.yaml
 $ git commit -m "adding the App Engine deployment file"
 [master eeea76a] adding the App Engine deployment file
  1 file changed, 22 insertions(+)
  create mode 100644 app.yaml
 $ git push
 Counting objects: 3, done.
 Delta compression using up to 2 threads.
 Compressing objects: 100% (3/3), done.
 Writing objects: 100% (3/3), 451 bytes | 0 bytes/s, done.
 Total 3 (delta 1), reused 0 (delta 0)
 remote: Resolving deltas: 100% (1/1)
 To https://source.developers.google.com/p/tempblog-me-dba/r/tempblog-me-dba-repo
  c7e7fc4..eeea76a master -> master
And finally, the blog can be deployed. You'll have to choose the region to deploy the blog as part of this process.
$ gcloud app deploy
 You are creating an app for project [tempblog-me-dba].
 WARNING: Creating an App Engine application for a project is irreversible and the region
 cannot be changed. More information about regions is at
 <https://cloud.google.com/appengine/docs/locations>.

 Please choose the region where you want your App Engine application
 located:

  [1] asia-east2 (supports standard and flexible)
  [2] asia-northeast1 (supports standard and flexible)
  [3] asia-south1 (supports standard and flexible)
  [4] australia-southeast1 (supports standard and flexible)
  [5] europe-west (supports standard and flexible)
  [6] europe-west2 (supports standard and flexible)
  [7] europe-west3 (supports standard and flexible)
  [8] northamerica-northeast1 (supports standard and flexible)
  [9] southamerica-east1 (supports standard and flexible)
  [10] us-central (supports standard and flexible)
  [11] us-east1 (supports standard and flexible)
  [12] us-east4 (supports standard and flexible)
  [13] us-west2 (supports standard and flexible)
  [14] cancel
 Please enter your numeric choice: 10

 Creating App Engine application in project [tempblog-me-dba] and region [us-central]....done.
 Services to deploy:

 descriptor: [/home/vagrant/tempblog-me-dba-repo/app.yaml]
 source: [/home/vagrant/tempblog-me-dba-repo]
 target project: [tempblog-me-dba]
 target service: [default]
 target version: [20190122t031126]
 target url: [https://tempblog-me-dba.appspot.com]


 Do you want to continue (Y/n)? Y

 Beginning deployment of service [default]...
 ??????????????????????????????????????????????????????????????
 ?? Uploading 16 files to Google Cloud Storage ??
 ??????????????????????????????????????????????????????????????
 File upload done.
 Updating service [default]...done.
 Setting traffic split for service [default]...done.
 Deployed service [default] to [https://tempblog-me-dba.appspot.com]

 You can stream logs from the command line by running:
  $ gcloud app logs tail -s default

 To view your application in the web browser run:
  $ gcloud app browse
Using a Custom Domain Name
The default URL was definitely something that I didn't want to keep because it had the unappealing "appspot.com" part. Therefore, I obtained my own domain name (you can google something like " cheap domain registrars" to find a registrar suitable for you. It should be possible to get one for around $10/year). Once you have your own domain name, you will need to map it to the App Engine deployment by following the instructions in the Custom Domain documentation. You will need to access your domain registrar to add a few more records to the DNS configuration as part of this process:- A TXT record to validate the ownership of the domain.
- The IPv4 and IPv6 A and AAAA records that point the domain to the App Engine's IP addresses.
$ gcloud app ssl-certificates list --filter="DOMAIN_NAMES=tempblog.me-dba.com"
 ID DISPLAY_NAME DOMAIN_NAMES
 11030802 managed_certificate tempblog.me-dba.com
 $ gcloud app ssl-certificates describe 11030802
 certificateRawData:
  publicCertificate: |

  -----END CERTIFICATE-----
  -----BEGIN CERTIFICATE-----

  -----END CERTIFICATE-----
 displayName: managed_certificate
 domainMappingsCount: 1
 domainNames:
 - tempblog.me-dba.com
 expireTime: '2019-04-22T11:03:19Z'
 id: '11030802'
 managedCertificate:
  lastRenewalTime: '2019-01-22T12:03:21.890738152Z'
  status: OK
 name: apps/tempblog-me-dba/authorizedCertificates/11030802
 visibleDomainMappings:
 - apps/tempblog-me-dba/domainMappings/tempblog.me-dba.com
Once these steps are completed, the blog should be available on the new URL - https://tempblog.me-dba.com. It's easy to see that we can stop the configuration here, as the blog is published and everything is working. Deploying a new blog post would require the following steps:
- Write the new blogpost in Markdown and store the new file in _posts directory of the repository.
- Commit the changes and push to master (so they are not lost).
- Rebuild the static files to update them by using Jekyll build:
$ docker run --rm --publish 4000:4000 --volume="$PWD:/srv/jekyll" --privileged -it jekyll/jekyll:latest bash -c "JEKYLL_ENV=production jekyll serve"
- Deploy the new site to GCP App Engine.
$ gcloud app deploy
Continuous Publishing
Now, we can set up a mechanism that will watch the source repository we created and detect when new code is committed to the master branch. When that happens, ajekyll build will be triggered to recreate the static files, and deploy them to the App Engine as a new version. This section involves using GCP Container Register for storing the Jekyll Docker image and GCP Cloud Build for automation of the work.
Pushing the Docker Image to GCP Container Registry
Before the image is uploaded to the GCP Container Registry, I'll add one more tiny script that will take care of running thejekyll build. I'm doing this because I experienced some file access privilege issues while the build was ongoing and they were too difficult to resolve. I think they had to do with the fact that the Docker container mounts the local /workspace directory of the Cloud Build instance to /srv/jekyll to access the required files. The script will simply copy all files to some local place (/u01) inside the container to work with them, and then will copy back the built _site folder. Here's what needs to be done (this could have been done with a Dockerfile too, but I find this way a little simpler to work with):
- Start the container with an interactive bash session and create the required script file:
$ docker run --rm --volume="$PWD:/srv/jekyll" --privileged -it jekyll/jekyll:latest bash

 # the following set of 8 lines is a single command
 bash-4.4# echo "rm -rf /u01 /srv/jekyll/_site > /dev/null
 mkdir /u01
 chmod 777 /srv/jekyll /u01
 cp -r /srv/jekyll/* /u01/
 cd /u01/
 JEKYLL_ENV=production jekyll build
 cp -r /u01/_site /srv/jekyll/
 rm -rf /u01 > /dev/null" > /root/init_build.sh

 bash-4.4# chmod a+x /root/init_build.sh
- Commit the change to the image from another session while the container is running:
$ docker ps -a
 CONTAINER ID IMAGE COMMAND CREATED STATUS PORTS NAMES
 ef8bd6153c06 gcr.io/tempblog-me-dba/jekyll:latest "/usr/jekyll/bin/ent…" 16 seconds ago Up 15 seconds 4000/tcp, 35729/tcp serene_blackwell

 # use the ID from the previous output
 $ docker container commit ef8bd6153c06 jekyll/jekyll:latest
 sha256:579bd4e195cff00abb38b967009f7727ce1814ae9f8677ce9d903a7683fcbd6e
- "Exit" from the interactive bash session of the running container.
- We're going to upload the image to GCP Container registry via command line, thus, the "Google Container Registry API" needs to be enabled for the GCP Project first. Log on to the GCP console, navigate to "APIs & Services" module, locate and click on the "Container Registry API", and finally enable it if it's not yet enabled.
- Docker images that are going to be pushed to the GCP Container Registry need to follow a specific naming of
[HOSTNAME]/[PROJECT-ID]/[IMAGE], so the first task is to tag the customized Jekyll image:$ docker image tag jekyll/jekyll:latest gcr.io/tempblog-me-dba/jekyll:latest $ docker image ls gcr.io/tempblog-me-dba/jekyll REPOSITORY TAG IMAGE ID CREATED SIZE gcr.io/tempblog-me-dba/jekyll latest 9667c6cbe572 19 hours ago 480MB
- Next, Docker needs to be configured to make it aware of the GCP Container Registry and how to access it. This process is a super simple one-liner in Google Cloud SDK. You should have it already installed if you're working on the same machine where you set up your access to the GCP Source Repository; otherwise, you'll need to install it again:
$ gcloud auth configure-docker The following settings will be added to your Docker config file located at [/home/vagrant/.docker/config.json]: { "credHelpers": { "gcr.io": "gcloud", "us.gcr.io": "gcloud", "eu.gcr.io": "gcloud", "asia.gcr.io": "gcloud", "staging-k8s.gcr.io": "gcloud", "marketplace.gcr.io": "gcloud" } } Do you want to continue (Y/n)? Y Docker configuration file updated. - Finally, we can push the Docker image to the container registry:
$ docker push gcr.io/tempblog-me-dba/jekyll:latest
 The push refers to repository [gcr.io/tempblog-me-dba/jekyll]
 bbe16356ce18: Pushed
 4ec78dd675c8: Pushed
 ce753fc763b8: Layer already exists
 cb136294e186: Layer already exists
 bf8d0e7b5481: Layer already exists
 7bff100f35cb: Layer already exists
 latest: digest: sha256:bc1dd9adf3c08422b474545c82a83f1e79fce23d7feaeb9941afa0b89c093b03 size: 1580
GCP Cloud Build
We'll use GCP Cloud Build to define the build and deploy processes. I must say I was very impressed by how little configuration is required and how simple it was to instruct the Cloud Build to do what I needed. In our case, we need Cloud Build to run the following two commands:- Build the new blog files:
$ docker run --rm --publish 4000:4000 --volume="$PWD:/srv/jekyll" --privileged -it jekyll/jekyll:latest bash -c "JEKYLL_ENV=production jekyll build"
- Deploy the new version to App Engine:
$ gcloud app deploy
cloudbuild.yaml in the root of the repository, and its contents should look like this:
$ cat cloudbuild.yaml
 steps:
  - name: 'gcr.io/cloud-builders/docker'
  args: ['run', '--rm', '--volume=/workspace:/srv/jekyll', '--privileged', 'gcr.io/tempblog-me-dba/jekyll:latest', '/root/init_build.sh']
  - name: "gcr.io/cloud-builders/gcloud"
  args: ["app", "deploy"]
 timeout: "600s"
 $ git add cloudbuild.yaml
 $ git commit -m "Adding the instructions file for Cloud Build"
 $ git push
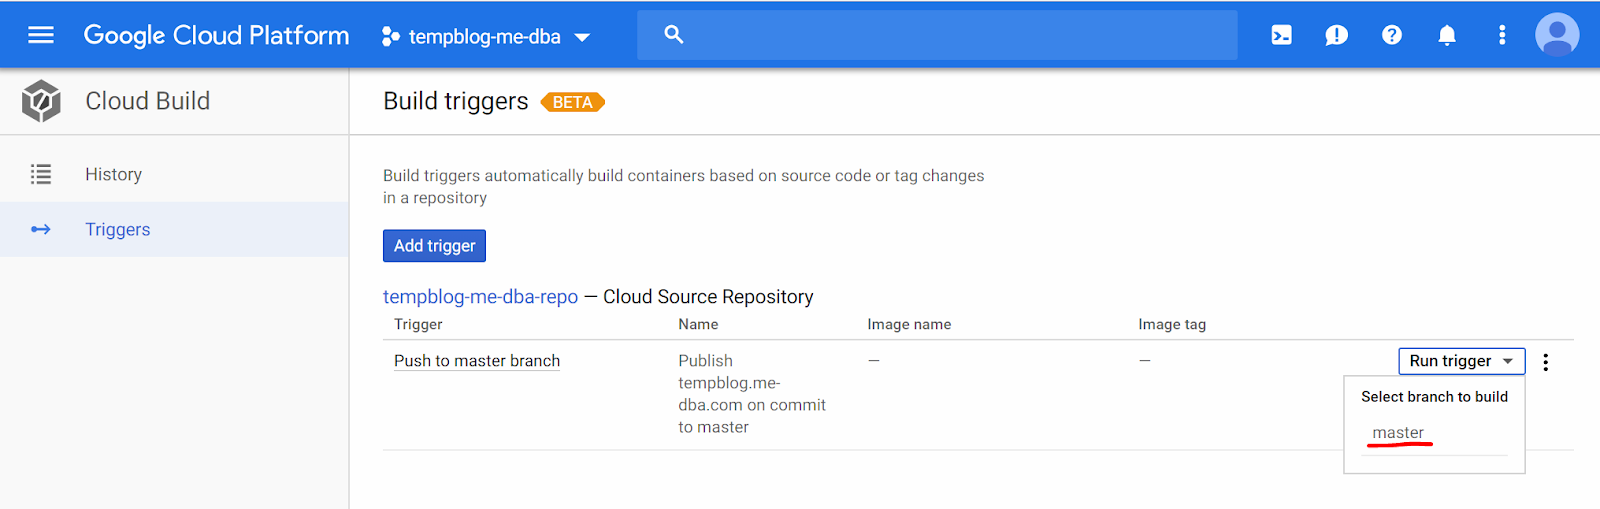
Next, a Build Trigger needs to be created to initiate the build when a commit to master happens. Navigate to "Cloud Build" -> "Triggers" in GCP Cloud Console. Enable the Cloud Build API if you're presented with the message that it's disabled. Then create a trigger:
- Select "Cloud Source Repository" option.
- Select the name of your repository (tempglog-me-dba-com in my case).
- Provide the following options:
- Give your trigger a name.
- Choose "branch" as Trigger Type ("Tag" is another option. In this case the trigger will watch for specific git tags that will initiate the build).
- Choose "Cloud Build configuration file (yaml or json)" as the Build Configuration.
- Make sure that the Build Configuration File Location is already "/ cloudbuild.yaml".
- Click on "Create Trigger".
 Running the trigger manually[/caption] Navigate to "History" on the left side menu, you may see that the build runs for a while, and then fails: [caption id="attachment_106239" align="aligncenter" width="1301"]
  The app deployment step fails at this point[/caption] In my case, the first step succeeded (it should be the same for you too), but the second step failed. The log entries visible on the same page displayed the following entry:
Step #1: API [appengine.googleapis.com] not enabled on project [520897212625].
 Step #1: Would you like to enable and retry (this will take a few minutes)?
 Step #1: (y/N)?
 Step #1: ERROR: (gcloud.app.deploy) User [520897212625@cloudbuild.gserviceaccount.com] does not have permission to access app [tempblog-me-dba] (or it may not exist): App Engine Admin API has not been used in project 520897212625 before or it is disabled. Enable it by visiting https://console.developers.google.com/apis/api/appengine.googleapis.com/overview?project=520897212625 then retry
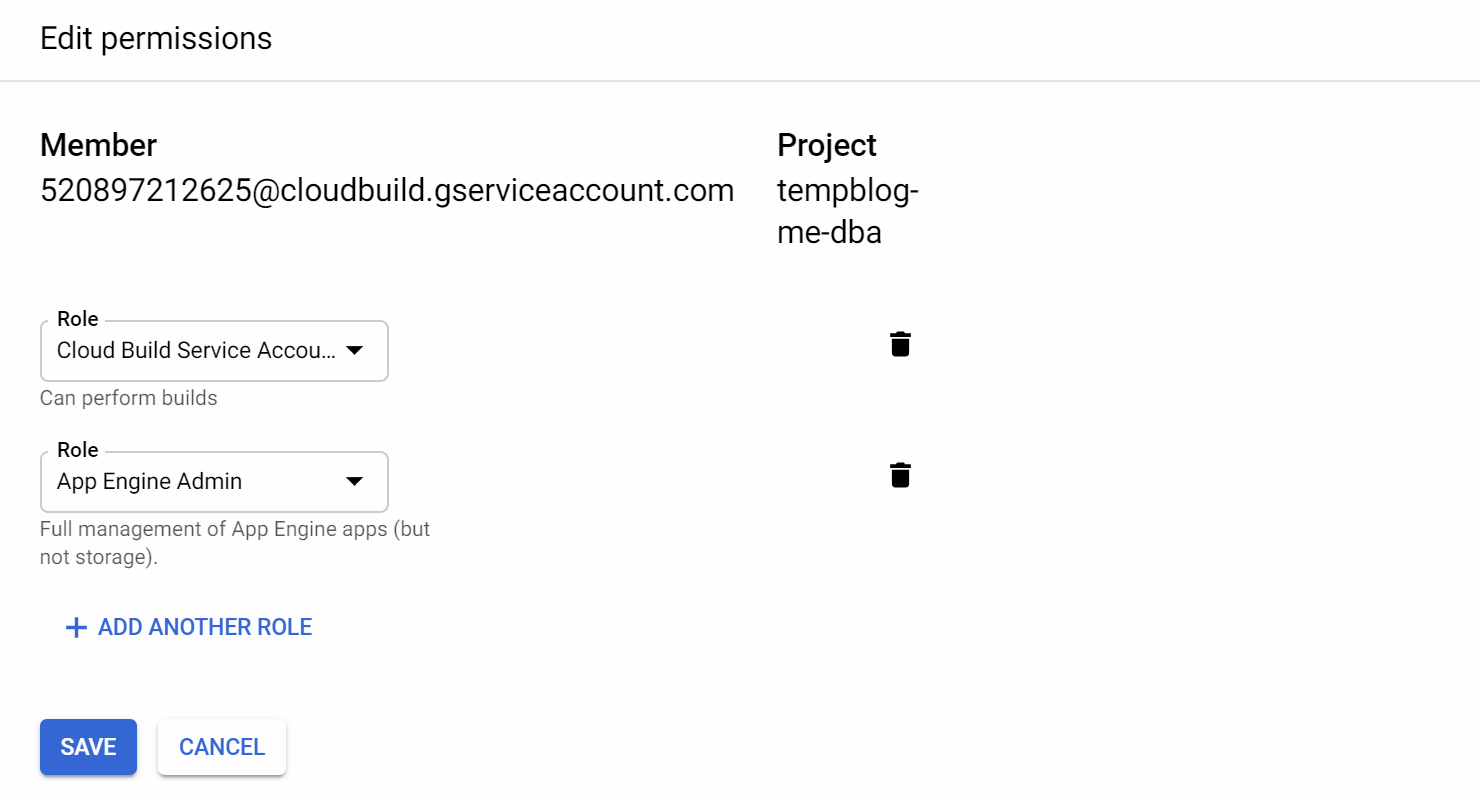
This means the App Engine Admin API needs to be enabled for the Service account that the Cloud Build uses - 520897212625@cloudbuild.gserviceaccount.com in this case. Navigate to "IAM & Admin" -> "IAM", find the service account listed, and add "App Engine Admin" role to that account: [caption id="attachment_106238" align="aligncenter" width="1480"]  Adding the "App Engine Admin" role to the service account[/caption] Additionally, the "App Engine Admin API' needs to be enabled by navigating to "APIs & Services". It may require a minute or two for the new privileges to take effect. Navigate back to the "Cloud Build" -> "History", open the details of the failed run, and click on "Retry", to run the build again. This time the build should succeed.
Test the Workflow
Everything is ready. The only thing left is testing the publishing of new blog posts. I'll create this simple file in the_posts directory and will commit it to the master (this is all that should be needed to publish new content to the blog):
$ cat _posts/2019-01-23-it_works.markdown
 ---
 layout: post
 title: "It Works!"
 date: 2019-01-23 12:19:00 +0300
 comments: true
 categories: serverless blog
 ---
 Congratulations! Your serverless blog works!

 $ git add -A
 $ git commit -m "It Works"
 $ git push
In a short while (it sometimes took around 10 minutes after the new version became available on the App Engine, due to caching, I suppose) the post should be live - published on your new blog. Congratulations!
Closing Remarks
The solution provided in this article was designed to be as inexpensive as possible, and it relies on Always Free resources that GCP provides. Despite that, we should take care to avoid unexpected service charges in case GCP changes the limitations of Always Free or your new blog goes viral suddenly! Take your time to look at the "BIlling" -> "Budgets & alerts", and create an alert that will notify you if the service charges reach a certain level. I've set up the monthly budget of $2 USD, and configured an alert if 50% of the budget is consumed. I can rest assured that I will be notified if the costs go up suddenly without having to log on to the GCP console periodically to check it by myself. We haven't discussed troubleshooting and monitoring. This is a topic that would require an article of its own; however, it's good to know that applications running on the App Engine are logged and monitored by default and by going to the "App Engine" menu in the GCP console, you will be presented with a good amount of usage information. Also, Stackdriver can be used to check the HTTP access logs. I hope you've enjoyed this journey and have managed to build a working blogging platform on GCP by following these instructions. This is just a starting point, and there are definitely more things to learn and discover. There might be a learning curve for working with Jekyll - how to create new blog posts, how to customize the template and the page layouts, how to include images and where to place them in the repository, and so on. But don't be overwhelmed by the volume of new things to learn. There is plenty of helpful material on the internet already to research and follow. I also understand that the level of detail I've provided about working with GCP may be insufficient for people who have never touched it before. Fortunately, there's also plenty of learning material provided by Google, including documentation to read, sample projects to work on, and videos to watch. It's clear the cloud is not going away anytime soon, and the knowledge you gain will become handy in the future, too. Happy blogging!On this page
Share this
Share this
How to build a cost-effective serverless blogging platform on GCP - Part 1
![]()
How to build a cost-effective serverless blogging platform on GCP - Part 1
Mar 13, 2019 12:00:00 AM
11
min read
Using El Carro Operator on AWS
![]()
Using El Carro Operator on AWS
Aug 2, 2021 12:00:00 AM
12
min read
SQL Server AlwaysOn Availability Groups on Google Kubernetes Engine
SQL Server AlwaysOn Availability Groups on Google Kubernetes Engine
Nov 9, 2021 12:00:00 AM
17
min read