Introduction
While working on a few tasks in the past few weeks, I faced a problem that involved setting a "filter" for an application that was exposed to the internet. The application receives requests with some data, processes it and then it produces an output, the problem was that the application did not have much control on how many requests it could receive in a specific time frame or from which source it could receive this requests. While looking at options on how to solve this problem, I came across Kong API. Kong is an Open Source API gateway that provides you with the functionality of putting an API gateway in front of your application. Kong has various endpoints (or plugins) like authentication, security, rate limiting, etc. 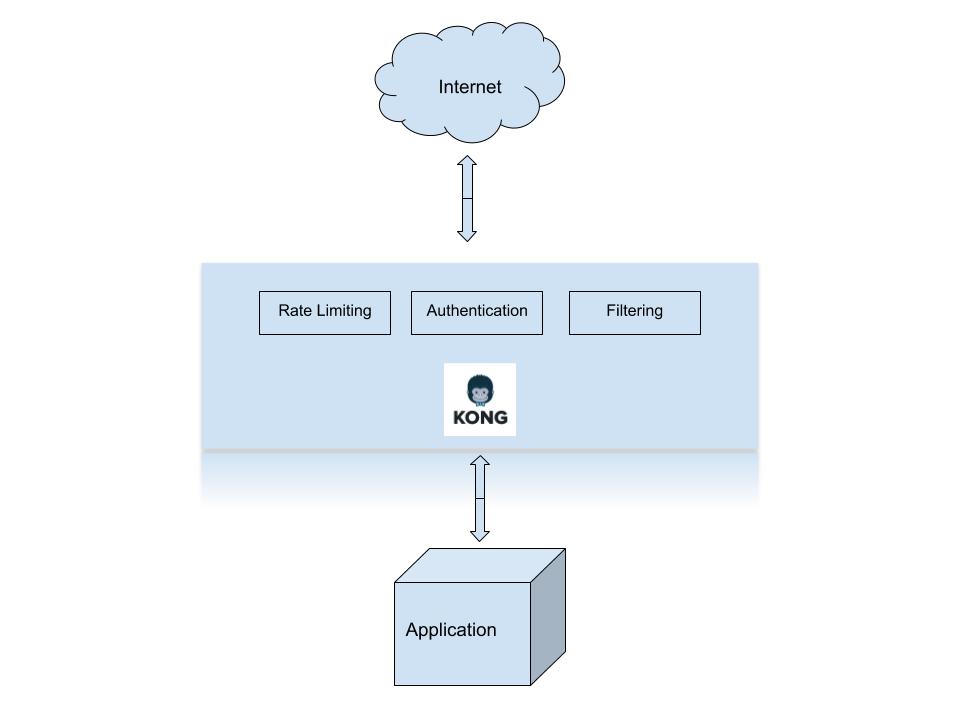
I will explain how to set up Kong using a Kong Docker container, after that I'll go over the process on how to install the key authentication plugin and finally, go over the rate limiting plugin. An API gateway is a service that acts as a filter in front of a RESTful API. As I mentioned earlier, I'll be going over the steps to deploy this API in a docker container. The steps outlined here were performed in an AWS Linux EC2 instance.
Setup
1. Setup a Cassandra container:
$ docker run -d --name kong-database \
 -p 9042:9042 \
 cassandra:3
2. Download and start Kong:
# docker run -d --name kong \ --link kong-database:kong-database \ -e "KONG_DATABASE=cassandra" \ -p 8000:8000 \ -p 8443:8443 \ -p 8001:8001 \ -p 7946:7946 \ -p 7946:7946/udp kong:latest The port usage and description is the following: * 8000 - non-SSL enabled proxy port for API requests * 8443 - SSL enabled proxy port for API requests * 8001 - RESTful admin API for configuration. This is the port that will be used to interact and configure Kong * 7946 - Port used for Kong clustering3. After the database and Kong container have been setup, you can test your install by executing:
$ curl https://127.0.0.1:8001
  {
   "plugins": {

 "enabled_in_cluster": [],
   "available_on_server": {
   "response-transformer": true,
   "correlation-id": true,
   "statsd": true,
   "jwt": true,
   "cors": true,
   "basic-auth": true,
   "key-auth": true,
   "ldap-auth": true,
   "http-log": true,
   "oauth2": true,
   "hmac-auth": true,
   "acl": true,
   "datadog": true,
   "tcp-log": true,
   "ip-restriction": true,
   "request-transformer": true,
   "file-log": true,
   "bot-detection": true,
   "loggly": true,
   "request-size-limiting": true,
   "syslog": true,
   "udp-log": true,
   "response-ratelimiting": true,
   "aws-lambda": true,
   "runscope": true,
   "rate-limiting": true,
   "request-termination": true
   }
   },
   "tagline": "Welcome to kong",
   "configuration": {
   "plugins": {
   "response-transformer": true,
   "correlation-id": true,
   "statsd": true,
   "jwt": true,
   "cors": true,
   "basic-auth": true,
   "key-auth": true,
   "ldap-auth": true,
   "http-log": true,
   "request-termination": true,
   "hmac-auth": true,
   "rate-limiting": true,
   "datadog": true,
   "tcp-log": true,
   "runscope": true,
   "aws-lambda": true,
   "response-ratelimiting": true,
   "acl": true,
   "loggly": true,
   "syslog": true,
   "request-size-limiting": true,
   "udp-log": true,
   "file-log": true,
   "request-transformer": true,
   "bot-detection": true,
   "ip-restriction": true,
   "oauth2": true
   },
   "admin_listen": [
   "0.0.0.0:8001"
   ],
4. Add Mockbin API to your Kong container
Mockbin allows you to generate custom endpoints to test, mock and track HTTP requests and responses from libraries, sockets and APIs.$ curl -i -X POST --url https://localhost:8001/apis/ --data 'name=pythian-blog' --data 'hosts=localhost' --data 'upstream_url=https://httpbin.org' HTTP/1.1 201 Created Date: Thu, 26 Apr 2018 19:26:43 GMT Content-Type: application/json; charset=utf-8 Transfer-Encoding: chunked Connection: keep-alive Access-Control-Allow-Origin: * Server: kong/0.13.1 {"created_at":1524770803789,"strip_uri":true,"id":"740f1ec1-719f-469d-bf5d-0df1698f8552","hosts":["localhost"],"name":"pythian-blog","http_if_terminated":false,"https_only":false,"retries":5,"upstream_url":"http:\/\/httpbin.org","upstream_send_timeout":60000,"upstream_read_timeout":60000,"upstream_connect_timeout":60000,"preserve_host":false}Now perform a simple query to the Mockbin API
$ curl -i -X GET --url https://localhost:8000/ --header 'Host: localhost'
  HTTP/1.1 200 OK
  Content-Type: text/html; charset=utf-8
  Content-Length: 13129
  Connection: keep-alive
  Server: gunicorn/19.7.1
  Date: Thu, 26 Apr 2018 19:27:19 GMT
  Access-Control-Allow-Origin: *
  Access-Control-Allow-Credentials: true
  X-Powered-By: Flask
  X-Processed-Time: 0
  Via: kong/0.13.1
  X-Kong-Upstream-Latency: 13
  X-Kong-Proxy-Latency: 128
Take note that to install the plugin, port 8001 was used. To interact with the plugin, port 8000 is used. You can query the administration API to confirm that the Mockbin API was added successfully
$ curl --url https://localhost:8001/apis
  {"total":1,"data":[{"created_at":1524770803789,"strip_uri":true,"id":"740f1ec1-719f-469d-bf5d-0df1698f8552","hosts":["localhost"],"name":"pythian-blog","http_if_terminated":false,"https_only":false,"retries":5,"upstream_url":"http:\/\/httpbin.org","upstream_send_timeout":60000,"upstream_read_timeout":60000,"upstream_connect_timeout":60000,"preserve_host":false}]}
5. Now, let's add some authentication to our Kong installation
$ curl -i -X POST --url https://localhost:8001/apis/pythian-blog/plugins --data 'name=key-auth'
  HTTP/1.1 201 Created
  Date: Thu, 26 Apr 2018 19:30:07 GMT
  Content-Type: application/json; charset=utf-8
  Transfer-Encoding: chunked
  Connection: keep-alive
  Access-Control-Allow-Origin: *
  Server: kong/0.13.1

 {"created_at":1524771007906,"config":{"key_in_body":false,"run_on_preflight":true,"anonymous":"","hide_credentials":false,"key_names":["apikey"]},"id":"2fa21a4d-4e1d-4d38-9538-d4270eeb54cb","enabled":true,"api_id":"740f1ec1-719f-469d-bf5d-0df1698f8552","name":"key-auth"}
And now verify that the key-auth plugin was successfully installed
$ curl -i -X GET --url https://localhost:8000/ip --header 'Host: localhost'
  curl: (6) Could not resolve host: --url
  HTTP/1.1 401 Unauthorized
  Date: Thu, 26 Apr 2018 19:30:32 GMT
  Content-Type: application/json; charset=utf-8
  Transfer-Encoding: chunked
  Connection: keep-alive
  WWW-Authenticate: Key realm="kong"
  Server: kong/0.13.1

 {"message":"No API key found in request"}
6. The next step is to add a consumer to the Kong instance.
A consumer is associated to individuals using the API and it can be used for tracking and access management:$ curl -i -X POST --url https://localhost:8001/consumers/ --data "username=pythian" HTTP/1.1 201 Created Date: Thu, 26 Apr 2018 19:30:57 GMT Content-Type: application/json; charset=utf-8 Transfer-Encoding: chunked Connection: keep-alive Access-Control-Allow-Origin: * Server: kong/0.13.1 {"created_at":1524771057707,"username":"pythian","id":"cea6646e-deb8-4048-8d7c-9e3ba8a171b6"}Now let's add credentials for the 'pythian' consumer
$ curl -i -X POST --url https://localhost:8001/consumers/pythian/key-auth/ --data 'key=abc123'
  HTTP/1.1 201 Created
  Date: Thu, 26 Apr 2018 19:31:42 GMT
  Content-Type: application/json; charset=utf-8
  Transfer-Encoding: chunked
  Connection: keep-alive
  Access-Control-Allow-Origin: *
  Server: kong/0.13.1

 {"id":"10995997-a68c-40de-8818-78bb457f7649","created_at":1524771102071,"key":"abc123","consumer_id":"cea6646e-deb8-4048-8d7c-9e3ba8a171b6"}
And to finish it up, you can confirm that the credentials are valid:
$ curl -i -X GET --url https://localhost:8000/ip --header "Host: localhost" --header "apikey: abc123"
  HTTP/1.1 200 OK
  Content-Type: application/json
  Content-Length: 43
  Connection: keep-alive
  Server: gunicorn/19.7.1
  Date: Thu, 26 Apr 2018 19:31:57 GMT
  Access-Control-Allow-Origin: *
  Access-Control-Allow-Credentials: true
  X-Powered-By: Flask
  X-Processed-Time: 0
  Via: kong/0.13.1
  X-Kong-Upstream-Latency: 6
  X-Kong-Proxy-Latency: 75

 {
   "origin": "172.17.0.1, 3x.1x.x.x"
  }
You can enter an erroneous password just to confirm that the authentication works:
$ curl -i -X GET --url https://localhost:8000/ip --header "Host: localhost" --header "apikey: xyz456"

 HTTP/1.1 403 Forbidden
  Date: Thu, 26 Apr 2018 19:32:27 GMT
  Content-Type: application/json; charset=utf-8
  Transfer-Encoding: chunked
  Connection: keep-alive
  Server: kong/0.13.1

 {"message":"Invalid authentication credentials"}
7. The Kong API shows its great power when plugins are enabled and configured. Now we are going to install and configure the IP Restriction plugin.
This plugin restricts access to a service or route in our application by either whitelisting or blacklisting IP addresses. In this case we are going to whitelist a local IP using the 'config.whitelist' option. In this plugin, 'whitelist' and 'blacklist' are mutually exclusive in their usage, this means that you cannot configure the plugin to both 'whitelist' and 'blacklist' at the same time.$ curl -X POST https://localhost:8001/apis/pythian-blog/plugins --data "name=ip-restriction" --data "config.whitelist=192.168.100.12" root@ip-172-31-81-177:~# curl -X POST https://localhost:8001/apis/pythian-blog/plugins --data "name=ip-restriction" --data "config.whitelist=192.168.100.12" {"created_at":1524771190128,"config":{"whitelist":["192.168.100.12"]},"id":"69a34538-6c26-4969-b266-1e49f5a47d51","enabled":true,"api_id":"740f1ec1-719f-469d-bf5d-0df1698f8552","name":"ip-restriction"}
Summary
These are the first steps to get a working Kong setup. In the next blog post I will go over further plugins configuration, tuning and also a very interesting web gui interface to manage Kong. ¡Vámonos!
Cassandra Database Consulting Services
Ready to optimize your Cassandra Database for the future?
Share this
Share this
