This blog post covers sharding a SQL Server database using Azure tools and PowerShell script snippets.
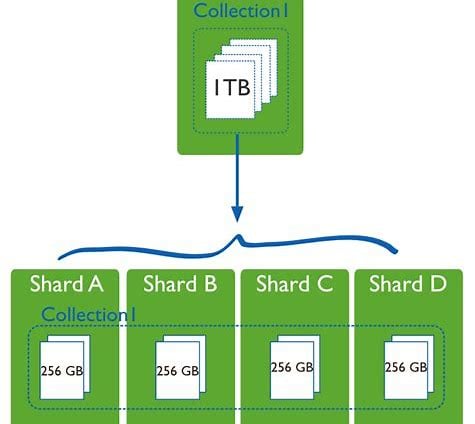
Sharding a database[/caption] Sharding, at its core, is breaking up a single, large database into multiple smaller, self-contained ones. This is usually done by companies that need to logically break the data up, for example a SaaS provider segregating client data. The performance benefits of this are clear, as the sharded database is generally much smaller than the original, and so queries, maintenance, and all other tasks are much faster. However, the company now needs to deal with many more (possibly hundreds of) databases than it previously had. At a high level, sharding works like this:
- The company chooses a logical method to separate the data called the Sharding Key
- A Shard Map is created in a new database. This map ties the sharding key to the database it's data is associated with
- New databases are created and the data is moved to it's new home.
- The client connections are changed. They will now query the shard map to find the shard's data, and then connect to the new database.
Identify sharding key
The Sharding key is the value that will be used to break up the data into separate shards. The key is used by the Sharding Map to identify where the required user data is being stored, and to route connections there appropriately. It is critical that the Sharding key be able to be mapped to every value that will be migrated. Any values without a Sharding key will be skipped. For example, a retail business with multiple stores across the US may choose to use a StoreID value as a Sharding Key. StoreID may be a uniqueidentifier or an INT IDENTITY, and logically this means that the data will be sharded by store.Identify sharding method
Shards can be stored in their respective databases via one of two methods: Range sharding Range Sharding stores several shards in one database based on the Sharding key being within a defined range of values. For example, in a system with an Integer Sharding key, the values 1-10 could be stored within the same database, and data with the values 11-20 stored in a second database. This allows database resources to be shared across several Sharding keys, and reduces the overall number of databases that must be maintained. List/point sharding Point Sharding stores the data for every shard in a separate database for each key. This allows a guaranteed level of service for each shard as database resources are not shared; however, it can also mean that many databases are created and must be maintained.Identify shard tables and reference tables
There are two types of tables in a Sharded database. The Shard tables are the tables that have been broken up based on the Sharding key. For these tables, the data will be different depending on which database the client connects to. The Reference tables are exactly the same regardless of the database. In the retail store example, a Product table may be a reference table because all stores will need a complete list of all products. On the other hand, the ProductSold table would have data that only relates to an individual store, so it is a Shard table.Migrate sharing key to shard tables
As mentioned earlier, all tables that will be sharded must have the Sharding key as a column. This step is simply creating the [StoreID] column in every sharded table and the updating the value to the associated store. For this piece, manual scripts will need to be created and run.Create shard map database
The Shard Map tracks which shards are in which database. It also handles returning the correct connection string to the application. It is important this be placed in a separate database to ensure performance can be maintained for all clients regardless of any one client having issues. The Shard Map database is a regular Azure SQL DB and should be created via the Azure portal front-end. This database will be hit by all clients to discover which shard database they need to connect to, so make sure it’s powerful enough to handle the expected load.Register database schema in shard map
The database schema must be registered in the Shard Map. This is used by the Split-Merge process to identify the Sharded tables and the Reference tables. The below PowerShell commands give an example of how to do this. Note that it takes advantage of a module written by the Azure Shard team.$ShardMapManager = new-ShardMapManager -UserName 'example' -Password '*****!' -SqlServerName 'example.database.windows.net' -SqlDatabaseName 'ShardAdmin'
# $ShardMapManager is the shard map manager object
new-ListShardMap -KeyType $([guid]) -ShardMapManager $ShardMapManager -ListShardMapName 'ListShardMap'
$SchemaInfo = New-Object Microsoft.Azure.SqlDatabase.ElasticScale.ShardManagement.Schema.SchemaInfo
# Reference Table
$ReferenceTableName = "Product"
$SchemaInfo.Add($(New-Object Microsoft.Azure.SqlDatabase.ElasticScale.ShardManagement.Schema.ReferenceTableInfo($ReferenceTableName)))
# Sharded Table
$ShardedTableSchemaName = "dbo"
$ShardedTableName = "ProductSold"
$ShardedTableKeyColumnName = "StoreID"
$SchemaInfo.Add($(New-Object Microsoft.Azure.SqlDatabase.ElasticScale.ShardManagement.Schema.ShardedTableInfo($ShardedTableSchemaName, $ShardedTableName, $ShardedTableKeyColumnName)))
$SchemaInfoCollection = $ShardMapManager.GetSchemaInfoCollection()
# Add the SchemaInfo for this Shard Map to the Schema Info Collection
$SchemaInfoCollection.Add('StoreListShardMap', $SchemaInfo)
Create cloud services to run split-merge process
The split-merge process is run via a cloud service in Azure. After registering the shard with the Shard Map, a notification is sent to the Split-Merge process, and a new request is queued up. Each request is worked through serially, and because of this we recommend having multiple cloud services to run different split-merge requests. To create a cloud service for the Split-Merge process, follow this tutorial.Create new databases and assign shards
For every shard in the existing database, these steps will have to be performed: Create a new Azure SQL database and database objects like tables, views, etc… Depending on the number of shards you’re dealing with, this is almost certainly going to be easier with a PowerShell script of some kind. It is important that you do not create, or at least enable, constraints at this point. The split-merge utility does not reference them when inserting data, and the process will fail. Associate the new database with the GUID shard value in the Shard Map The following code snippet will do this:
 $ShardMapManager = Get-ShardMapManager -UserName 'example' -Password '****!' -SqlServerName 'example.database.windows.net' -SqlDatabaseName 'ShardAdmin'

 # Get Shard Map.
 $ShardMap = Get-ListShardMap -KeyType $([guid]) -ShardMapManager $ShardMapManager -ListShardMapName $ShardMapName

 # Add new DB to shard map
 Add-Shard -ShardMap $ShardMap -SqlServerName $FullSQLServerName -SqlDatabaseName $ShardName | wait-process

 # Add shard to shard map -- Mapped to $SourceDB because that's where it is currently
 Add-ListMapping -keyType $([guid]) -ListShardMap $ShardMap -ListPoint $Guid -SqlServerName $FullSQLServerName -SQLDatabaseName $SourceDB | wait-process
Assign the new shard to a Cloud Service for the Split-Merge process Again, this code snippet is an example of doing this. In this case, a modulus value is used to assign each shard to a different merge-split service.
$mod = $NumOfShards % $NumOfMergeSplitApps

 if ($mod -eq 1) {
  $SplitMergeURL = "https://example-mergesplit.cloudapp.net"
  $LogOutput = (Get-Date).ToShortDateString() + " " + (Get-Date).ToShortTimeString() + " : " + $ShardName + " sent to " + $SplitMergeURL
  Add-Content -Path $LogFile -value $LogOutput
 }
 elseif ($mod -eq 2) {
  $SplitMergeURL = "https://example-mergesplit2.cloudapp.net"
  $LogOutput = (Get-Date).ToShortDateString() + " " + (Get-Date).ToShortTimeString() + " : " + $ShardName + " sent to " + $SplitMergeURL
  Add-Content -Path $LogFile -value $LogOutput
 }
 else{
  $SplitMergeURL = "https://example-mergesplit10.cloudapp.net"
  $LogOutput = (Get-Date).ToShortDateString() + " " + (Get-Date).ToShortTimeString() + " : " + $ShardName + " sent to " + $SplitMergeURL
  Add-Content -Path $LogFile -value $LogOutput
 }

 # Queue up the split database operation
 $OperationID = Submit-ShardletMoveRequest `
  -SplitMergeServiceEndpoint $SplitMergeURL `
  -ShardMapManagerServerName $ShardMapServerName `
  -ShardMapManagerDatabaseName $ShardMapDB `
  -ShardMapName $ShardMapName `
  -ShardKeyType 'guid' `
  -ShardletValue $Guid `
  -TargetServerName $FullSQLServerName `
  -TargetDatabaseName $ShardName `
  -UserName $AdminLogin `
  -Password $AdminPasswd `
  -CertificateThumbprint '####' #Unique to your project. See MS Tutorial

 $LogOutput = (Get-Date).ToShortDateString() + " " + (Get-Date).ToShortTimeString() + " : " + "Operation ID: " + $OperationID
 Add-Content -Path $LogFile -value $LogOutput
Monitor split-merge processes
The Split-Merge process logs its current status to a database, and each process has its own DB. The databases for this example will be located on the shard map database server and are named example-mergesplitN where N is a number. The below queries will return information about the currently executing split process, any successful or failed process, and how many processes are left in the queue.SELECT
[TimeStamp] LastUpdateTime,
[Status],
Progress [EstPercentDone],
OperationID,
CancelRequest [Cancelled],
Details
FROM
RequestStatus
WHERE
OperationID IN (select operationid from requeststatus where [status] not in ('Queued', 'Canceled', 'Failed', 'Succeeded'))
ORDER BY
LastUpdateTime desc;
SELECT
*
FROM
RequestStatus
WHERE
status IN ('Failed', 'Succeeded')
ORDER BY
[timestamp] desc;
SELECT
*
FROM
RequestStatus
WHERE
status = 'queued'
ORDER BY
[timestamp] desc;
Change application code to use shard map
Microsoft has written a set of libraries called the ShardMapManagerFactory to enable an easy transition to a sharded database. These libraries allow a client to pass in a Sharding Key and will return a connection string to the database associated with that Shard.Enable foreign key constraints
The Split-Merge process does not perform INSERT or DELETE operations in any particular order, and does not respect Foreign Key constraints. Because of this, all constraints must be disabled prior to running the Split-Merge process.
SQL Server Database Consulting Services
Ready to future-proof your SQL Server investment?