MySQL Workbench is a popular tool for many developers working with a MySQL backend database. In a simple environment where you can connect directly to the database it works very intuitively, but in more complex environments it might be a little less straightforward. In this post, we'll be using MySQL Workbench 8.0.18 to connect to a MySQL cluster which is configured with a ProxySQL server in front of it and managed by Orchestrator for high availability. This is a common setup with many of our customers and it's something that I've frequently spoken about in conferences around the world. If you want to know more about this kind of setup, check out my slidedecks published on speakerdeck.
Introduction to the Cluster Configuration
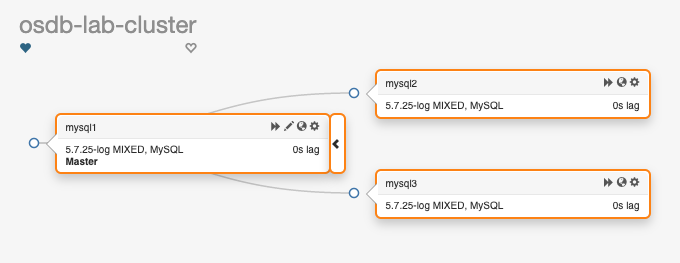
To start off, I'll describe the demo lab environment. We have three MySQL servers, all running 5.7.25 in a pretty standard replication topology. This is Orchestrator's view of the current situation: One writable master, two read-only replicas, and automatic failovers enabled. Ready to go! In front of these MySQL instances are two ProxySQL nodes (proxysql1 and proxysql2). All of these instances are running in Docker containers and they're exposing different ports depending on their role. Here are details for the ProxySQL containers:$ docker ps | grep proxysql aa11e92b4a97 centos:7 "/bin/bash" About an hour ago Up About an hour 0.0.0.0:33062->6033/tcp proxysql2 b775502ac18e centos:7 "/bin/bash" About an hour ago Up About an hour 0.0.0.0:33061->6033/tcp proxysql1As you can see in the Docker output, ProxySQL is listening on it's default client port
6033 and we exposed that port on ports 33061 for proxysql1 and 33062 for proxysql2. Currently this lab is still running ProxySQL 1.4.15, but I've tested this on ProxySQL 2.0 instances before. The version of ProxySQL makes no difference for this post so I decided not to touch my running system.
Application Read-Write Splitting
In this demo environment, we'll be splitting reads and writes from the application side by using different usernames and passwords to connect to MySQL (through ProxySQL). Here are configuration details for the ProxySQL instances:$ docker exec -ti proxysql1 mysql Welcome to the MariaDB monitor. Commands end with ; or \g. Your MySQL connection id is 63 Server version: 5.5.30 (ProxySQL Admin Module) Copyright (c) 2000, 2018, Oracle, MariaDB Corporation Ab and others. Type 'help;' or '\h' for help. Type '\c' to clear the current input statement. Admin> SELECT username, default_hostgroup, frontend, backend FROM runtime_mysql_users ORDER BY username; +----------+-------------------+----------+---------+ | username | default_hostgroup | frontend | backend | +----------+-------------------+----------+---------+ | app_ro | 101 | 0 | 1 | | app_ro | 101 | 1 | 0 | | app_rw | 100 | 0 | 1 | | app_rw | 100 | 1 | 0 | +----------+-------------------+----------+---------+ 4 rows in set (0.00 sec) Admin> SELECT hostname, hostgroup_id, comment FROM runtime_mysql_servers; +-------------+--------------+---------+ | hostname | hostgroup_id | comment | +-------------+--------------+---------+ | 192.168.0.2 | 100 | mysql1 | | 192.168.0.4 | 101 | mysql3 | | 192.168.0.3 | 101 | mysql2 | +-------------+--------------+---------+ 3 rows in set (0.00 sec) Admin>All of this runs in the local lab environment on a machine that is reachable on the local IP address
192.168.56.2.
Let's Start Workbench
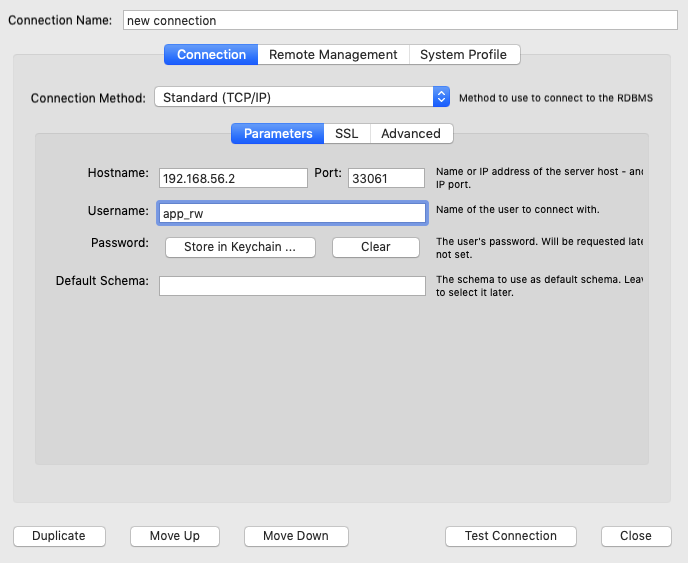
Now it's time to kick off the MySQL Workbench client and create a connection for the app_rw user to the port off the proxysql1 instance. After we add the details, we can use the "Test connection" button at the bottom of the page.
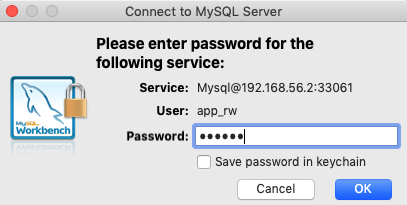
Enter the password when prompted.
The connection failed, as you might have expected. Why else would I write a blog post if everything works out-of-the-box?
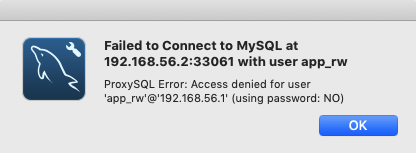
What immediately caught my attention was the fact that I got a "ProxySQL Error," which is good. The client is at least attempting to connect through ProxySQL. The second thing I noticed is that it's determined that I did not supply a password. This is a bit odd, as I've deliberately posted a screenshot where I did enter a password. As we're using MySQL Workbench version 8.0, I suspected that it might be using the new caching_sha2_password password encryption method. This is something that ProxySQL does not (yet) support ( feature request!). The Workbench release notes for 8.0 confirmed this:
"MySQL Workbench now supports the caching_sha2_password authentication plugin introduced in MySQL 8.0 (see Caching SHA-2 Pluggable Authentication)."
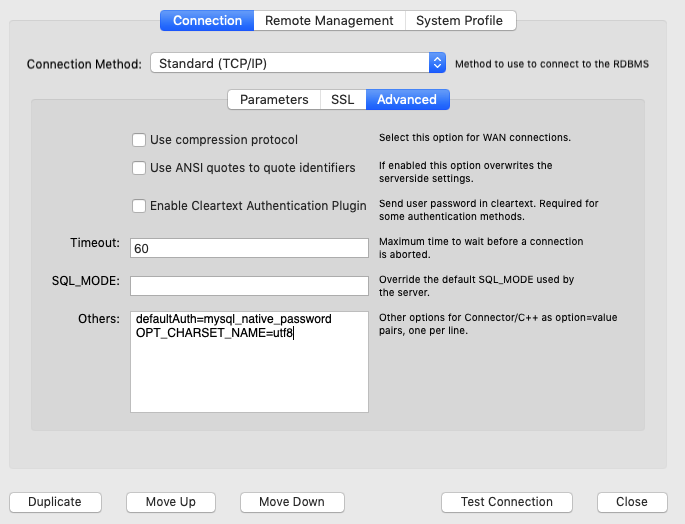
While investigating this, I remembered that there was some recent chatter on the ProxySQL Google group about this very same topic. One person in the group suggested adding SHA2 password caching as an option in the "Advanced" section of the connection. The suggested workaround was to add defaultAuth=mysql_native_password and OPT_CHARSET_NAME=utf8. We only want to make minimal configuration changes, so let's start with the trying the first option.

After clicking "Test Connection" and entering the password again, Workbench seems to be "hanging." After a few moments, it returned with the following message:
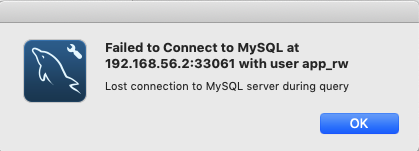
The proxysql log file showed the following (about 5000 times):
[root@proxysql1 /]# tail -5 /var/lib/proxysql/proxysql.log
 Can't initialize character set (null) (path: compiled_in)
 2020-04-06 16:39:03 MySQL_Session.cpp:1869:handler_again___status_CHANGING_CHARSET(): [ERROR] Detected a broken connection during SET NAMES on 192.168.0.2 , 3306 : 2019, Can't initialize character set (null) (path: compiled_in)
 Can't initialize character set (null) (path: compiled_in)
 2020-04-06 16:39:03 MySQL_Session.cpp:1869:handler_again___status_CHANGING_CHARSET(): [ERROR] Detected a broken connection during SET NAMES on 192.168.0.2 , 3306 : 2019, Can't initialize character set (null) (path: compiled_in)
 2020-04-06 16:39:03 MySQL_Session.cpp:95:kill_query_thread(): [WARNING] KILL CONNECTION 126210 on 192.168.0.2:3306
So, it seems that the charset name option is required after all.
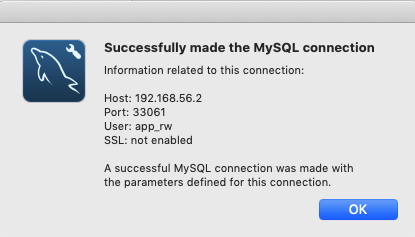
And voila, the connection test is successful!
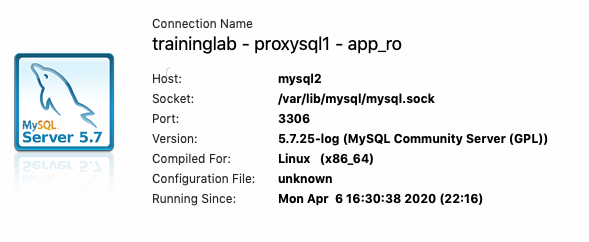
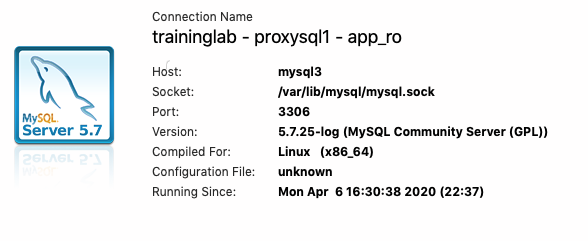
When we open the connection and select the Server Status page, it indicates that we're connected to mysql1 with the app_rw user, which is the expected result. 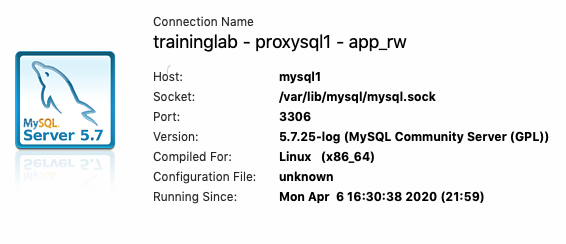
The app_ro user takes us to one of the replica's.
Conclusion
With a minimal configuration tweak, MySQL Workbench can connect to a MySQL instance behind ProxySQL. However, because we are using ProxySQL version 1.4.x, it does not allow us to use frontend SSL connectivity. Version 1.4 simply does not have that feature. In the next few days or weeks, we'll upgrade the lab to use ProxySQL 2.x and attempt to use the SSL features of MySQL Workbench in combination with ProxySQL. For now, make sure that you are on a local network when trying to connect using workbench, or that you have some other kind of encrypted tunnel before sending MySQL credentials and data over the network. Stay safe, both in real life and in the digital world.
MySQL Database Consulting
Looking to optimize your MySQL use?